Our site contains ads and uses Amazon affiliate links. We may earn a small commission at no extra cost to you. We know ads can be distracting, and we’re sorry for any inconvenience they cause. It helps us keep the site running. Thanks for your understanding and supporting us!
📊 Recipe at a Glance
- Time: 30 minutes (plus 2 hours chilling)
- Yield: 24 truffles
- Difficulty: Easy
- Dietary: Vegetarian | Can be made Gluten-Free
Imagine biting into a perfectly spiced gingerbread cookie that’s been transformed into a luxuriously creamy, chocolate-coated truffle.
That’s exactly what you’ll get with these gingerbread truffles.
All the nostalgic warmth of gingerbread in an elegant, no-bake treat that’s ready in just 30 minutes of active time.
They’re the perfect make-ahead dessert for Holiday cookie exchanges, homemade gift giving, or simply enjoying with a cup of hot cocoa on a cold winter evening.
What sets this recipe apart is its foolproof two-ingredient base that creates the perfect truffle texture every time.
The addition of molasses and spices ensures that authentic gingerbread flavor shines through.
Most Shared: Longhorn Brussels Sprouts Recipe: Sweet, Spicy & Crispy Delight
Why This Gingerbread Truffles Recipe Works
• No-bake simplicity: No oven required means less stress and more time for other holiday preparations.
• Authentic gingerbread flavor: The combination of gingersnap cookies, molasses, and fresh spices delivers that classic warm, spicy taste you crave.
• Perfect texture every time: The cream cheese and cookie ratio creates truffles that are firm enough to hold their shape but melt-in-your-mouth creamy.
Read More: 17 Five-Ingredient Lazy Dinner Ideas to Save the Day
• Make-ahead friendly: These actually taste better after a day or two, making them ideal for advance holiday prep.
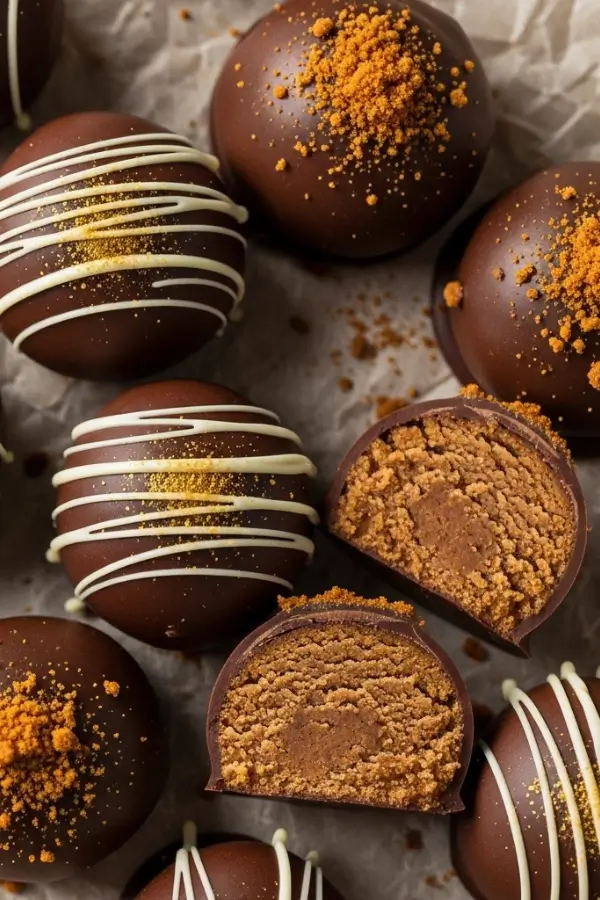
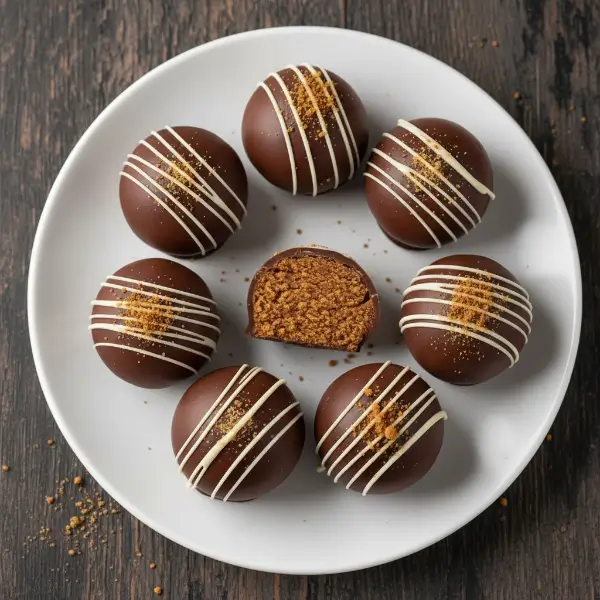
• Customizable coating options: Choose from dark chocolate, white chocolate, or a festive combination of both.
• Gift-worthy presentation: They look professionally made with minimal effort, perfect for holiday gifting.
Read More: 19 Easy Pumpkin Cake Recipes for Thanksgiving Desserts
Ingredients You’ll Need
For the Truffle Base:
- 10 ounces (285g) gingersnap cookies (about 2 cups crushed): Use store-bought or homemade; ensure they’re crispy, not soft
- 8 ounces (225g) cream cheese, softened to room temperature: Full-fat works best for richness
- 2 tablespoons molasses (not blackstrap): Adds depth and authentic gingerbread flavor
- 1 teaspoon ground ginger: Fresh ground is most potent
- 1 teaspoon ground cinnamon: Use quality Ceylon cinnamon if possible
- ½ teaspoon ground nutmeg: Freshly grated is ideal
- ¼ teaspoon ground cloves: A little goes a long way
- ¼ teaspoon fine sea salt: Enhances all the other flavors
For the Chocolate Coating:
- 12 ounces (340g) chocolate: Use dark, milk, or white chocolate (or a combination)
- 1 tablespoon coconut oil or vegetable shortening: Helps create a smooth, glossy coating
Optional Toppings:
- Crushed gingersnaps for garnish
- White chocolate drizzle
- Sparkling sugar or edible gold dust
- Finely chopped crystallized ginger
How to Make Gingerbread Truffles
Step-1: Prepare the Cookie Crumbs
Place the gingersnap cookies in a food processor and pulse until you have fine, uniform crumbs (they should resemble coarse sand).
Alternatively, place cookies in a sealed plastic bag and crush with a rolling pin until finely ground.
You want approximately 2 cups of crumbs with no large chunks remaining.
Step-2: Mix the Truffle Base
In a large mixing bowl, beat the softened cream cheese with an electric mixer for 1-2 minutes until smooth and fluffy.
Add the molasses, ginger, cinnamon, nutmeg, cloves, and salt, beating until everything is evenly combined and aromatic.
Step-3: Combine Cookies and Cream Cheese
Add the gingersnap crumbs to the cream cheese mixture and stir with a sturdy spoon or spatula until fully incorporated.
The mixture should be thick, moldable, and hold together when pressed.
If it seems too dry, add an extra tablespoon of cream cheese; if too wet, add more cookie crumbs.
Step-4: Chill the Mixture
Cover the bowl with plastic wrap and refrigerate for at least 1 hour, or up to 24 hours.
This chilling step is crucial, it makes the mixture easier to roll and helps the truffles hold their shape beautifully.
Step-5: Roll the Truffles
Line a baking sheet with parchment paper. Using a small cookie scoop (about 1 tablespoon capacity) or a spoon, portion out the chilled mixture.
Roll each portion between your palms to form smooth, round balls. Place on the prepared baking sheet.
You should get approximately 24 truffles.
Step-6: Freeze for Easy Coating
Place the rolled truffles in the freezer for 30 minutes.
This firming step prevents them from falling apart when you dip them in warm chocolate and creates a perfect coating.
Step-7: Melt the Chocolate
While the truffles freeze, prepare your chocolate coating. Chop the chocolate into small, uniform pieces and place in a microwave-safe bowl with the coconut oil.
Microwave in 30-second intervals, stirring between each, until completely smooth and glossy (usually 1-2 minutes total).
Alternatively, melt using a double boiler over simmering water.
Step-8: Coat the Truffles
Remove truffles from the freezer. Working with one at a time, drop a truffle into the melted chocolate and use a fork to roll it around until completely coated.
Lift it out with the fork, allowing excess chocolate to drip back into the bowl, then gently slide it onto a clean parchment-lined baking sheet.
Immediately add any toppings while the chocolate is still wet.
Step-9: Set the Coating
Once all truffles are coated, refrigerate them for 15-20 minutes until the chocolate is completely set and firm to the touch. They’re now ready to enjoy or package for gifting!
Step-10: Final Storage
Transfer the finished truffles to an airtight container with parchment paper between layers to prevent sticking.
Store in the refrigerator for up to 2 weeks, or freeze for up to 3 months.
Related Recipes You’ll Love to Try
- Snickerdoodle Banana Bread with Cinnamon Crunch
- Best Sugar Cookie Cutouts for Decorating with Royal Icing
- Best Royal Icing for Sugar Cookies (Hardens Fast)
- Easy Christmas Meringue Cookies to Wow Your Guests
Nutrition Information
Per truffle (1 of 24)
- Calories: 145
- Protein: 2g
- Carbohydrates: 16g
- Fat: 9g
- Fiber: 1g
- Sugar: 11g
- Sodium: 95mg
Nutritional values are approximate and will vary based on specific ingredients and chocolate used.
Expert Tips for Success
• Room temperature matters: Make sure your cream cheese is truly softened (leave it out for 1-2 hours) for the smoothest texture without lumps.
• Consistent sizing: Use a cookie scoop for perfectly uniform truffles that look professional and cook evenly.
• Keep hands cool: If the mixture gets too soft while rolling, refrigerate for 10 minutes, or dampen your hands with cold water.
• Chocolate temperature: Let melted chocolate cool for 2-3 minutes before dipping. Too hot and it will be too thin; too cool and it won’t coat smoothly.
• Double-dipping option: For an extra-thick chocolate shell, let the first coat set completely, then dip a second time.
• Work quickly: Don’t let the truffles sit at room temperature too long – they’re easiest to work with when cold.
• Tap off excess: After coating, tap the fork gently on the bowl’s edge to remove excess chocolate for a cleaner finish.
Variations & Substitutions
Flavor Variations:
• Chocolate Gingerbread Truffles: Add 2 tablespoons cocoa powder to the cream cheese mixture.
• Chai-Spiced Truffles: Add ½ teaspoon cardamom and reduce cloves to ⅛ teaspoon.
• Orange Gingerbread: Add 1 tablespoon orange zest for a bright, citrusy twist.
• Espresso Gingerbread: Mix in 1 teaspoon instant espresso powder for depth.
Coating Variations:
• White Chocolate Peppermint: Coat in white chocolate and sprinkle with crushed candy canes.
• Dark Chocolate Sea Salt: Use dark chocolate and finish with flaky sea salt.
• Dual-Chocolate: Coat in dark chocolate, then drizzle with white chocolate.
• Naked Truffles: Skip the chocolate coating and roll in cocoa powder, powdered sugar, or crushed cookies.
Dietary Substitutions:
• Gluten-Free: Use certified gluten-free gingersnap cookies.
• Dairy-Free: Substitute cream cheese with dairy-free cream cheese alternative; use dairy-free chocolate.
• Lower Sugar: Use sugar-free gingersnaps and sugar-free chocolate chips.
Storage & Make Ahead Instructions
Storage:
• Refrigerator: Store in an airtight container between layers of parchment paper for up to 2 weeks.
• Freezer: Freeze for up to 3 months in a freezer-safe container; thaw in refrigerator for 2-3 hours before serving.
• Room Temperature: Can sit at room temperature for up to 2 hours during serving, but should be refrigerated otherwise.
Make Ahead:
These truffles are perfect make-ahead treats! You can:
• Prepare the base: Mix the truffle base up to 2 days in advance and keep refrigerated.
• Roll and freeze: Roll truffles and freeze uncoated for up to 1 month; coat when ready to serve.
• Complete entirely: Make and coat completely up to 2 weeks before needed.
Gifting Tips:
• Package in decorative boxes or tins with parchment paper between layers.
• Include a “keep refrigerated” note for recipients.
• Make 2-3 days before gifting for optimal flavor development.
• Consider individual mini cupcake liners for an elegant presentation
Serving Suggestions
These gingerbread truffles are incredibly versatile for holiday entertaining:
• Coffee pairing: Serve alongside espresso, cappuccino, or spiced chai lattes.
• Dessert platter: Arrange on a platter with other holiday treats like peppermint bark and fudge.
• Hot cocoa companion: The perfect indulgent addition to a mug of hot chocolate.
• Breakfast treat: Pair with your morning coffee for a special holiday breakfast.
• Cookie exchange: Stand out at cookie swaps with this unique no-bake option.
Presentation Ideas:
- Dust with powdered sugar for a snowy effect.
- Arrange in decorative tins lined with festive tissue paper.
- Place in individual mini cupcake liners for easy serving.
- Create a “flavor flight” with different coating variations.
Frequently Asked Questions
Can I make these gingerbread truffles without a food processor?
Yes! Place the gingersnap cookies in a heavy-duty zip-top bag and crush them with a rolling pin until you achieve fine crumbs.
It takes a bit more effort, but works perfectly. You can also use a blender, working in batches.
Why are my truffles falling apart when I coat them?
This usually happens if the truffle balls aren’t cold enough or if the chocolate is too hot.
Make sure your truffles are firmly frozen before dipping, and let your melted chocolate cool for 2-3 minutes after melting.
Also ensure your cookie-to-cream cheese ratio is correct.
Can I use homemade gingersnap cookies instead of store-bought?
Absolutely! Just make sure they’re completely cooled and crispy. Soft or chewy cookies won’t create the right texture.
You’ll need about 30-35 small crispy gingersnaps to equal 10 ounces.
What type of chocolate works best for coating?
Any chocolate you enjoy! Dark chocolate (60-70% cacao) provides a sophisticated, less-sweet option that balances the spiced truffle center beautifully.
Milk chocolate creates a sweeter, more approachable flavor, while white chocolate offers a pretty contrast and vanilla sweetness. Chocolate melting wafers are easiest to work with.
How do I prevent the chocolate coating from cracking?
Cracking usually occurs from temperature shock. Bring the truffles from freezer to refrigerator for 10 minutes before dipping, and make sure your chocolate isn’t too hot.
Adding coconut oil or shortening to the chocolate also creates a more flexible coating that’s less likely to crack.
Can I make these truffles ahead of time for Christmas?
Yes! These are an ideal make-ahead dessert. Make them 1-2 weeks before Christmas and store in the refrigerator, or make them up to 3 months ahead and freeze.
They actually taste better after the flavors meld for a day or two.
What’s the difference between molasses types, and does it matter?
Use regular (mild or dark) molasses, not blackstrap molasses. Blackstrap is too bitter and intense for this recipe.
Regular molasses provides the right sweetness and authentic gingerbread flavor.
If you only have blackstrap, reduce the amount to 1 tablespoon.