Our site contains ads and uses Amazon affiliate links. We may earn a small commission at no extra cost to you. We know ads can be distracting, and we’re sorry for any inconvenience they cause. It helps us keep the site running. Thanks for your understanding and supporting us!
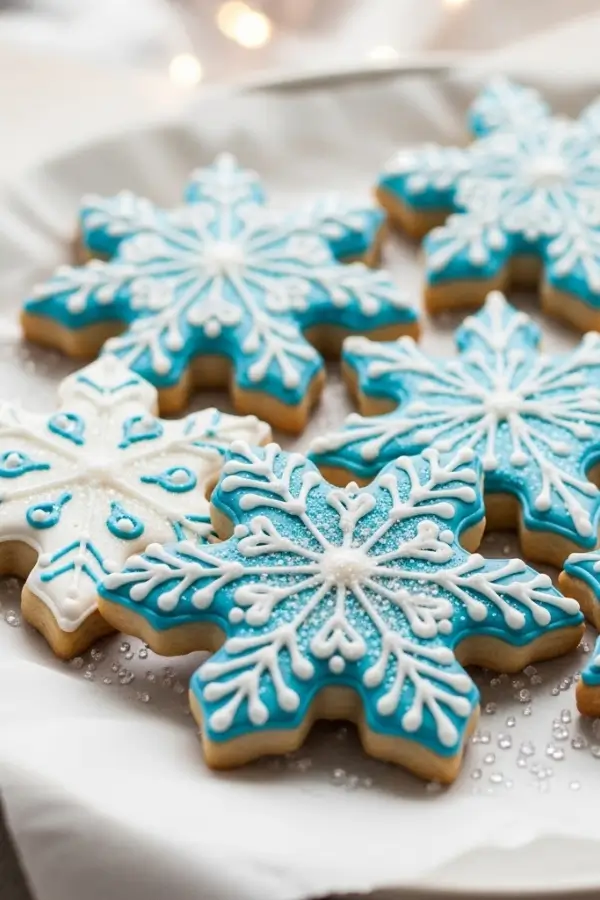
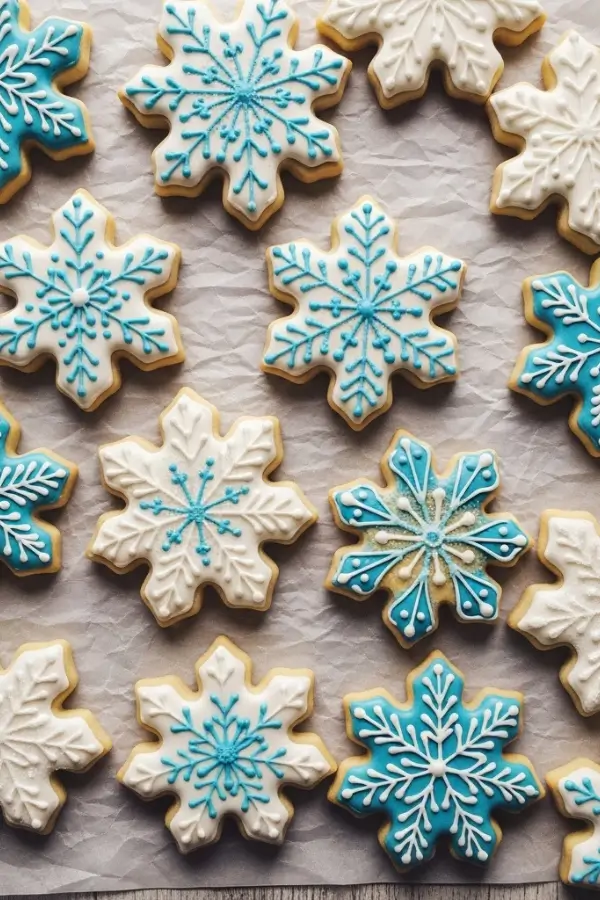
Snowflake sugar cookies are a sweet and simple way to bring winter magic into your kitchen. These cookies are soft, buttery, and shaped into delicate snowflakes that look just as beautiful as they taste.
I love how easy the dough is to work with, making it perfect for both beginners and seasoned bakers. Once baked, a touch of icing and sprinkles turns each cookie into a little edible snowflake.
They’re perfect for holiday parties, gift boxes, or cozy baking days at home. Whether you decorate them simply or go all out, these cookies always feel festive.
For me, they’re a must-bake every winter. Each cookie becomes a canvas for creative decorating, transforming simple ingredients into edible winter art that captures the magic of freshly fallen snow.
Most Shared: Longhorn Brussels Sprouts Recipe: Sweet, Spicy & Crispy Delight
Why This Recipe Stands Out
• Perfect Texture Balance: These cookies deliver a satisfying snap when you bite into them, followed by a soft, buttery interior that dissolves on your tongue.
• No Chilling Required: Unlike traditional sugar cookies that demand hours of refrigeration, this dough comes together quickly and holds its shape beautifully.
• Foolproof Decorating: The royal icing dries to a smooth, glossy finish that makes even beginner decorators look like pros.
Read More: 17 Five-Ingredient Lazy Dinner Ideas to Save the Day
• Make-Ahead Friendly: Baked cookies stay fresh for up to two weeks in an airtight container, perfect for holiday prep.
• Customizable Flavors: The vanilla base welcomes additions like almond extract, lemon zest, or even a hint of cardamom for unique flavor profiles.
• Consistent Results: Precise measurements and clear techniques ensure your snowflakes turn out identical every single time.
Read More: 19 Easy Pumpkin Cake Recipes for Thanksgiving Desserts
Ingredients You’ll Need
For the Cookies:
- 3 Cups all-purpose flour, spooned and leveled
- 1 Teaspoon baking powder
- ½ Teaspoon salt
- 1 Cup (2 sticks) unsalted butter, softened to room temperature
- 1 Cup granulated sugar
- 1 Large egg, room temperature
- 2 Teaspoons pure vanilla extract
- ½ Teaspoon almond extract (optional)
For the Royal Icing:
- 4 Cups powdered sugar, sifted
- 3 Tablespoons meringue powder
- 6 Tablespoons warm water
- Blue Gel food coloring (for snowflake designs)
- White Sanding sugar or edible glitter
Tools to Use
- Stand mixer or electric hand mixer
- Rolling pin
- Snowflake cookie cutters (various sizes)
- Parchment paper
- Baking sheets
- Wire cooling racks
- Piping bags
- Small round piping tips
- Toothpicks or scribe tools
- Small offset spatula
How to Make Snowflake Sugar Cookies for Holiday
Step-1: Prepare Your Dry Ingredients
Whisk together the flour, baking powder, and salt in a medium bowl.
The gentle swishing sound signals that your dry ingredients are properly combined and aerated.
Set this bowl aside while you work on the butter mixture. This step ensures even distribution of the leavening agents throughout your dough.
Step-2: Cream the Butter and Sugar
Beat the softened butter and granulated sugar in your stand mixer on medium-high speed for 3-4 minutes.
The mixture should transform from grainy yellow clumps into a pale, fluffy cloud that clings to the sides of the bowl.
You’ll hear the mixer’s tone change as air incorporates into the butter. Scrape down the sides halfway through to ensure even mixing.
Step-3: Add the Wet Ingredients
Drop in the egg, vanilla extract, and almond extract if using.
Beat on medium speed for another minute until the egg disappears completely into the butter mixture.
The batter will look slightly curdled at first but will smooth out as the egg emulsifies. The sweet aroma of vanilla will fill your kitchen at this stage.
Step-4: Incorporate the Flour Mixture
Add the flour mixture in three additions, mixing on low speed after each addition.
Stop the mixer as soon as the last streak of flour disappears. Overmixing at this stage develops gluten, which creates tough, hard cookies instead of tender ones.
The dough should look soft and slightly sticky but pull away from the bowl’s sides.
Step-5: Roll Out the Dough
Divide the dough in half for easier handling. Place one portion between two sheets of parchment paper.
Roll to ¼-inch thickness, turning the dough frequently to maintain even thickness.
The parchment prevents sticking without adding extra flour that would dry out your cookies. You should feel consistent resistance under your rolling pin.
Step-6: Cut Your Snowflakes
Preheat your oven to 350°F while you cut shapes. Dip your snowflake cookie cutters in flour before each cut to prevent sticking.
Press down firmly and twist slightly to release the dough. The crisp cutting sound indicates a clean edge.
Place cutouts on parchment-lined baking sheets, spacing them 2 inches apart.
Step-7: Bake to Perfection
Slide the baking sheets into your preheated oven. Bake for 9-11 minutes, watching for the edges to barely begin turning golden.
The centers should still look slightly soft and pale. A warm, buttery scent will waft from the oven when they’re ready.
Don’t overbake or the cookies will taste dry rather than tender.
Step-8: Cool Completely
Let cookies rest on the baking sheet for 5 minutes after removing from the oven. They’ll firm up as they cool.
Transfer to wire racks using a thin spatula. The cookies must cool completely before decorating, typically 30 minutes, or the icing will melt and slide off.
Step-9: Prepare Royal Icing
Combine the sifted powdered sugar and meringue powder in a large bowl. Add the warm water and beat on low speed for 7-10 minutes.
The icing will transform from a dull paste into a brilliant white, glossy mixture.
Test consistency by lifting the beater; the icing should form a ribbon that dissolves back into itself within 10 seconds.
Step-10: Color and Thin the Icing
Divide the royal icing into separate bowls for different consistencies. For outlining, keep the icing thick.
For flooding (filling in areas), add water one teaspoon at a time until the icing flows smoothly but still holds its shape.
Add gel food coloring drop by drop, stirring thoroughly between additions. The color will deepen as it sits.
Step-11: Outline Your Snowflakes
Fill a piping bag fitted with a small round tip with thick royal icing.
Trace the outer edge of each snowflake cookie, holding the bag at a 45-degree angle. The icing should flow steadily in a smooth line.
Work slowly and deliberately around each intricate edge. Let the outlines set for 15 minutes before flooding.
Step-12: Flood the Centers
Thin some icing to flooding consistency and pour it into a piping bag or squeeze bottle.
Fill in the outlined areas, starting from the center and working outward.
Use a toothpick to spread the icing into corners and pop any air bubbles.
The flooded surface should look wet and shiny, self-leveling as it sits.
Step-13: Add Decorative Details
While the flood icing is still wet, pipe delicate snowflake designs on top using thicker icing in contrasting colors.
Create radiating lines from the center, add dots, or draw intricate patterns.
Sprinkle with white sanding sugar or edible glitter for sparkle. The decorations will set into the base as everything dries together.
Step-14: Dry the Icing
Let decorated cookies sit undisturbed at room temperature for at least 6 hours, preferably overnight.
The icing will lose its wet sheen and become hard to the touch. Rushing this step results in smudged designs.
You’ll know they’re ready when you can gently touch the surface without leaving a mark.
Related Recipes You’ll Love to Try
- Snickerdoodle Banana Bread with Cinnamon Crunch
- Pumpkin Bread Ring With Maple Cream Cheese Filling
- Best Royal Icing for Sugar Cookies (Hardens Fast)
- Easy Christmas Meringue Cookies to Wow Your Guests
Nutritional Information
Per Cookie (based on 24 cookies):
- Calories: 185
- Protein: 2g
- Fat: 8g
- Carbohydrates: 27g
- Sodium: 75mg
Tips for Success
• Temperature Matters: Ensure your butter is truly at room temperature (65-67°F).
It should dent easily when pressed but not look greasy or melted. Cold butter won’t cream properly, while too-soft butter creates spread.
• Measure Flour Correctly: Spoon flour into your measuring cup and level with a knife.
Scooping directly from the bag compacts the flour, adding up to 25% more than the recipe requires, resulting in dry, tough cookies.
• Rotate Your Pans: Halfway through baking, rotate the pan 180 degrees for even browning.
Ovens have hot spots that can cause uneven baking, especially important for delicate sugar cookies.
• Master Icing Consistency: The “10-second rule” is crucial. When you lift the spoon, the ribbon of icing that falls should disappear back into the bowl in exactly 10 seconds.
Too thick and it won’t flow smoothly; too thin and it will run off the edges.
• Work in Batches: Only decorate 3-4 cookies at a time when using wet-on-wet techniques.
This ensures the base stays wet enough for additional details to merge seamlessly.
• Store Smart: Layer cooled, undecorated cookies between parchment paper in an airtight container. They’ll stay fresh for two weeks, ready to decorate whenever you have time.
Common Mistakes to Avoid
• Rolling Dough too Thin: Cookies thinner than ¼-inch become brittle and break easily during decorating.
They also overbake quickly, turning hard and cracker-like instead of tender.
• Skipping the Sifting: Lumpy powdered sugar creates bumpy royal icing that won’t flow smoothly or dry to a glossy finish. Always sift for professional-looking results.
• Overmixing the Dough: Once flour is added, mix just until combined. Overworked dough develops gluten, creating tough, dense cookies that spread unpredictably during baking.
• Decorating Warm Cookies: Even slightly warm cookies will cause royal icing to melt and slide off. Patience during cooling prevents hours of wasted decorating effort.
• Using Regular Food Coloring: Liquid food coloring thins royal icing and prevents proper drying. Gel colors provide vibrant hues without compromising consistency.
• Cutting Shapes from Warm Dough: If the dough feels soft or sticky, refrigerate the rolled sheet for 10 minutes. Warm dough stretches and distorts, creating misshapen snowflakes.
Creative Serving Ideas
• Winter Wonderland Display: Arrange cookies on a cake stand dusted with powdered sugar to mimic snow.
Add evergreen sprigs and battery-operated fairy lights for a magical centerpiece.
• Hot Cocoa Companions: Perch a small snowflake cookie on the rim of a mug filled with hot chocolate.
The cookie softens slightly in the steam, becoming the perfect dunking treat.
• Gift Box Assortments: Package 6-8 cookies in clear cellophane bags tied with blue and silver ribbons.
Stack different sizes for visual interest and include a decorative gift tag.
• Ice Cream Sandwiches: Sandwich a scoop of vanilla or peppermint ice cream between two cookies.
Roll the edges in mini chocolate chips or crushed candy canes for a festive twist.
• Dessert Charcuterie Addition: Include snowflake cookies alongside winter fruits, white chocolate, and nuts on a dessert board. Their decorative appeal elevates the entire presentation.
• Cake Toppers: Use smaller snowflake cookies to decorate winter-themed cakes or cupcakes. Insert them at angles into frosting for dimensional interest.
Frequently Asked Questions
Can I Freeze the Cookie Dough?
Yes, wrap the dough tightly in plastic wrap and freeze for up to 3 months. Thaw overnight in the refrigerator before rolling. The texture remains perfect after freezing.
Why Did My Cookies Spread during Baking?
Butter that’s too soft or dough that’s too warm causes spreading. Ensure butter is at proper room temperature and chill rolled dough if your kitchen is warm.
How Long Does Royal Icing Take to Dry?
Surface drying occurs within 1-2 hours, but complete hardening requires 6-8 hours. Humidity extends drying time, so allow overnight drying in humid climates.
Can I Use Salted Butter instead?
Yes, but omit the salt called for in the recipe. Salted butter works fine but makes it harder to control the final salt level in your cookies.
What’s the Best Way to Store Decorated Cookies?
Layer between parchment paper in an airtight container at room temperature.
Decorated cookies stay fresh for up to one week. Avoid refrigeration as it causes condensation.
Can I Make these Cookies Vegan?
Substitute vegan butter and use a flax egg (1 tablespoon ground flaxseed plus 3 tablespoons water). For royal icing, use aquafaba-based meringue powder alternatives.
Why is My Royal Icing Grainy?
Undermixing or using unsifted powdered sugar causes graininess. Beat the icing for the full 10 minutes and always sift your sugar beforehand.
How Do I Fix Icing That’s too Thick?
Add water one teaspoon at a time, mixing thoroughly between additions. Test consistency frequently using the 10-second ribbon test to avoid overthinning.
Can I Add Different Extracts for Flavor?
Absolutely. Try lemon, peppermint, or orange extract in place of almond. Use the same measurement or adjust to taste preferences.
Do I Need Special Meringue Powder?
While traditional royal icing uses raw egg whites, meringue powder is shelf-stable and food-safe. Find it in the baking aisle of most grocery stores.