Our site contains ads and uses Amazon affiliate links. We may earn a small commission at no extra cost to you. We know ads can be distracting, and we’re sorry for any inconvenience they cause. It helps us keep the site running. Thanks for your understanding and supporting us!
📊 Recipe at a Glance
- Prep Time: 20 minutes (plus 3 hours chilling time)
- Cook Time: 12 minutes
- Total Time: 3 hours 32 minutes
- Servings: 24 cookies
- Diet Type: Vegetarian
- Cuisine: American
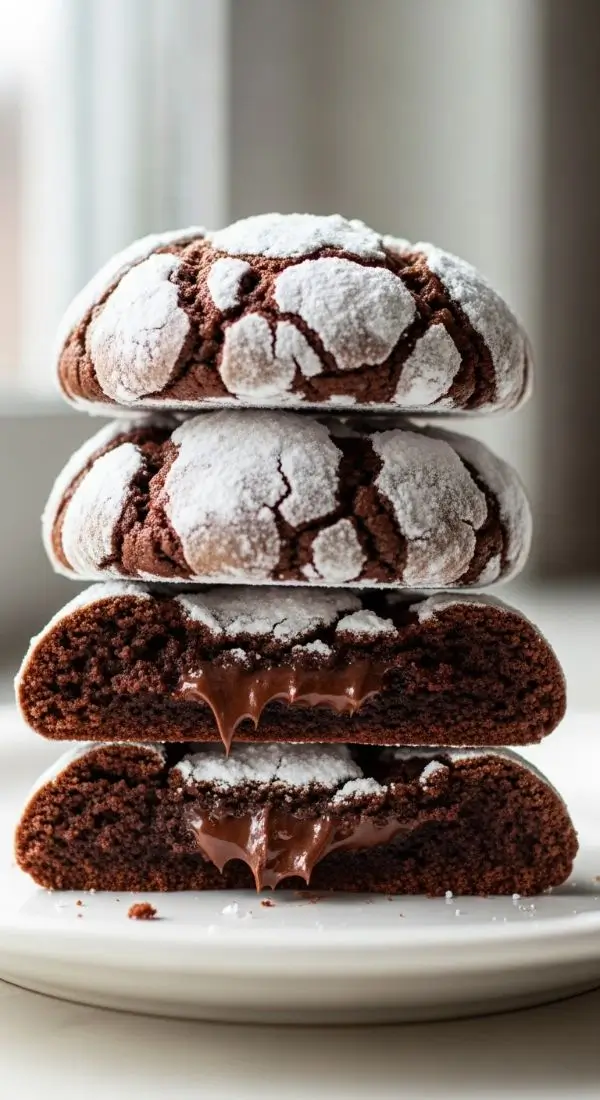
Chocolate crinkle cookies are small round cookies known for their deeply chocolatey, almost brownie like interior and a cracked powdered sugar exterior.
The signature look comes from the dough expanding in the oven, pushing the powdered sugar coating apart to reveal the dark chocolate beneath.
These are especially popular during the holidays but they are delicious any time of year.
In this post, I’ll explain exactly what goes into Chocolate Crinkle Cookies, why they’re so beloved, how to bake them step‑by‑step.
Plus smart variations, troubleshooting tips and some of my favorite picks to make everything easier (and more fun!).
Most Shared: Longhorn Brussels Sprouts Recipe: Sweet, Spicy & Crispy Delight
Why This Recipe Stands Out
The origin of chocolate crinkle cookies is somewhat debated, but sources indicate they first appeared in the early 1950s and were credited to a home‐baker in Saint Paul, Minnesota.
So, what makes them so popular:
• Intense Chocolate Flavor: Uses both cocoa powder and melted chocolate for maximum chocolate impact.
• Perfect Texture Contrast: Crispy edges meet soft, brownie-like centers in every bite.
• Foolproof Method: Chilling the dough ensures cookies maintain their shape and don’t spread too thin.
• Stunning Visual Appeal: Those dramatic cracks make these cookies look professionally crafted.
• Make-Ahead Friendly: Dough can be prepared up to 3 days in advance and baked when needed.
• Crowd-Pleaser: Appeals to both kids and adults, perfect for cookie exchanges and holiday gatherings.
Read More: 17 Five-Ingredient Lazy Dinner Ideas to Save the Day
Ingredients You’ll Need
For the Cookie Dough
- 1 cup all-purpose flour
- 1/2 cup unsweetened cocoa powder
- 1 teaspoon baking powder
- 1/4 teaspoon salt
- 1/2 cup unsalted butter, melted
- 1 cup granulated sugar
- 2 large eggs, room temperature
- 1 teaspoon vanilla extract
- 4 ounces semi-sweet chocolate, melted and slightly cooled
For Coating
- 1/2 cup granulated sugar
- 1 cup powdered sugar
Tools To Use
- Mixing bowls
- Whisk
- Electric mixer or wooden spoon
- Measuring cups and spoons
- Cookie scoop or tablespoon
- Baking sheets
- Parchment paper or silicone baking mats
- Cooling rack
- Small bowls for coating sugars
How to Make Delicious Chocolate Crinkle Cookies
Step-1: Prepare the Dry Ingredients
Grab a medium bowl and whisk together the flour, cocoa powder, baking powder, and salt.
Make sure to break up any cocoa clumps as you whisk. The mixture should look uniformly dark brown with no streaks.
Set this bowl aside while you work on the wet ingredients.
Read More: 19 Easy Pumpkin Cake Recipes for Thanksgiving Desserts
Step-2: Mix the Wet Ingredients
In a large mixing bowl, combine the melted butter and granulated sugar. Stir vigorously until the mixture looks smooth and glossy.
Add the eggs one at a time, beating well after each addition. The mixture will look slightly lighter in color.
Pour in the vanilla extract and melted chocolate. Stir until everything is completely combined and silky.
Step-3: Combine Wet and Dry Mixtures
Pour the flour mixture into the chocolate mixture. Fold gently with a spatula or wooden spoon until no flour streaks remain.
The dough will be thick, sticky, and incredibly chocolatey. Don’t overmix or your cookies will turn out tough.
Step-4: Chill the Dough
Cover the bowl tightly with plastic wrap, pressing it directly onto the surface of the dough.
Refrigerate for at least 3 hours or overnight. This step is crucial. The dough needs to firm up so you can shape it into balls.
Cold dough also prevents excessive spreading during baking.
Step-5: Prepare for Baking
When you’re ready to bake, preheat your oven to 350°F (175°C). Line two baking sheets with parchment paper.
Set up your coating station by placing granulated sugar in one small bowl and powdered sugar in another bowl.
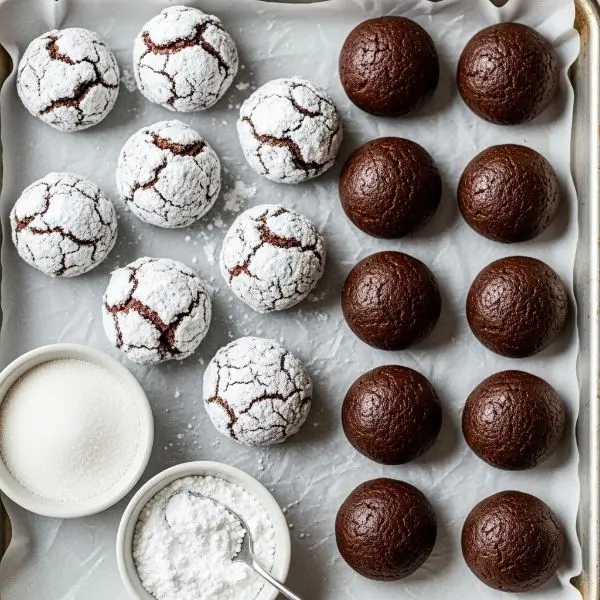
Step-6: Shape and Coat the Cookies
Using a cookie scoop or tablespoon, scoop out portions of dough about 1 tablespoon in size.
Roll each portion between your palms to form a ball. First, roll the ball in granulated sugar, coating it completely.
Then, roll it generously in powdered sugar. Make sure the coating is thick and even.
The more powdered sugar, the more dramatic the cracks.
Step-7: Arrange on Baking Sheets
Place the coated dough balls on prepared baking sheets, spacing them about 2 inches apart.
They will spread during baking. Don’t crowd them or they’ll merge into one giant cookie.
Step-8: Bake the Cookies
Bake for 10 to 12 minutes. The cookies are done when they look set around the edges but still soft in the center.
You’ll see beautiful cracks forming across the surface. The centers might look slightly underdone, but they’ll firm up as they cool.
Don’t overbake or you’ll lose that fudgy texture.
Step-9: Cool and Enjoy
Let the cookies cool on the baking sheet for 5 minutes. They’ll be too soft to move immediately.
Then transfer them to a cooling rack. As they cool, you’ll hear tiny crackling sounds as the sugar coating settles.
Once completely cool, the cookies will have that perfect texture: crispy outside, soft inside.

Related Recipes You’ll Love to Try
- Christmas Cherry Bars: A Lovely Festive Dessert
- Christmas Thumbprint Cookies with Raspberry Jam
- Sweet Potato Smoothie Bowl: Breakfast You’ll Crave Daily
- Best Gingerbread Truffles Recipe (No-Bake Holiday Treat!)
Nutritional Information
Per Cookie (Makes approximately 24 cookies)
- Calories: 145
- Protein: 2g
- Fat: 6g
- Carbohydrates: 22g
- Sodium: 45mg
Tips For Success
• Use Room Temperature Eggs: Cold eggs can seize the melted chocolate, creating lumps in your dough.
• Don’t Skip the Chilling: Warm dough spreads too much and won’t crack properly.
• Be Generous with Powdered Sugar: A thick coating creates more dramatic cracks and better visual appeal.
• Watch the Baking Time: These cookies continue cooking on the hot pan after you remove them from the oven.
• Cool Completely before Storing: Warm cookies will stick together and lose their coating.
• Sift Your Cocoa Powder: This prevents lumps and ensures even chocolate distribution throughout the dough.
• Use Fresh Baking Powder: Old leavening agents won’t give you those beautiful puffed cracks.
• Let Melted Chocolate Cool Slightly: Hot chocolate can cook the eggs when mixed.
Common Mistakes To Avoid
• Skipping the Double Sugar Coating: Rolling only in powdered sugar creates less contrast; the granulated sugar layer helps the powdered sugar adhere.
• Overbaking: These cookies should look slightly underdone when you remove them; they firm up during cooling.
• Making Dough Balls too Large: Oversized cookies won’t bake evenly and may have raw centers.
• Not Chilling Long Enough: Warm dough spreads too thin and won’t develop proper cracks.
• Using Natural Cocoa Instead Of Dutch-Process: While both work, Dutch-process cocoa creates a darker color and milder flavor.
• Overmixing The Batter: This develops too much gluten, resulting in tough, cakey cookies instead of fudgy ones.
• Placing Cookies Too Close Together: They need room to spread without touching.
• Storing Before Completely Cool: The steam gets trapped, making cookies soggy and causing the sugar coating to dissolve.
Creative Serving Ideas
• Ice Cream Sandwiches: Press a scoop of vanilla, mint, or coffee ice cream between two cookies for an elegant dessert.
• Cookie Platter Centerpiece: Arrange on a white platter with fresh mint sprigs and whole coffee beans for a stunning holiday display.
• Dunking Companion: Serve alongside hot coffee, hot chocolate, or cold milk for the perfect afternoon treat.
• Crumbled Topping: Break cookies into chunks and sprinkle over chocolate mousse or vanilla pudding.
• Gift Box Addition: Package in clear cellophane bags tied with ribbon for beautiful homemade gifts.
• Dessert Board Star: Include on a dessert charcuterie board with fresh berries, chocolate truffles, and whipped cream.
• Breakfast Treat: Pair with your morning espresso for an indulgent start to the day.
• S’mores Twist: Use instead of graham crackers for sophisticated campfire s’mores.
Frequently Asked Questions
Can I Freeze the Cookie Dough?
Yes, you can freeze the dough balls after rolling in both sugars.
Place them on a baking sheet and freeze until solid, then transfer to a freezer bag. Bake directly from frozen, adding 1 to 2 minutes to the baking time.
Why Didn’t My Cookies Crack?
The most common reason is not using enough powdered sugar or not chilling the dough long enough.
Make sure your dough is very cold and your powdered sugar coating is generous.
Can I Use Oil Instead of Butter?
Yes, but butter provides better flavor. If using oil, use a neutral-flavored vegetable oil and the cookies may spread slightly more.
How Do I Store These Cookies?
Store in an airtight container at room temperature for up to 5 days.
Layer with parchment paper to prevent sticking. They also freeze well for up to 3 months.
Can I Make These Gluten-Free?
Yes, substitute a 1:1 gluten-free flour blend for the all-purpose flour. The texture will be slightly different but still delicious.
Why are My Cookies Flat?
This usually happens when the dough isn’t chilled enough or the oven temperature is too low. Always verify your oven temperature with an oven thermometer.
Can I Add Mix-Ins?
Absolutely! Fold in chocolate chips, chopped nuts, or peppermint extract after mixing the dough.
Just don’t add more than 1/2 cup of mix-ins or the cookies won’t hold together properly.
Do I Need to Use Both Types of Chocolate?
The melted chocolate adds richness while the cocoa powder provides structure.
You can use just cocoa powder, but the cookies will be less fudgy and more cake-like.