Our site contains ads and uses Amazon affiliate links. We may earn a small commission at no extra cost to you. We know ads can be distracting, and we’re sorry for any inconvenience they cause. It helps us keep the site running. Thanks for your understanding and supporting us!
📊 Recipe at a Glance
- Prep Time: 15 minutes
- Cook Time: 35–40 minutes
- Cooling Time: 60 minutes
- Total Time: About 1 hour 50 minutes
- Servings: 24 bars
- Diet Type: Vegetarian
- Cuisine: American
When the holiday season rolls around, few things bring more joy than baking treats that look and taste like Christmas itself.
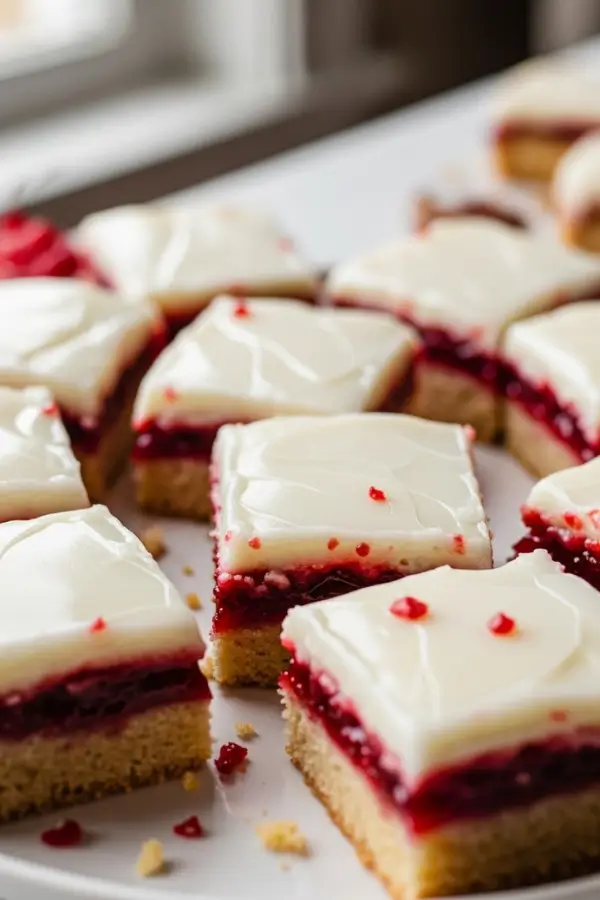
Christmas Cherry Bars are one of those festive desserts that perfectly capture the spirit of the season.
They are vibrant, sweet, and delightfully easy to make, featuring layers of buttery dough, luscious cherry filling, and a light sugar glaze that looks just like snow.
Whether you are planning a cozy night with family or a big holiday party, these bars will be a hit on any dessert table.
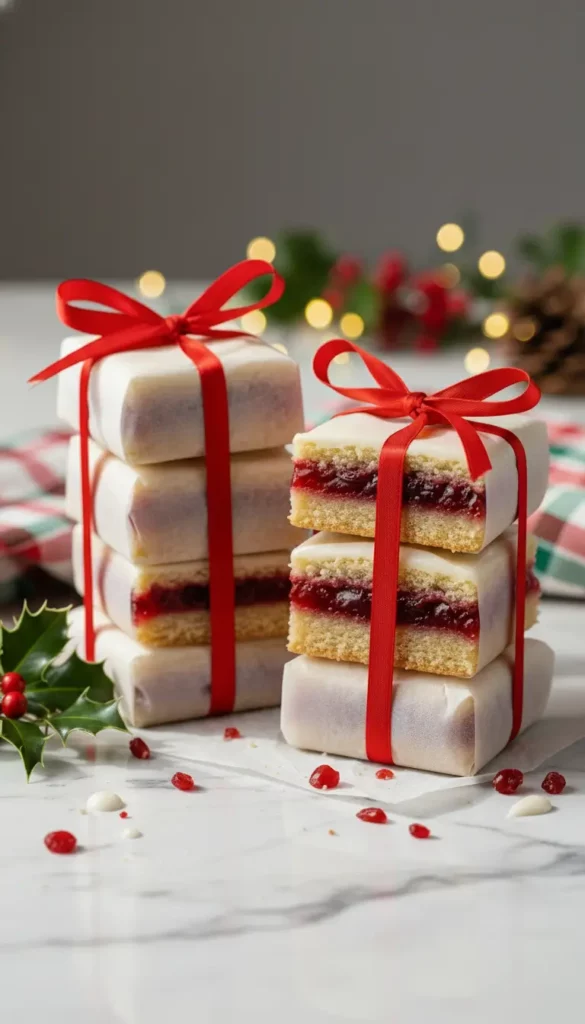
Plus, they are easy to bake in batches and make wonderful edible gifts.
In this guide, I will instruct you a step-by-step recipe, ingredient tips, flavor variations, and equipment recommendations to make perfect Christmas Cherry Bars every time.
Read More: 19 Easy Pumpkin Cake Recipes for Thanksgiving Desserts
Why Christmas Cherry Bars Are Perfect for the Holidays
There is something special about the combination of sweet cherries and buttery crust that makes this dessert ideal for holiday.
The red cherry filling represents the classic holiday color scheme, while the soft glaze gives it a snowy, winter-wonderland appearance.
Here’s why you should add these bars to your baking list:
- They are simple to prepare in one pan.
- Perfect for feeding a crowd or taking to parties.
- Easy to cut, store, and transport.
- They freeze beautifully for make-ahead convenience.
- Their festive look adds instant cheer to your dessert spread.
These cherry bars deliver all the flavor of cherry pie without the extra effort.
Read More: 17 Five-Ingredient Lazy Dinner Ideas to Save the Day
Ingredients You’ll Need
You will need a handful of everyday baking ingredients, plus a few festive extras to give these bars that Christmas charm.
For the dough:
- 1 cup butter, softened
- 1 ¾ cups granulated sugar
- 4 large eggs
- 1 teaspoon vanilla extract
- ½ teaspoon almond extract (optional but adds a holiday touch)
- 3 cups all-purpose flour
- 1 teaspoon baking powder
- ½ teaspoon salt
For the filling:
- 1 can (21 oz) cherry pie filling (or homemade cherry compote if you prefer fresh fruit)
For the glaze:
- 1 cup powdered sugar
- 2–3 tablespoons milk
- ½ teaspoon almond extract or vanilla extract
Optional holiday add-ons:
- White chocolate chips
- Chopped pistachios for a red-and-green contrast
- Edible glitter or coarse sugar for sparkle
Ingredient Tips:
- Butter: Always use real butter instead of margarine for rich flavor and perfect texture.
- Cherry filling: Choose a premium brand for a deeper cherry flavor. You can also make your own filling by simmering cherries with sugar and cornstarch.
- Extracts: Almond extract pairs beautifully with cherries and instantly gives that festive bakery aroma.
Most Shared: Longhorn Brussels Sprouts Recipe: Sweet, Spicy & Crispy Delight
Recommended Baking Tools
Having the right tools makes a big difference when baking cherry bars. Here are the essentials you’ll need:
- 9×13 inch non-stick baking pan
- Parchment paper for easy removal and cleanup
- Stand mixer or hand mixer for creaming butter and sugar
- Offset spatula for spreading dough evenly
- Sharp knife or dough cutter for clean slicing
How to Make Christmas Cherry Bars
Step-1: Prepare the Oven and Pan
Preheat your oven to 350°F (175°C). Line a 9×13 inch baking pan with parchment paper, leaving a bit of overhang on the sides so you can lift the bars out easily later.
Step-2: Make the Dough
In a large bowl, cream together the softened butter and granulated sugar until light and fluffy.
Beat in the eggs one at a time, mixing well after each addition. Stir in vanilla and almond extracts.
In a separate bowl, whisk together flour, baking powder, and salt.
Gradually add the dry ingredients to the wet ingredients and mix until combined. The dough should be thick and slightly sticky.
Step-3: Assemble the Layers
Spread about two-thirds of the dough evenly across the bottom of your prepared pan. Top with cherry pie filling, spreading it out gently with an offset spatula.
Then drop small spoonfuls of the remaining dough over the cherry layer.
It’s okay if some cherry filling peeks through; it adds a beautiful marbled look after baking.
Step-4: Bake to Perfection
Bake for 30 to 40 minutes, or until the top is lightly golden and a toothpick inserted into the dough comes out clean.
Avoid overbaking, as the bars will continue to set as they cool.
Step-5: Cool Completely
Allow the bars to cool in the pan for at least an hour. Lifting them too soon can cause them to crumble, so patience is key.
Step-6: Glaze and Decorate
Once cool, whisk together powdered sugar, milk, and extract until smooth. Drizzle the glaze over the bars using a spoon or piping bag.
For an extra festive touch, sprinkle crushed pistachios or edible glitter before the glaze sets.
Step-7: Slice and Serve
Lift the slab out of the pan using the parchment overhang. Cut into squares or rectangles using a sharp knife.
Serve them on a holiday platter or wrap small bundles in parchment and ribbon for edible gifts.
Related Recipes You’ll Love to Try
- Best Snowflake Sugar Cookies: Simple, Soft & Festive
- Best Sugar Cookie Cutouts for Decorating with Royal Icing
- Sweet Potato Smoothie Bowl: Breakfast You’ll Crave Daily
- Best Gingerbread Truffles Recipe (No-Bake Holiday Treat!)
Flavor Variations and Festive Twists
Christmas Cherry Bars are endlessly customizable. Try one of these ideas to make them your own:
- Cherry Almond Dream: Add sliced almonds to the glaze or on top of the dough before baking.
- Chocolate Cherry Bars: Add a handful of mini chocolate chips to the dough for a rich twist.
- Mixed Berry Delight: Swap half of the cherry filling with blueberry or raspberry filling for a colorful blend.
- Coconut Snow Bars: Sprinkle shredded coconut on top before baking for a snowy look.
- White Chocolate Pistachio Bars: Add white chocolate chips to the dough and top with chopped pistachios.
Serving and Storing
Serve Christmas Cherry Bars at room temperature on a festive dessert platter. They pair beautifully with coffee, hot cocoa, or eggnog.
To store, place bars in an airtight container with parchment paper between layers.
They’ll stay fresh at room temperature for up to 3 days, or refrigerated for up to a week. You can also freeze them for up to three months; just thaw before glazing and serving.
Troubleshooting Tips
If something doesn’t turn out quite right, here’s how to fix it:
- Bars are Too Soft: Bake a few minutes longer or let them cool completely before slicing.
- Dough is Sticky: Chill it for 10–15 minutes before pressing into the pan.
- Filling Leaked: Reduce the amount of pie filling slightly or thicken homemade filling before layering.
- Glaze too Runny: Add more powdered sugar until you reach the desired consistency.
Frequently Asked Questions
What size pan should I use for cherry bars?
A standard 9×13 inch pan works best. If you prefer thinner bars, use a 15×10 inch jelly roll pan and reduce baking time slightly.
Can I use fresh cherries instead of canned pie filling?
Yes, you can use fresh or frozen cherries. Cook them with sugar and cornstarch until thick before spreading them on the dough.
How do I keep the bars from sticking to the pan?
Line your pan with parchment paper, leaving an overhang on the sides. This helps lift the bars out easily for cutting.
Can I freeze Christmas Cherry Bars?
Absolutely. Once cooled and sliced, wrap the bars tightly and freeze for up to three months. Thaw at room temperature before serving.
Can I use a different filling?
You can substitute cherry filling with blueberry, raspberry, or even apple pie filling. Each variation brings a new flavor twist.
How long do Christmas Cherry Bars stay fresh?
When stored in an airtight container, they stay fresh for up to a week in the refrigerator or up to three months in the freezer.
Can I double the recipe?
Yes. For larger gatherings, double the ingredients and bake in two 9×13 inch pans or one large sheet pan.


