Our site contains ads and uses Amazon affiliate links. We may earn a small commission at no extra cost to you. We know ads can be distracting, and we’re sorry for any inconvenience they cause. It helps us keep the site running. Thanks for your understanding and supporting us!
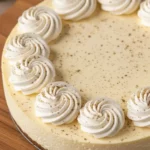
Finding the best sugar cookie icing recipe that hardens is a game changer for holiday baking. This icing goes on smooth, sets beautifully, and gives your cookies that perfect bakery-style finish.
It’s sweet but not overpowering, letting the cookie shine through. I love how easy it is to make with just a few simple ingredients.
Once it hardens, you can stack, store, or gift the cookies without any mess. It’s ideal for decorating cut-out sugar cookies for Christmas, birthdays, or any celebration.
Whether you prefer simple designs or detailed patterns, this icing gives you a smooth, glossy surface to work with. Perfect cookies start with the right icing and this one delivers every time.
Why This Recipe Stands Out
• Sets Perfectly Hard in 2-4 Hours: Unlike softer icings that remain tacky, this formula dries to a smooth, rock-solid finish that won’t stick to packaging or leave fingerprints.
• Achieves Three Consistency Levels: Master stiff, medium, and flood consistency from one base recipe for outlining, filling, and detailed decorating work.
• Uses Simple Pantry Ingredients: Requires only powdered sugar, meringue powder, and water with no specialty items or expensive equipment needed.
Most Shared: Pumpkin Square Bars with Cream Cheese Frosting
• Creates Bright White Base: The pure white color provides the perfect canvas for food coloring without any yellow or cream tones interfering.
• Stays Fresh for Weeks: Decorated cookies maintain their crisp icing and vibrant colors for up to three weeks when stored properly in airtight containers.
• Works in Any Climate: The formula holds up beautifully in humid conditions where other icings would weep or soften.
• Food Safe without Eggs: Meringue powder eliminates concerns about raw eggs, making decorated cookies safe for everyone including children and pregnant women.
Most Shared: Homemade Pumpkin Spice Latte: Better Than Starbucks!
Ingredients You’ll Need
For the Icing Base:
- 4 cups (480g) Powdered Sugar, sifted to remove lumps
- 3 tablespoons (21g) Meringue Powder
- 6 tablespoons (90ml) Warm Water, plus more for thinning
- 1 teaspoon Pure Vanilla Extract or clear vanilla for whitest icing
- 1/4 teaspoon Cream Of Tartar for extra stability
For Coloring and Flavoring:
- Gel Food Coloring in desired shades
- Flavor Extracts such as almond, lemon, or peppermint (optional)
Tools to Use
- Stand mixer or hand mixer
- Large mixing bowl
- Rubber spatula
- Sifter or fine-mesh strainer
- Piping bags
- Piping tips (sizes 2, 3, and 4)
- Squeeze bottles for flooding
- Toothpicks for detail work
- Plastic wrap
- Damp towel

Now retrieving an image set.
Professional 0.5 Sec Instant Read Meat Thermometer Digital, NIST Certified ±0.5℉...
$15.99 (as of November 24, 2025 23:45 GMT +00:00 - More infoProduct prices and availability are accurate as of the date/time indicated and are subject to change. Any price and availability information displayed on [relevant Amazon Site(s), as applicable] at the time of purchase will apply to the purchase of this product.)
Now retrieving an image set.
Alfolive 2025 AI Wireless Meat Thermometer, Smart Bluetooth Meat Thermometer Dig...
$69.99 (as of November 24, 2025 23:45 GMT +00:00 - More infoProduct prices and availability are accurate as of the date/time indicated and are subject to change. Any price and availability information displayed on [relevant Amazon Site(s), as applicable] at the time of purchase will apply to the purchase of this product.)
Now retrieving an image set.
Cutting Boards for Kitchen - Food Grade Double Sided Pure Titanium& Bamboo Chopp...
$25.99 (as of November 24, 2025 23:45 GMT +00:00 - More infoProduct prices and availability are accurate as of the date/time indicated and are subject to change. Any price and availability information displayed on [relevant Amazon Site(s), as applicable] at the time of purchase will apply to the purchase of this product.)Total Yields
Makes: Approximately 3 cups of royal icing
Decorates: 24 to 36 medium-sized sugar cookies (3 to 4 inches)
This recipe provides enough icing for outlining and flooding standard sugar cookies.
Most Shared: Longhorn Brussels Sprouts Recipe: Sweet, Spicy & Crispy Delight
For simple designs, you can decorate up to 48 smaller cookies.
For intricate, detailed work on larger cookies, expect to decorate 12 to 18 cookies.
The actual yield depends on cookie size, design complexity, and icing layer thickness. Each medium cookie typically requires 2 to 3 tablespoons of icing for complete coverage.
Read More: 17 Five-Ingredient Lazy Dinner Ideas to Save the Day
How to Make Best Sugar Cookie Icing
Step-1: Prepare Your Workspace
Clear your countertop and lay out all ingredients within arm’s reach.
The whisper of sifted powdered sugar cascading through your mesh strainer creates soft clouds that settle into your mixing bowl.
Measure the meringue powder precisely, as this ingredient provides the structure that allows your icing to harden beautifully.
Have your warm water ready, the steam rising gently from the measuring cup.
Step-2: Combine the Dry Ingredients
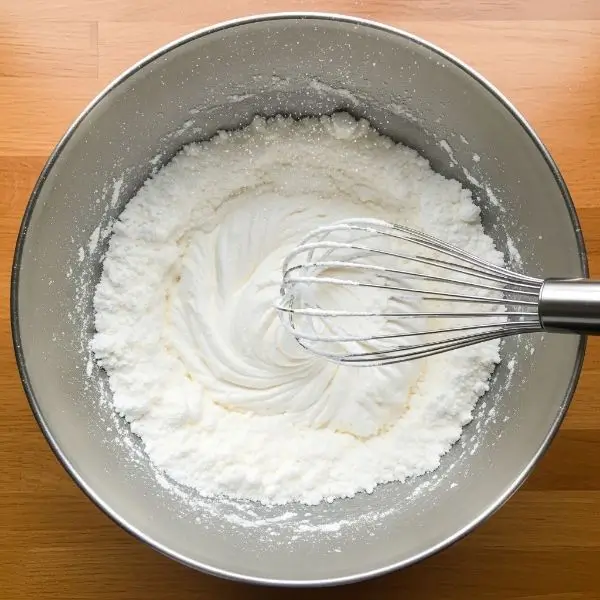
Pour the sifted powdered sugar into your mixing bowl. The fine powder feels silky between your fingers, light as snow.
Sprinkle the meringue powder and cream of tartar over the sugar. Whisk these dry ingredients together for 30 seconds until completely combined.
Read More: 19 Easy Pumpkin Cake Recipes for Thanksgiving Desserts
This crucial step prevents lumps from forming when you add the liquid.
Step-3: Add the Liquid Ingredients
Pour the warm water and vanilla extract into the bowl with your dry mixture.
The vanilla releases its sweet, comforting fragrance immediately. Start your mixer on the lowest speed to prevent a powdered sugar explosion.
The mixture will look crumbly and dry at first, resembling damp sand.
Step-4: Beat to Stiff Peak Consistency
Increase the mixer speed to medium-high. Beat the mixture for 7 to 10 minutes until it transforms into glossy, thick icing.
Listen for the change in sound as the motor works harder, pushing through the thickening mixture.
The icing should form stiff peaks that hold their shape when you lift the beater. This creates your base consistency perfect for piping borders and details that need definition.
Step-5: Test the Consistency
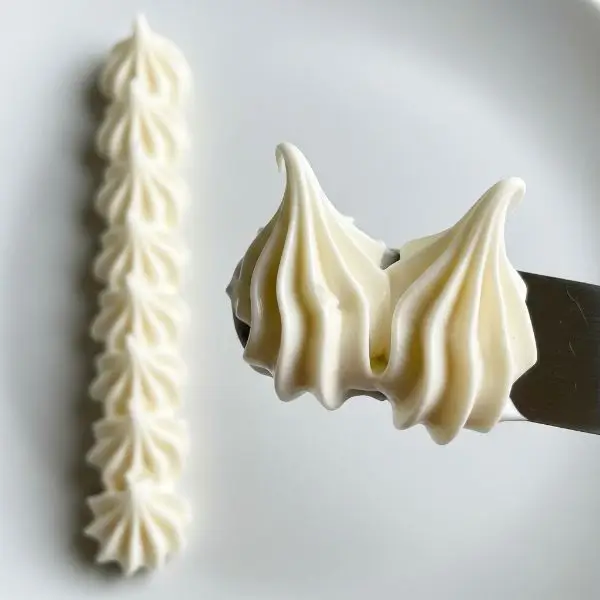
Lift your spatula from the bowl and watch how the icing behaves. Stiff consistency icing holds its peak without drooping.
To test, pipe a small line on a plate. It should maintain sharp edges without spreading. The surface should look matte and slightly textured.
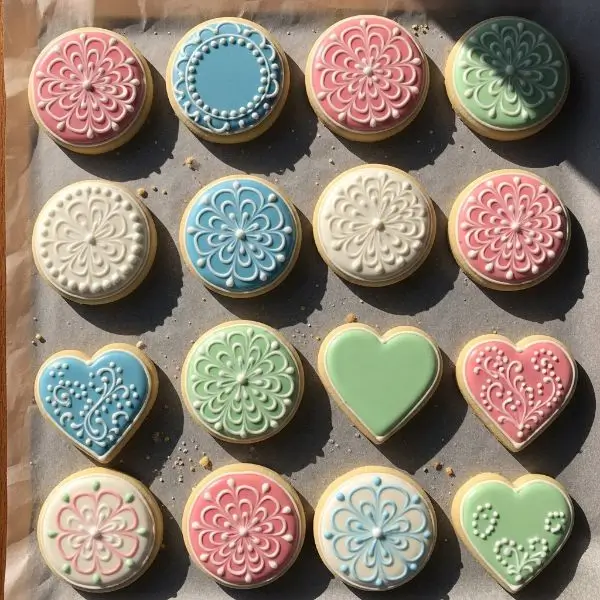
This consistency works beautifully for writing, creating dimensional flowers, and piping borders that frame your cookies.
Step-6: Create Medium Consistency for Details
Transfer half your icing to a separate bowl. Add water one teaspoon at a time, mixing thoroughly after each addition.
After about 2 teaspoons, the icing will thin slightly. Test by piping a line.
Medium consistency should hold its shape but soften slightly at the edges within 10 seconds.
The ribbon from your spatula should disappear into the bowl within 15 seconds. This consistency excels for filling in smaller sections and creating texture.
Step-7: Make Flood Consistency for Filling
Take a third portion and thin it further with additional water. Add the water gradually, stirring gently to avoid incorporating air bubbles.
The icing should flow smoothly from your spatula in a continuous ribbon.
When you drizzle icing back into the bowl, the ribbon should disappear and become smooth within 10 to 15 seconds.
This creates that flawless, glass-like finish on cookie surfaces. The consistency resembles thick glue or honey that flows but isn’t watery.
Step-8: Divide and Color Your Icing
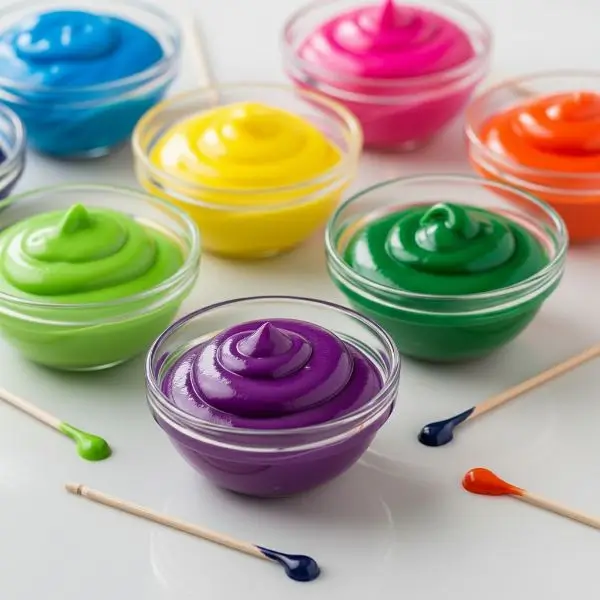
Separate your prepared icing into small bowls based on how many colors you need.
Add gel food coloring using a toothpick, adding just a tiny amount initially.
The vivid color concentrates bloom as you stir, swirling through the white icing like watercolors.
Mix thoroughly until no streaks remain and the color appears uniform. Remember that colors deepen slightly as the icing dries.
Step-9: Fill Your Piping Tools
Transfer stiff and medium consistency icings into piping bags fitted with small round tips.
Squeeze bottles work perfectly for flood consistency icing, making it easy to fill large areas.
Press out any air pockets before sealing. Cover each bowl and filled bag with plastic wrap pressed directly against the icing surface.
Place a damp towel over everything to prevent crusting while you work.
Step-10: Outline Your Cookies First
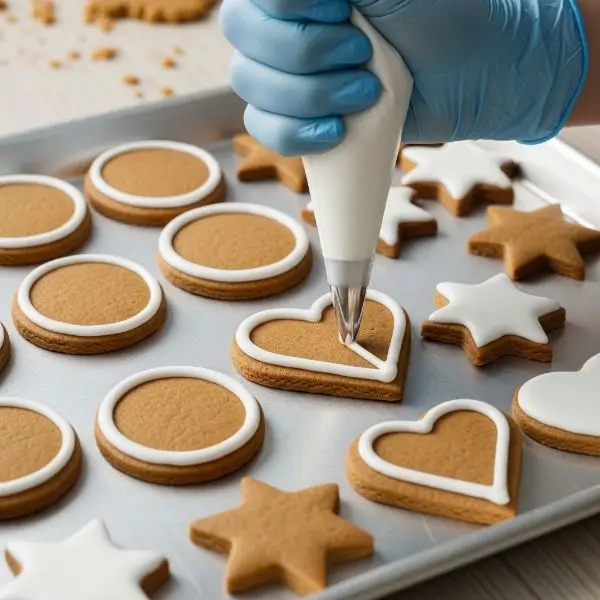
Using stiff consistency icing in your piping bag, create borders around each cookie edge.
Hold the bag at a 45-degree angle, applying steady pressure.
The icing should flow smoothly, creating a dam that prevents flooding icing from spilling over the edges.
Let these outlines dry for 15 to 20 minutes until they feel firm to a gentle touch. You’ll notice the wet sheen disappear as the surface sets.
Step-11: Flood the Cookie Surface
Working within your dried borders, squeeze flood consistency icing onto the cookie surface.
Start in the center and work outward in a spiral motion. The icing spreads naturally, seeking its own level like water finding the edges of a pool.
Use a toothpick to guide icing into corners and pop any air bubbles that surface. The icing should settle into a smooth, even layer within 30 seconds.
Step-12: Add Wet-On-Wet Details
While your flood icing remains wet, pipe dots, lines, or designs using different colors.
The new icing sinks slightly into the base layer, creating a seamless finish.
Use a toothpick to drag through colors for marbling effects or to create hearts, feathers, and other patterns.
Work quickly as you have about 5 minutes before the base begins to set.
Step-13: Allow Proper Drying Time
Leave decorated cookies undisturbed on flat surfaces for at least 2 hours.
The icing develops a dry surface crust within 30 minutes, but the interior remains soft. Full hardening takes 4 to 8 hours depending on humidity levels.
Overnight drying ensures completely hardened icing that won’t dent or scratch.
You’ll know it’s ready when the surface feels completely smooth and hard to a firm touch.
Step-14: Layer Additional Decorations
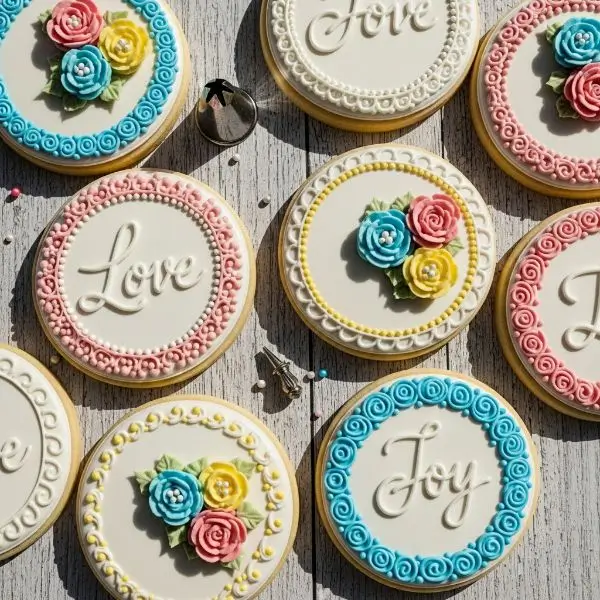
Once your base layer has fully hardened, add dimensional details using stiff consistency icing.
Pipe borders, dots, flowers, or text that sits on top of the base layer. These raised decorations need their own drying time of 2 to 4 hours.
Multiple layers create stunning depth and professional-looking designs that rival bakery creations.
Related Recipes You’ll Love to Try
- Snickerdoodle Banana Bread with Cinnamon Crunch
- Pumpkin Bread Ring With Maple Cream Cheese Filling
- Cinnamon Sugar Focaccia Sourdough Bread with Cream Cheese Icing
- Pumpkin Spice Thumbprint Cookies with Creamy Pumpkin Filling
Nutritional Information
Per serving (2 tablespoons of icing):
- Calories: 110
- Protein: 0g
- Fat: 0g
- Carbohydrates: 28g
- Sodium: 5mg
Tips For Success
• Sift Your Powdered Sugar Twice: This extra step prevents lumps that clog piping tips and create bumpy surfaces, ensuring silky smooth icing every time.
• Use Room Temperature Water for Better Mixing: Warm water helps meringue powder dissolve completely while cold water can create grainy texture.
• Keep Everything Covered: Royal icing forms a hard crust within minutes of air exposure, so cover all bowls and piping bags with plastic wrap pressed directly against the icing.
• Add Color to Thickened Icing before Thinning: Gel colors blend more easily into thicker icing, preventing streaks and ensuring even color distribution.
• Test Consistency on a Plate before Decorating: Pipe test lines or dots to verify your icing behaves correctly before committing to your carefully baked cookies.
• Use Toothpicks to Pop Air Bubbles Immediately: Bubbles that dry create crater-like imperfections, so pop them within the first 30 seconds after flooding.
• Work in Small Batches: Prepare only as much flood icing as you can use in 20 minutes to prevent crusting in your bottles.
• Add Corn Syrup for Slight Shine: Mix in 1 teaspoon light corn syrup per cup of icing if you prefer a subtle gloss rather than matte finish.
• Dry Cookies Near a Fan for Faster Setting: Gentle air circulation speeds drying time without disrupting wet icing.
• Store Unused Icing in the Refrigerator: Sealed containers of royal icing keep for two weeks; bring to room temperature and rebeat before using.
Common Mistakes to Avoid
• Adding too Much Water at Once: Flood consistency requires patience; add water by the half-teaspoon to prevent icing that becomes too thin and runs off cookie edges.
• Skipping the Drying Time between Layers: Rushing causes colors to bleed together and details to sink into base layers, creating muddy designs.
• Using Old Meringue Powder: Expired or improperly stored meringue powder won’t provide proper structure, resulting in icing that never fully hardens.
• Decorating Warm Cookies: Heat causes icing to melt and slide, creating a mess; always let cookies cool completely to room temperature first.
• Overmixing after Reaching Desired Consistency: Excessive beating incorporates air bubbles that create pitted, cratered surfaces when dried.
• Not Sealing Icing Containers Properly: Even brief air exposure creates crusty layers that require straining out, wasting icing and time.
• Using Liquid Food Coloring instead of Gel: Liquid colors thin your icing too much and create pale, washed-out shades compared to concentrated gels.
• Storing Decorated Cookies in Humid Environments: Moisture softens hardened icing, causing colors to bleed and designs to become sticky.
• Expecting Instant Hardening: Royal icing requires genuine patience; moving or stacking cookies too soon ruins hours of detailed work.
• Ignoring Consistency Differences: Using flood consistency for outlines or stiff consistency for filling creates frustrating results and unprofessional appearance.
Creative Serving Ideas
• Stack in Clear Cellophane Bags with Ribbon: The hardened icing prevents smudging, making individually wrapped cookies perfect party favors or bake sale items.
• Create Cookie Bouquets: Insert cookie sticks before baking, then arrange decorated cookies in foam blocks covered with tissue paper for edible centerpieces.
• Build Cookie Box Collections: Layer different designs separated by parchment in decorated boxes for impressive holiday gifts that ship beautifully.
• Display on Tiered Cake Stands: Showcase your artwork at parties by arranging cookies by color or theme on elegant multi-level stands.
• Pair with Coffee or Tea Service: The sweet icing complements bitter coffee perfectly; arrange cookies on small plates beside afternoon tea settings.
• Attach to Dessert Boards: Add decorated cookies to charcuterie-style dessert boards alongside chocolates, fruits, and nuts for textural variety.
• Use as Place Cards: Pipe guest names on cookies and prop against place settings for edible table decorations at weddings or dinner parties.
• Create Cookie Sandwiches: Spread buttercream or ganache between two decorated cookies for an elevated treat that combines textures.
• Freeze for Later Enjoyment: Fully dried decorated cookies freeze beautifully for three months; thaw at room temperature while still wrapped.
• Build Gingerbread-Style Houses: Use sugar cookies as structural elements with royal icing as edible glue for creative architectural projects beyond traditional gingerbread.
Frequently Asked Questions
How Long Does Royal Icing Take to Fully Harden?
Royal icing develops a dry surface within 30 minutes but requires 4 to 8 hours for complete hardening throughout.
Overnight drying ensures the icing reaches maximum hardness. High humidity can extend drying time to 12 hours.
Can I Make Royal Icing without Meringue Powder?
Yes, substitute 3 tablespoons of meringue powder with 2 large egg whites, though this requires using pasteurized eggs for food safety.
The consistency and hardening properties remain similar. Fresh egg white icing must be refrigerated and used within two days.
Why is My Royal Icing Turning Gray or Yellow?
Overmixing incorporates air that oxidizes, creating grayish tones, while butter flavoring or vanilla extract with color causes yellowing.
Use clear vanilla extract and mix only until combined. Add a tiny amount of violet gel color to counteract yellowing.
How Do I Fix Icing That’s too Thick or Too Thin?
Add powdered sugar one tablespoon at a time to thicken runny icing, mixing thoroughly between additions.
For thick icing, add water by the half-teaspoon until reaching desired consistency. Always test on a plate before decorating cookies.
Can I Color Royal Icing with Natural Food Dyes?
Natural food colorings work but produce softer, more muted shades compared to gel colors and may slightly affect drying time.
Use concentrated natural gel colors rather than liquid versions. Expect pastel results even with generous amounts.
How Should I Store Decorated Sugar Cookies?
Store completely dried decorated cookies in airtight containers at room temperature for up to three weeks.
Layer cookies between parchment paper sheets to prevent sticking. Avoid refrigerating as condensation softens the icing.
Why Did My Icing Crack after Drying?
Icing applied too thickly or dried too quickly develops surface cracks as the exterior hardens before the interior.
Apply thinner layers and allow natural drying at room temperature. Avoid placing cookies near heat sources or in direct sunlight.
Can I Thin Royal Icing with Milk Instead of Water?
Water is essential for proper drying; milk prevents hardening and can cause spoilage.
Stick with water for thinning, adding small amounts gradually. Milk-based icings remain soft and require refrigeration unlike true royal icing.
How Do I Prevent Air Bubbles in Flood Icing?
Stir flood consistency icing gently rather than beating to minimize air incorporation.
Let thinned icing rest for 5 minutes before using, allowing bubbles to rise and pop. Use toothpicks to pop any bubbles that appear after flooding.
What’s the Difference between Royal Icing and Regular Icing?
Royal icing hardens completely due to meringue powder or egg whites, creating a firm, stackable finish.
Regular icing made with butter or cream cheese remains soft. Royal icing dries matte and food-safe at room temperature unlike buttercream frostings.