Our site contains ads and uses Amazon affiliate links. We may earn a small commission at no extra cost to you. We know ads can be distracting, and we’re sorry for any inconvenience they cause. It helps us keep the site running. Thanks for your understanding and supporting us!
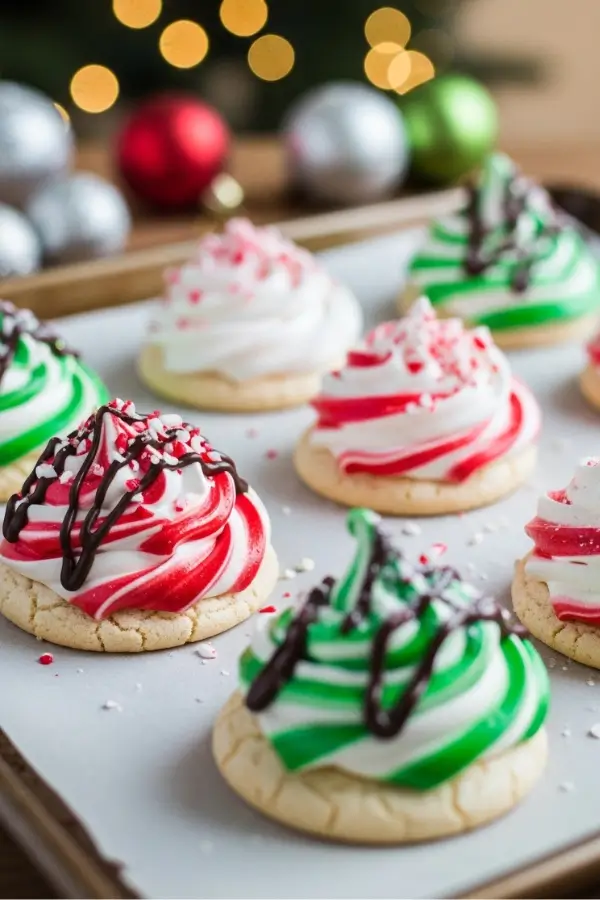
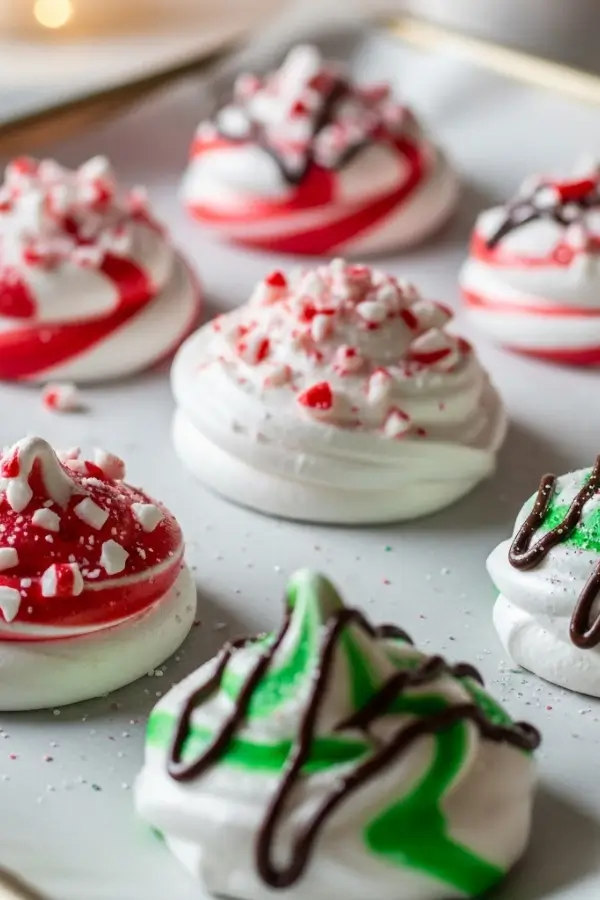
Every holiday season, making Christmas meringue cookies has become one of my favorite traditions. There’s something truly magical about watching glossy peaks of whipped sweetness transform into delicate, crisp cookies that melt in your mouth.
Light, airy, and perfectly sweet, these little treats capture the spirit of the season with their simplicity. Just a few humble ingredients come together to create something so festive and beautiful.
Swirling in cheerful reds and greens or dusted with a touch of shimmer, they feel extra special. Perfect for gifting, sharing at cookie swaps, or savoring with a warm cup of cocoa by the tree.
The beauty of meringues lies not only in their ethereal appearance but also in their versatility.
They can be piped into charming Christmas trees, kissed with chocolate, or sprinkled with crushed candy canes. Each variation a sweet expression of holiday joy.
Why This Recipe Stands Out
• Foolproof Technique: The gradual sugar addition and low-temperature baking ensure success every time, even for beginners.
• Incredibly Versatile: Easily customize with different extracts, colors, and mix-ins to match your holiday theme or personal preferences.
• Allergy-Friendly: Naturally gluten-free and dairy-free, making them perfect for guests with dietary restrictions.
• Make-Ahead Friendly: These cookies store beautifully for weeks, making them ideal for early holiday baking and gift-giving.
• Impressive Presentation: Their elegant appearance makes them look bakery-worthy, yet they’re simple enough for home bakers.
• Light And Guilt-Free: With minimal calories and zero fat, you can enjoy these treats without the heaviness of traditional cookies.
Most Shared: Pumpkin Square Bars with Cream Cheese Frosting
Ingredients You’ll Need
For the Meringue Base:
- 4 large egg whites (at room temperature)
- 1 cup granulated sugar
- 1/4 teaspoon cream of tartar
- 1/4 teaspoon salt
- 1 teaspoon pure vanilla extract
For Festive Variations:
- 1/2 teaspoon peppermint extract (optional)
- Red and green gel food coloring
- 1/2 cup crushed candy canes
- 1/2 cup mini chocolate chips
- Edible glitter or sanding sugar
Most Shared: Homemade Pumpkin Spice Latte: Better Than Starbucks!
Tools to Use
- Stand mixer or hand mixer
- Large mixing bowl
- Baking sheets
- Parchment paper or silicone baking mats
- Piping bags
- Large star tip or round tip
- Rubber spatula
- Wire cooling racks
Now retrieving an image set.
HomeCurated Large Roasting Pan With Rack 17'' x 12'' - Heavy Duty Carbon Steel N...
$49.99 (as of November 20, 2025 23:43 GMT +00:00 - More infoProduct prices and availability are accurate as of the date/time indicated and are subject to change. Any price and availability information displayed on [relevant Amazon Site(s), as applicable] at the time of purchase will apply to the purchase of this product.)
Now retrieving an image set.
Crock-Pot Portable Electric Lunch Box 20-Ounce Food Warmer Moonshine Green | Ide...
$27.79 (as of November 20, 2025 23:43 GMT +00:00 - More infoProduct prices and availability are accurate as of the date/time indicated and are subject to change. Any price and availability information displayed on [relevant Amazon Site(s), as applicable] at the time of purchase will apply to the purchase of this product.)
Now retrieving an image set.
Warming Mat for Food Extra Large 32"x15", Electric Silicone Food Warmer Trays fo...
$47.49 (as of November 20, 2025 23:43 GMT +00:00 - More infoProduct prices and availability are accurate as of the date/time indicated and are subject to change. Any price and availability information displayed on [relevant Amazon Site(s), as applicable] at the time of purchase will apply to the purchase of this product.)How to Make Christmas Meringue Cookies
Step-1: Prepare Your Baking Environment
Begin by positioning your oven racks to the middle and lower thirds of the oven.
Preheat your oven to 200°F (93°C). This low temperature is crucial for achieving that perfectly crisp exterior while keeping the interior tender.
Line two large baking sheets with parchment paper or silicone baking mats. The smooth surface prevents sticking and ensures even baking.
Make sure your baking sheets are completely clean and dry, as any grease will prevent the meringue from holding its shape.
Most Shared: Longhorn Brussels Sprouts Recipe: Sweet, Spicy & Crispy Delight
Step-2: Prepare the Egg Whites
Separate your eggs carefully, ensuring absolutely no yolk gets into the whites.
Even the tiniest speck of yolk can prevent the whites from whipping properly.
The fat in egg yolks interferes with the protein structure that gives meringues their signature volume.
Allow the egg whites to come to room temperature for about 30 minutes.
Room temperature egg whites whip up to greater volume than cold ones. You’ll notice they become slightly looser and more fluid as they warm.
Wipe down your mixing bowl and whisk attachment with a bit of white vinegar or lemon juice.
This removes any traces of grease that could sabotage your meringue.
Step-3: Start Whipping the Egg Whites
Pour the room temperature egg whites into your spotlessly clean mixing bowl. Add the cream of tartar and salt.
The cream of tartar acts as a stabilizer, helping the egg whites maintain their structure.
Begin mixing on medium-low speed until the whites become foamy and frothy. This takes about 1 minute.
You’ll see the clear liquid transform into a mass of small, uniform bubbles that fill the bowl.
Gradually increase the speed to medium-high. Continue beating until soft peaks form.
Soft peaks curl over gently when you lift the whisk. The mixture should look glossy and white.
Step-4: Add the Sugar
With the mixer running on medium-high speed, add the sugar very gradually.
Add it one tablespoon at a time, waiting about 10 seconds between each addition. The sound of the mixer will change slightly as the sugar dissolves into the whites.
This slow incorporation is essential. Rushing this step results in a grainy texture.
The sugar needs time to dissolve completely into the egg whites. You should not feel any grittiness when you rub a small amount between your fingers.
Continue beating after all the sugar is added. Beat for another 5 to 7 minutes until stiff, glossy peaks form.
The meringue should be thick, brilliant white, and incredibly smooth.
Step-5: Add Flavorings and Colors
Beat in the vanilla extract until just combined. If you’re making peppermint meringues, add the peppermint extract now.
The aroma of peppermint will fill your kitchen with instant holiday cheer.
For festive Christmas colors, divide the meringue into separate bowls if you want multiple colors.
Add a tiny amount of gel food coloring to each portion. Use a toothpick to add color, as gel food coloring is highly concentrated.
Fold the color through gently with a rubber spatula. For a marbled effect, don’t mix completely. Leave streaks of color swirling through the white for a stunning visual effect.
Step-6: Pipe the Meringues
Transfer the meringue to a piping bag fitted with your chosen tip.
A large star tip creates beautiful rosettes, while a round tip makes classic swirled kisses. You can also use multiple piping bags if you’ve made different colors.
Hold the piping bag perpendicular to the baking sheet, about half an inch above the surface.
Pipe small mounds about 1.5 inches in diameter, leaving about 1 inch between each cookie. The meringues won’t spread, but you need room for air circulation.
Apply steady, even pressure as you pipe. Release pressure and give a little twist as you pull away to create a neat peak.
The rhythmic motion becomes meditative as you fill your baking sheets.
If adding crushed candy canes or sprinkles, add them immediately after piping while the surface is still sticky.
The decorations will adhere beautifully and bake right into the meringue.
Step-7: Bake the Meringues
Place the baking sheets in the preheated oven. Bake for 1.5 to 2 hours without opening the oven door.
The low, slow heat gently dries out the meringues rather than cooking them quickly.
The meringues are done when they feel completely dry to the touch and lift easily from the parchment paper.
They should remain white or just barely ivory-tinted, never browned.
Turn off the oven but leave the meringues inside with the door closed.
Let them cool completely in the oven for at least 1 hour or overnight. This gradual cooling prevents cracking.
Step-8: Add Optional Chocolate Drizzle
If desired, melt chocolate chips in a microwave-safe bowl in 30-second intervals, stirring between each interval. The chocolate should be smooth and glossy.
Drizzle the melted chocolate over the cooled meringues using a spoon or a piping bag with a small opening.
The chocolate adds richness and creates a beautiful contrast against the pure white meringue.
Let the chocolate set completely at room temperature before storing. The chocolate will harden into a crisp shell that snaps satisfyingly when you bite into it.
Related Recipes You’ll Love to Try
- Creamy Dairy-Free Pumpkin Mousse: A Silky Fall Dessert
- Gluten-Free Pumpkin S’mores Cookies: Fall’s Campfire Treat
- Cinnamon Sugar Focaccia Sourdough Bread with Cream Cheese Icing
- Pumpkin Spice Thumbprint Cookies with Creamy Pumpkin Filling
Nutritional Information
Per Serving (2 Cookies):
- Calories: 45
- Protein: 1g
- Fat: 0g
- Carbohydrates: 11g
- Sodium: 30mg
Tips For Success
• Check Weather Conditions: Avoid making meringues on humid or rainy days, as moisture in the air prevents them from drying properly and can make them sticky.
• Use Fresh Eggs: Older egg whites actually whip better than fresh ones because they’re slightly more liquid and create more stable foam.
• Invest In Gel Food Coloring: Liquid food coloring adds too much moisture to meringues, while gel colors provide vibrant hues without affecting texture.
• Test Your Meringue: Before piping, rub a small amount between your fingers to ensure all sugar has dissolved; you shouldn’t feel any graininess.
• Don’t Rush the Cooling: Removing meringues from the oven too quickly causes them to crack from the sudden temperature change.
• Store Properly: Keep meringues in an airtight container at room temperature with a piece of parchment paper between layers to prevent sticking.
• Rescue Flat Meringues: If your meringue won’t stiffen, add another pinch of cream of tartar and continue beating.
Common Mistakes to Avoid
• Adding Sugar too Quickly: Dumping all the sugar at once prevents it from dissolving properly, resulting in a grainy, weepy meringue that won’t hold its shape.
• Using a Greasy Bowl: Any trace of oil or fat will prevent egg whites from whipping to full volume, leaving you with flat, lifeless meringues.
• Baking at too High Temperature: Temperatures above 225°F cause meringues to brown, crack, and develop a chewy interior instead of staying crisp throughout.
• Opening the Oven Door: Letting in cold air during baking or cooling causes temperature fluctuations that lead to cracked, collapsed meringues.
• Overbeating the Meringue: Beating past the stiff peak stage causes the proteins to break down, resulting in a grainy, dry texture that separates.
• Skipping the Cream of Tartar: Without this stabilizer, your meringue may not achieve proper volume or hold its shape during piping and baking.
• Using Old Baking Sheets: Dark or non-stick pans absorb too much heat and can cause the bottoms to brown or develop an unpleasant texture.
Troubleshooting Meringue Texture Issues
• Soft Centers: If your meringues have crispy exteriors but soft, marshmallow-like centers, this is actually a variation called “chewy meringues.”
Some bakers prefer this texture. If you want them completely crisp, extend baking time by 30 minutes and ensure they cool in the oven overnight.
• Hollow Shells: When meringues puff up beautifully but collapse into hollow shells, you’ve likely overbeaten the mixture or baked at too high a temperature.
The outside sets too quickly while the inside hasn’t dried. Reduce oven temperature by 25°F and beat only until stiff peaks form.
• Beading Or Sweating: Small droplets forming on the surface indicate sugar didn’t fully dissolve or the oven was too hot.
Always add sugar gradually and bake low and slow. Rubbing meringue between fingers before piping helps check if sugar crystals remain.
• Cracking During Baking: Surface cracks usually mean temperature fluctuations or too-high heat.
Never open the oven door during baking, and verify your oven temperature with an oven thermometer, as many ovens run 25°F hotter or cooler than the dial indicates.
Creative Serving Ideas
• Cookie Platter Centerpiece: Arrange meringues in varying sizes and colors on a tiered stand for a stunning dessert table display that catches every eye.
• Hot Chocolate Toppers: Float small meringues on top of hot chocolate or coffee where they slowly dissolve into sweet, marshmallow-like clouds.
• Ice Cream Sandwiches: Sandwich a small scoop of peppermint or vanilla ice cream between two meringues for an elegant frozen treat.
• Gift Bags and Boxes: Pack meringues in clear cellophane bags tied with festive ribbon as beautiful, homemade holiday gifts.
• Trifle Layers: Crush meringues and layer them in a trifle with whipped cream, berries, and custard for textural contrast.
• Cake Decorations: Use small meringue kisses to decorate the top of layer cakes, creating an edible winter wonderland scene.
• Dessert Charcuterie Board: Include meringues alongside chocolates, fruits, and nuts on a holiday dessert board for variety.
Flavor Variations Beyond Peppermint
• Cinnamon Spice: Add 1 teaspoon ground cinnamon and 1/4 teaspoon nutmeg to the meringue for warm, cozy flavors reminiscent of snickerdoodles.
• Almond Joy: Mix in 1/2 teaspoon almond extract, fold in 1/3 cup toasted coconut flakes, and drizzle with dark chocolate after baking.
• Lemon Zest: Add 1 tablespoon finely grated lemon zest and 1/2 teaspoon lemon extract for bright, citrusy meringues that cut through rich holiday meals.
• Espresso: Dissolve 1 tablespoon instant espresso powder in 1 teaspoon hot water, cool, then fold into meringue for sophisticated coffee-flavored cookies.
• Rose Water: Replace vanilla with 1/2 teaspoon rose water and tint pale pink for elegant, fragrant meringues perfect for upscale holiday gatherings.
• Salted Caramel: Fold in 1/2 cup finely crushed caramel candies and sprinkle with flaky sea salt before baking for sweet-salty perfection.
Frequently Asked Questions
Can I Make Meringue Cookies without Cream of Tartar?
Yes, you can substitute cream of tartar with an equal amount of white vinegar or lemon juice.
These acids help stabilize the egg whites similarly. However, cream of tartar provides the most reliable results and doesn’t add any flavor.
Why Did My Meringues Turn Brown?
Meringues turn brown when the oven temperature is too high or they bake for too long at higher heat.
Always bake at 200°F or lower. If browning occurs, your oven may run hot, so reduce the temperature by 25°F next time.
How Long Do Christmas Meringue Cookies Last?
Properly stored in an airtight container at room temperature, meringue cookies last 2 to 3 weeks.
Never refrigerate them as moisture will make them soft and sticky. They’re perfect for making ahead during the busy holiday season.
Can I Freeze Meringue Cookies?
While you can freeze meringues for up to 2 months in airtight containers, they’re prone to absorbing moisture when thawing.
It’s better to store them at room temperature. If freezing, let them thaw completely in the sealed container before opening.
What’s the Difference between French, Swiss, And Italian Meringue?
French meringue (this recipe) whips raw egg whites with sugar and is the simplest method.
Swiss meringue heats egg whites and sugar together first.
Italian meringue uses hot sugar syrup poured into whipped whites and is the most stable.
Can I Make Meringues with a Hand Mixer?
Absolutely, though it takes longer than using a stand mixer. Expect to beat for 10 to 12 minutes total to reach stiff peaks.
Make sure to use a large bowl and move the beaters around to incorporate all the egg whites evenly.
Why are My Meringues Sticky or Weeping?
Sticky meringues usually result from high humidity, underbaking, or improper storage.
The sugar absorbs moisture from the air. Always bake until completely dry and store in airtight containers with minimal air exposure.
Can I Add Cocoa Powder to Make Chocolate Meringues?
Yes, but you must use Dutch-processed cocoa powder, not natural cocoa. Add 2 tablespoons after the sugar is incorporated.
Natural cocoa’s acidity interferes with the egg white proteins and prevents proper structure formation.