Our site contains ads and uses Amazon affiliate links. We may earn a small commission at no extra cost to you. We know ads can be distracting, and we’re sorry for any inconvenience they cause. It helps us keep the site running. Thanks for your understanding and supporting us!
Every sourdough baker reaches a point where the discard jar takes over the fridge.
Pancakes and waffles are the usual answer. But this three-ingredient cracker recipe is faster, lasts a full week, and produces a texture that no other discard recipe can match.
This article explains why no-flour discard crackers crisp differently than dough-based versions, how discard age controls the final flavor, and why the two-stage bake with mid-score is the single technique that separates shatteringly crisp crackers from chewy disappointing ones.
No rolling pin. No chilling the batter. No extra flour. Just the discard already sitting in your fridge.
Why No Added Flour Makes These Crackers Different
Most cracker recipes that call themselves sourdough still add a significant amount of fresh all-purpose flour to the dough.
That added flour is completely unfermented. The gluten, phytic acid, and complex starches in it have not been touched by bacterial or enzymatic activity.
When you use only sourdough discard with no extra flour, every gram of starch in the cracker is already fermented. The natural yeasts and bacteria in discard break down anti-nutrients and gluten in the flour, making the grains more digestible and nutrients more readily absorbed.
The texture difference is also dramatic. Without the fresh gluten network of unfermented flour, the baked cracker is more delicate and shattery. It snaps cleanly with zero bend. That quality is a direct result of the pre-digested protein structure in the fermented discard.
The Science Behind the Crisp: Why Butter Is Non-Negotiable
Butter does two completely different jobs in this recipe.
First, the milk proteins in butter undergo browning reactions in the oven that produce dozens of flavor compounds contributing to that almost-cheesy aroma discard crackers are known for. Oil cannot replicate this.
Second, butter coats the fermented starch granules after baking and slows their reabsorption of moisture from the air. This is the mechanical reason these crackers stay crispy at room temperature for seven days when many homemade crackers go soft overnight.
The Pantry Mama confirms that butter produces a significantly richer and more complex flavor than olive oil in no-flour discard crackers, with olive oil producing a result that tastes more oily than tangy.
How Discard Age Controls the Flavor
This is the aspect of no-flour discard crackers that most recipes never address, and it is one of the most useful levers you have.
In recipes that add fresh flour to the discard, older, more acidic discard gets diluted by the unfermented flour. The sourness is muted regardless of discard age.
In a no-flour cracker, discard acidity is undiluted. The age of your discard directly controls the flavor intensity of the finished cracker.
Discard two to three days old produces a mild, lightly tangy cracker with a buttery finish that works for everyday snacking. Discard five to seven days old produces a noticeably sour cracker with flavor closer to sourdough bread.
Discard two weeks old creates an assertively sour cracker that pairs best with strong-flavored accompaniments like aged cheese or olive tapenade.
The Two-Stage Bake with Mid-Score: The Technique Most Recipes Miss
Standard cracker recipes ask you to either roll out dough and cut shapes before baking, or bake a full sheet and break it apart afterward.
Both approaches have real problems. Pre-cut shapes in a wet batter lose their edges during baking. Breaking a fully baked cracker sheet produces uneven pieces and large amounts of crumbs.
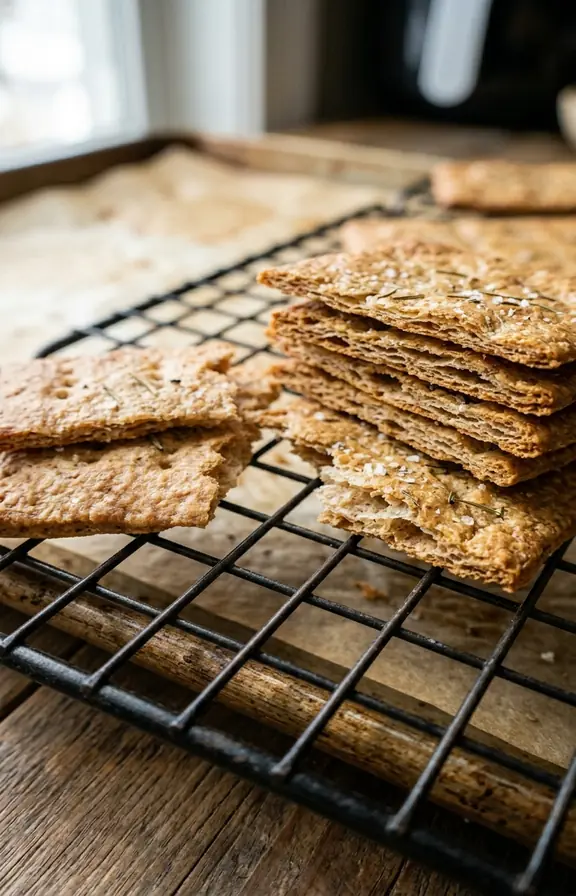
The two-stage bake solves this. Bake the spread batter for 10 to 12 minutes first, just until the surface is set and matte but not yet crispy. Then score with a pizza cutter while the surface is still hot and pliable. Return to the oven for the full second bake.
The scored lines hold their shape through the second bake and produce clean, uniform snap lines in the finished cracker. This method is used in professional crispbread production and almost never appears in home baking discard cracker recipes.
The Sensory Checkpoint Method for Doneness
The biggest mistake home bakers make with these crackers is pulling them from the oven too early because they look golden at the edges while the center is still pale.
Do not use the edges as your doneness indicator. Use the center.
When three or more of these cues align, your crackers are done regardless of what the timer says.
8 Flavor Variations Using the Same 3-Ingredient Base
The base recipe is deliberately neutral so you can steer the flavor in any direction.
All additions either mix into the batter in Step 2 or go on top as a finishing sprinkle before the first bake. Never add fresh garlic or fresh onion on top as they burn during the long low-heat second bake.
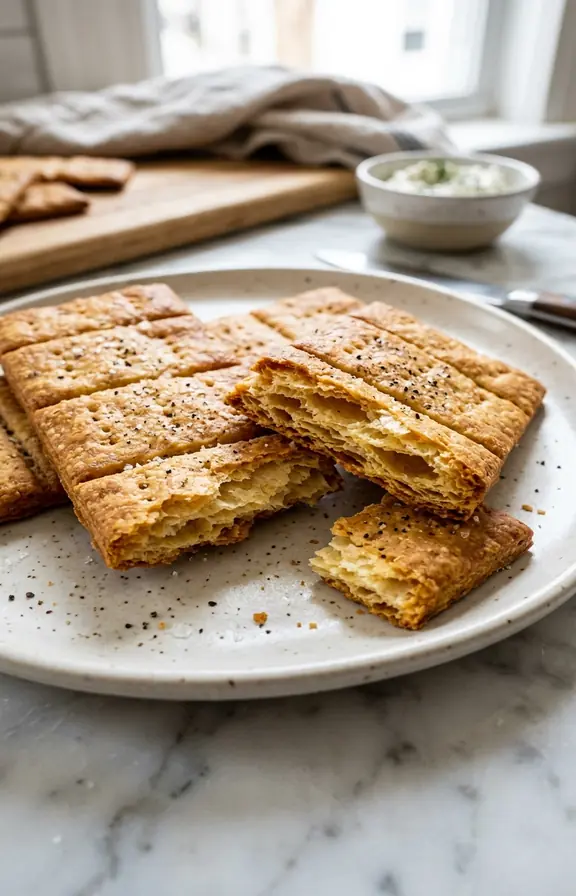
How to Serve These Crackers
The tangy fermented flavor of a no-flour discard cracker pairs exceptionally well with rich, creamy accompaniments that benefit from acid balance.
On a charcuterie board, these crackers work especially well alongside aged hard cheeses like manchego or sharp cheddar. Natasha’s Kitchen recommends pairing with hummus, tzatziki, whipped feta, or spinach artichoke dip for the best flavor contrast.
Crumble a handful into roasted tomato or lentil soup as a finishing topping. The thin, shatteringly crisp texture dissolves at the edges while the center stays crispy longer than croutons do.
Broken cracker pieces also work in place of everything bagel seasoning on avocado toast, adding crunch, tang, and salt in a single ingredient.
How to Store Without Losing the Crunch
Store completely cooled crackers in an airtight container at room temperature for up to seven days.
Never store in the refrigerator. The moisture environment in the fridge softens these crackers within one day regardless of how well they baked.
For longer storage, layer fully cooled crackers in a zip-close freezer bag and freeze for up to two months. Re-crisp directly from frozen at 300°F (150°C) for five to seven minutes. No thawing needed.
If crackers have softened at room temperature due to humidity, five minutes in a 300°F oven restores the original crunch completely.
Frequently Asked Questions
Sourdough Discard Crackers No Flour (3 Ingredients)
Make crispy, tangy no flour sourdough discard crackers with just 3 simple ingredients. This easy, no-waste recipe is quick, flavorful, and perfect for healthy snacking.
- Half-sheet pan (18 x 13 inch)
- Parchment paper
- Medium mixing bowl
- Whisk
- Offset spatula
- Pizza cutter or sharp knife
- Wire cooling rack
- 200g sourdough discard (unfed starter, refrigerator discard up to 2 weeks old)
- 2 tablespoons (28g) unsalted butter, melted and cooled to room temperature
- 1 teaspoon fine sea salt
- Flaky sea salt
- Dried rosemary, sesame seeds, or everything bagel seasoning
- Freshly cracked black pepper
- Step-1: Preheat and Prep Preheat your oven to 325°F (163°C). Line a half-sheet pan with parchment paper. Lightly brush the parchment with olive oil to prevent sticking and add a subtle crispness to the underside of the crackers.
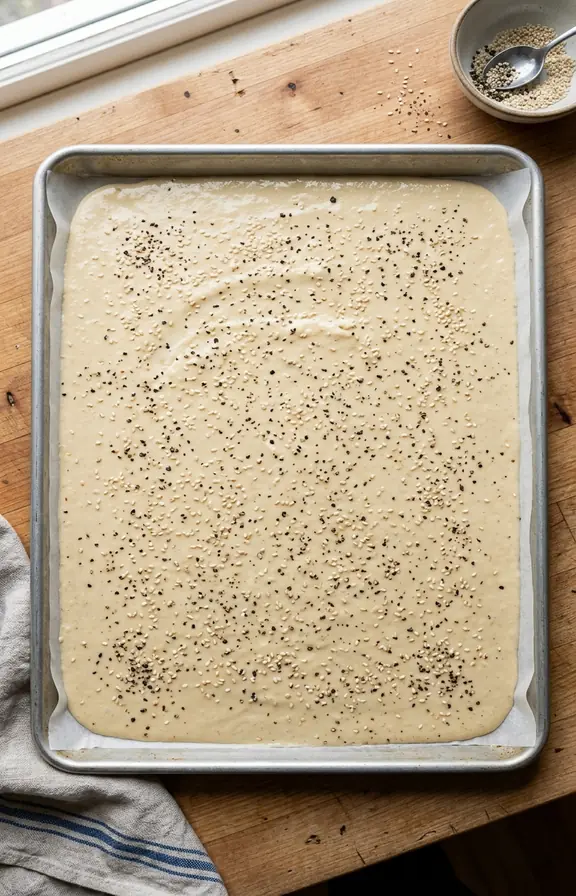
- Step-2: Mix the Batter Melt the butter and let it cool for two to three minutes. Add sourdough discard, cooled butter, and salt to a medium bowl. Whisk until fully combined and smooth. The consistency should be slightly thinner than pancake batter and pourable.
- Step-3: Spread Thin and Even Pour the batter onto the center of the prepared pan. Use an offset spatula to spread it into a thin, even layer approximately 1mm thick across most of the surface. Spend a full 60 seconds on this step. Uneven thickness is the primary cause of chewy patches.
- Step-4: Add Toppings Sprinkle your chosen toppings evenly over the unbaked batter now. Keep dried herbs and seeds as surface additions. Mix garlic powder or onion powder directly into the batter in Step 2 rather than sprinkling on top to prevent burning during the long bake.
- Step-5: First Bake Bake for 10 to 12 minutes until the batter loses its wet sheen and looks matte and set at the edges. The surface will not be crispy yet. Remove the pan from the oven and work quickly as the surface cools fast and becomes harder to score cleanly.
- Step-6: Score Into Crackers While the surface is still hot and pliable, use a pizza cutter to score into rectangles approximately 1.5 by 2 inches. Do not cut all the way through. This mid-bake scoring creates clean, uniform snap lines in the finished cracker without crumbling.
- Step-7: Second Bake Return the pan to the oven and bake for 30 to 45 additional minutes, checking every 10 minutes after the 30-minute mark. You are looking for uniform light golden-brown color from edge to center. Press a center cracker with your fingertip: done crackers feel completely firm and dry.
- Step-8: Cool Completely Remove from the oven and let crackers cool completely on the pan for at least 15 to 20 minutes before breaking apart. Crackers continue crisping as they cool. Breaking them warm makes them seem underbaked and leads to unnecessary extra oven time.
Nutritional values are estimates calculated using standard USDA food data. Actual values may vary based on specific ingredient brands and portion sizes.