Our site contains ads and uses Amazon affiliate links. We may earn a small commission at no extra cost to you. We know ads can be distracting, and we’re sorry for any inconvenience they cause. It helps us keep the site running. Thanks for your understanding and supporting us!
Recipe at a Glance
- Prep Time: 15 minutes
- Cook Time: 45 minutes
- Total Time: 12 hours (mostly hands-off)
- Servings: 1 loaf (8 slices)
- Diet Type: Vegan, vegetarian
- Cuisine: European
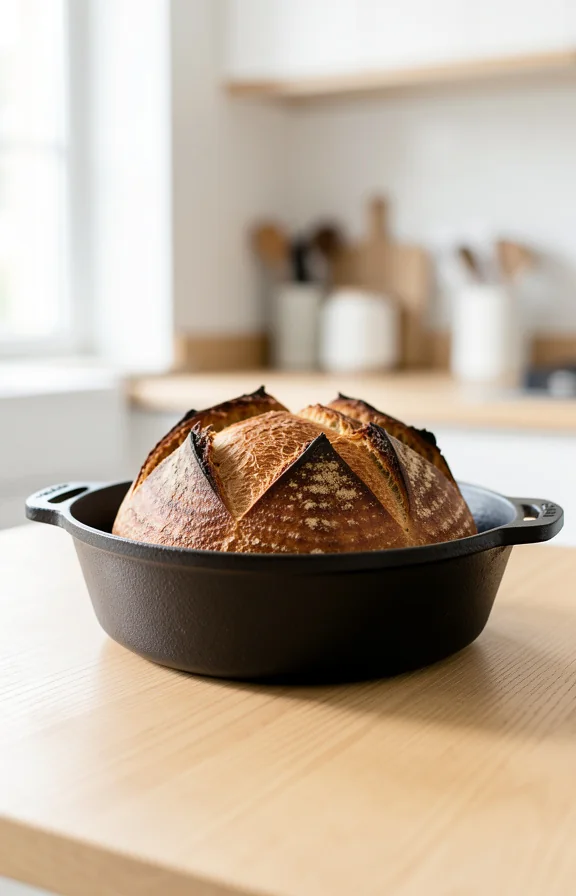
The aroma of crusty bread baking in a Dutch oven transforms any kitchen into a bakery.
Your first homemade loaf will have a crackling, golden exterior and tender crumb inside.
Dutch oven bread baking traps steam, creating that professional bakery crust you crave.
No special skills or equipment beyond what you likely own already. This recipe guides you through every step with confidence and results.
Why This Recipe Stands Out
- Long, cold fermentation develops deep flavor without commercial yeast intensity.
- Dutch oven traps steam for authentic bakery-style crust formation.
- Minimal kneading reduces hand fatigue and time commitment.
- High hydration dough creates open, irregular crumb structure naturally.
- No special bread flour required; all-purpose flour works perfectly.
Tips for Success
- Use room-temperature water between 70 and 75 degrees.
- Preheat your Dutch oven for at least 30 minutes.
- Score the dough deeply with a sharp knife or blade.
- Keep your Dutch oven lid on for the first 25 minutes.
- Use parchment paper to transfer dough without deflating it.
- Check water content by feel, not strict measurement rules.
Common Mistakes to Avoid
- Skipping the long fermentation results in bland, dense bread texture.
- Opening the oven door early releases steam needed for crust.
- Using boiling water on cold dough causes uneven cooking.
- Over-flouring your work surface creates a tough, thick crust.
- Removing the Dutch oven lid too early traps moisture inside.
- Shaping too aggressively deflates the dough and ruins structure.
Creative Serving Ideas
- Tear warm bread into chunks for olive oil dipping bowls.
- Toast thick slices and top with ricotta, berries, and honey.
- Make bread salad with tomatoes, cucumbers, and fresh basil.
- Serve alongside creamy soups for contrast in texture and temperature.
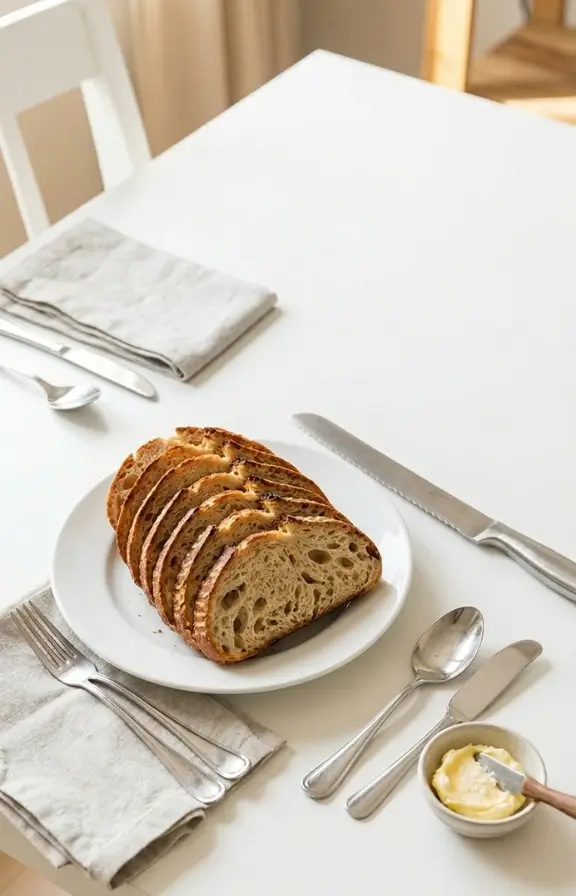
- Cut into thin slices for open-faced sandwiches with quality spreads.
- Cube and dry for homemade croutons in large batches.
Frequently Asked Questions
Can I use bread flour instead of all-purpose flour?
Yes, bread flour works beautifully and creates slightly chewier texture.
Reduce water by 1 tablespoon since bread flour absorbs more.
Your Dutch oven crusty bread will rise higher with bread flour.
My dough is too wet or sticky to handle easily.
This is normal and actually desired for open crumb structure.
Dust your hands with flour, not the dough itself.
Work gently and confidence grows with practice and repetition.
How do I store leftover bread properly?
Keep Dutch oven crusty bread in a paper bag for two days.
After that, wrap tightly in plastic wrap and freeze up to one month.
Reheat frozen slices in a 350-degree oven for 10 minutes.
Can I make this recipe without a Dutch oven?
You can use a covered baking vessel like a cloche.
A heavy stockpot with an oven-safe lid also works well.
Ensure whatever you use can handle 500-degree heat safely.
Is bread baking really suitable for absolute beginners?
Yes, this recipe intentionally minimizes complexity and technical skill required.
You only need a bowl, spoon, and Dutch oven.
Time does the heavy lifting, not difficult technique or precision.
Why does my crust shatter rather than crackle?
Score your dough deeper, about one-quarter inch into the surface.
Ensure your Dutch oven stays covered for the first half of baking.
The controlled steam release creates the desired crackling sound.
Can I refrigerate dough overnight instead of 12 hours?
Yes, overnight fermentation actually improves flavor development significantly.
Your Dutch oven crusty bread will taste even richer and deeper.
Remove from refrigerator 2 hours before baking for best results.
Ingredients You’ll Need
- 3 cups all-purpose flour
- 1 1/2 teaspoons salt
- 1/2 teaspoon instant yeast
- 1 1/2 cups room-temperature water
Tools to Use
- Large mixing bowl
- Dutch oven with lid
- Wooden spoon or spatula
- Kitchen scale (optional but helpful)
- Parchment paper
- Bread lame or sharp knife
- Instant-read thermometer (optional)
How to Make Dutch Oven Crusty Bread for Beginners
Step-1: Mix Your Dough Together
Combine flour, salt, yeast, and water in your mixing bowl.
Stir with a wooden spoon until no dry flour remains.
The dough will look shaggy, wet, and somewhat rough textured.
This is exactly what you want at this early stage.
Step-2: Let Dough Rest Overnight
Cover the bowl loosely with a kitchen towel or plastic wrap.
Leave at room temperature for 12 to 18 hours.
The dough rises slowly, becomes bubbly, and develops complex flavor.
You will see visible bubbles across the surface of dough.
Step-3: Turn Dough Onto Work Surface
Lightly flour your counter or cutting board with a dusting.
Tip the dough out gently onto the floured surface.
It will be sticky, loose, and spread out somewhat thin.
This high-hydration dough is the key to open crumb structure.
Step-4: Pre-Shape Your Dough Carefully
Fold the edges toward the center, rotating as you go.
Work gently to avoid deflating the precious air bubbles inside.
Repeat folding until the dough feels slightly taut and rounded.
This takes only 3 to 4 minutes of gentle work.

Step-5: Rest the Pre-Shaped Dough
Place the dough on a piece of parchment paper.
Let it rest for 30 minutes at room temperature.
This short rest makes final shaping much easier to accomplish.
Step-6: Final Shaping of Your Loaf
Flip the dough gently onto a clean, unfloured work surface.
Fold the top third down toward the center firmly.
Press that fold with the heel of your hand.
Fold the bottom third up and press again firmly.
Roll the dough toward you, sealing the seam with pressure.
Flip seam-side down onto the parchment paper now.
Step-7: Final Rise Before Baking
Cover loosely with a kitchen towel or plastic wrap.
Let the shaped dough rise for 2 to 4 hours.
Poke gently with your finger; it should spring back slowly.
This indicates readiness for the final baking stage ahead.
Step-8: Preheat Your Dutch Oven Thoroughly
Place your Dutch oven in the oven with the lid.
Preheat to 500 degrees Fahrenheit for at least 30 minutes.
A properly preheated Dutch oven creates steam for crust development.
Step-9: Score Your Dough for Expansion
Using a bread lame or very sharp knife, score decisively.
Make one confident slash about one-quarter inch deep diagonally.
This guides how the bread expands and creates a distinctive look.
Step-10: Transfer Dough to Hot Dutch Oven
Carefully remove the hot Dutch oven from your preheated oven.
Lift the parchment paper with your dough as one unit.
Lower it gently into the hot Dutch oven using the paper.
The parchment will brown but won’t catch fire at this temperature.
Step-11: Bake Covered for Steam Trapping
Replace the hot lid immediately onto the Dutch oven.
Bake for 25 minutes with the lid fully covering the pot.
This traps steam, creating the crispy exterior you are seeking.
Do not open the oven door during this critical time.
Step-12: Finish Baking Without the Lid
Carefully remove the hot lid using oven mitts or towels.
Bake uncovered for 20 to 25 minutes longer without lid.
The crust deepens to a rich, dark golden brown color.
The interior continues cooking while steam escapes gradually now.
Step-13: Cool Your Fresh Bread Completely
Remove the Dutch oven from the oven carefully using protection.
Lift the bread out using the parchment paper edges.
Let it cool on a wire rack for at least one hour.
Cooling allows the interior to firm up and set properly.
Cutting into warm bread releases steam and compresses the crumb.
Nutritional Information
- Calories per serving: 165
- Protein: 5 grams
- Fat: 0.5 grams
- Carbohydrates: 34 grams
- Fiber: 1 gram
- Sodium: 290 milligrams
- Sugar: 0 grams
Note: Nutritional values are approximate and may vary based on specific ingredient brands used.


