Our site contains ads and uses Amazon affiliate links. We may earn a small commission at no extra cost to you. We know ads can be distracting, and we’re sorry for any inconvenience they cause. It helps us keep the site running. Thanks for your understanding and supporting us!
Most Boston cream pie cupcakes fail in one of two spots. The pastry cream is undercooked and runs out the bottom by the time the cupcake reaches the table.
Or the ganache is poured on too hot and slides straight off the rounded top, leaving a bald cupcake and a puddle on the plate.
Neither problem comes from a bad recipe. It comes from skipping the temperature and timing details that actually control texture.
This recipe walks through the mechanics behind every step:
- why pastry cream needs a precise final temperature, not just a visual thickness check,
- how coring technique changes whether filling stays put or leaks,
- why a two-stage ganache application gives a cleaner finish than one thick pour,
- and how to assemble ahead without the cake going soggy.
Why Most Boston Cream Pie Cupcakes Leak Their Filling
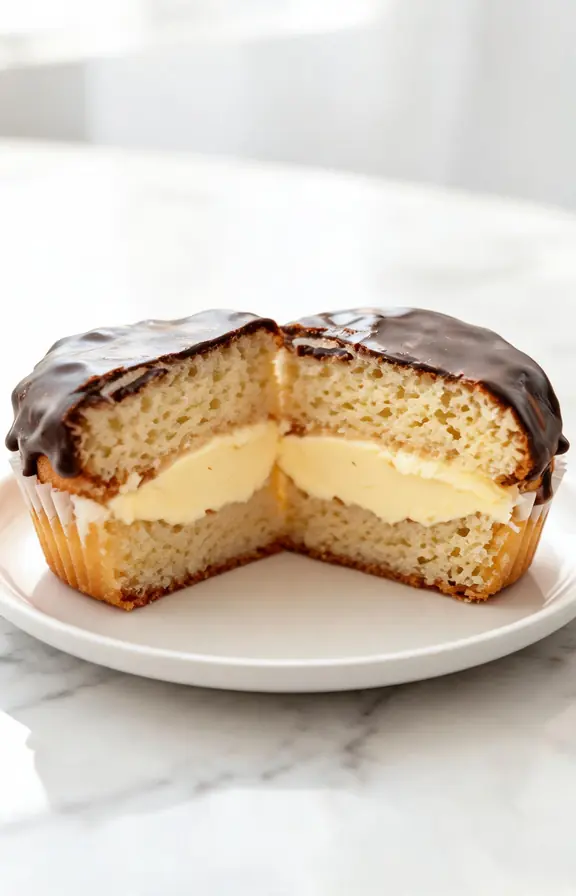
Boston cream pie cupcakes are really three separate desserts stacked into one bite: a moist vanilla cupcake, a cooked custard filling, and a set chocolate topping.
Each one has its own science, and they only work together if every component is fully finished before assembly.
The filling is where most home bakers get tripped up. Pastry cream looks thick on a spoon well before it has actually finished cooking, which tempts people to pull it off the heat early.
That early cream sets up soft in the bowl but turns watery again once it warms slightly inside a piped cupcake, which is exactly why so many filled cupcakes weep a thin puddle onto the serving tray.
Pastry Cream Science: What Actually Happens Inside the Saucepan
Cornstarch granules are tightly packed and inert at room temperature. As the milk mixture heats past roughly 144°F, those granules begin absorbing liquid and swelling.
Starch granules fully swell between 185°F and 205°F, so aiming for a final temperature of 190 to 200°F ensures the pastry cream sets with a smooth, stable texture once cooled, which is why a thermometer is more reliable here than a visual check.
Egg yolks are doing their own work at the same time. The proteins inside them unfold and link together into a soft gel as they heat, and that gel structure is what gives pastry cream its rich, custardy body instead of a thin, starchy paste.
This is also why constant whisking matters more than constant high heat. Steady motion keeps the egg proteins moving so they coagulate evenly across the whole pot instead of scrambling against the hot bottom of the saucepan.
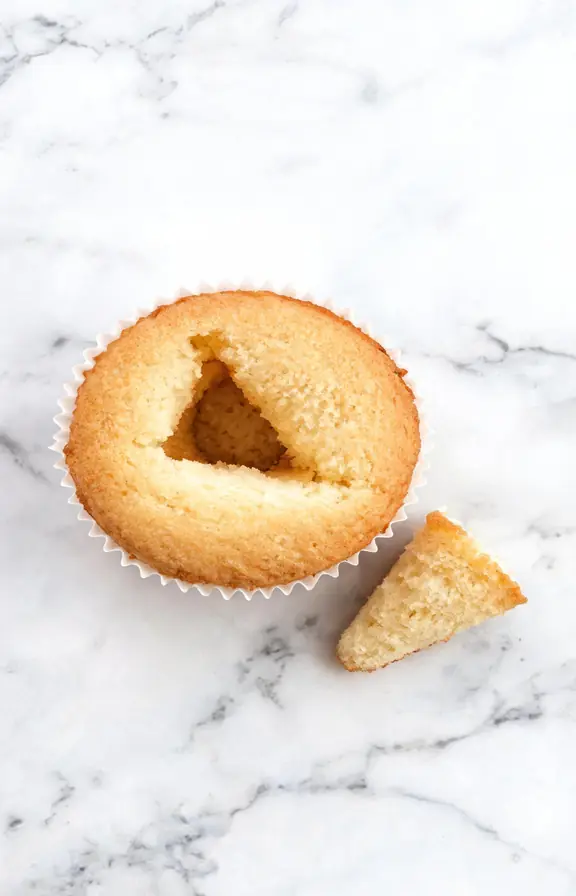
Coring Technique: Knife vs Cupcake Corer vs Apple Corer
This comparison rarely shows up in standard recipes, but it changes how well your filling stays inside the cake.
A straight-walled cupcake corer or apple corer punches a clean cylindrical hole all the way through the crumb. That shape is easy to fill, but it also gives the pastry cream a direct, unobstructed path straight down through the bottom liner.
A paring knife cut at a slight inward angle creates a cone-shaped cavity that is wider at the top and narrower toward the base. The narrow bottom acts like a natural plug, holding the filling above the point where it could escape through the paper liner.
Twist the knife tip in a small circle as you cut to widen the top of the cone without enlarging the base. Remove the plug, trim its bottom third off, and set the trimmed cap aside to use as a lid after piping in the filling.
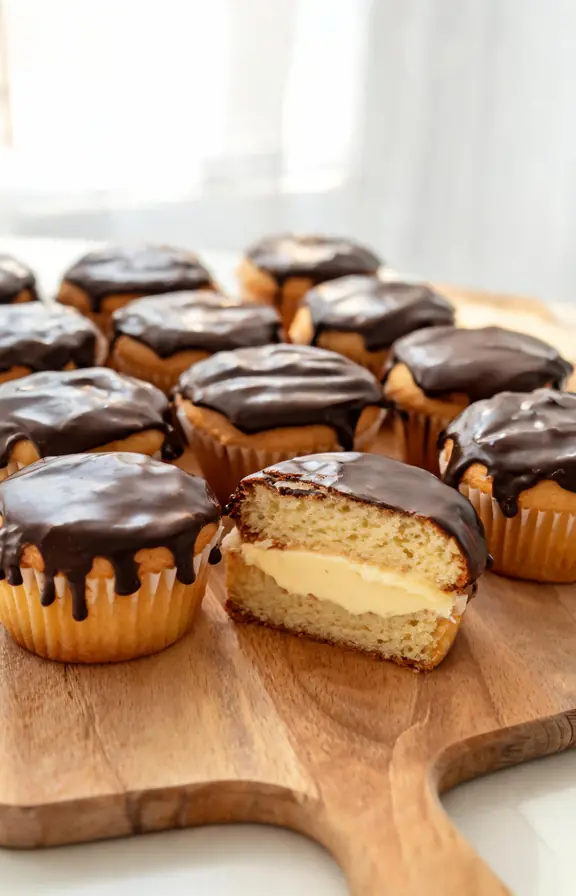
The Two-Stage Ganache: Why One Thick Pour Fails on a Domed Cupcake
A standard cupcake top is rounded, not flat, and gravity is working against you the moment hot ganache hits that curve.
Pour one thick layer of warm ganache straight onto the dome, and most of it slides down the sides instead of sitting on top where you want the shine.
The fix used by professional bakeries is a two-stage application. A ganache with a higher ratio of chocolate to cream will end up forming a more firm ganache, while a ganache with much more cream than chocolate will form a more fluid, softer ganache.
Use a thin, pourable ganache first as a glaze coat. Dip just the tops of the cupcakes and let that layer set in the refrigerator for 10 minutes before piping a thicker, slightly cooled ganache rosette on top for height and shine.
Assembling Ahead Without Soggy Cupcakes
Boston cream pie cupcakes are a multi-component bake, so timing the assembly matters as much as the individual recipes.
Bake and cool the cupcakes up to two days ahead, then store them unfilled in an airtight container at room temperature. The pastry cream can be made up to three days ahead and kept tightly covered with plastic wrap pressed directly onto its surface to stop a skin from forming.
Core and fill the cupcakes no more than 24 hours before serving. Filling too far ahead lets moisture from the custard migrate into the surrounding crumb, which softens the cake past the point of holding its shape.
Apply the ganache glaze coat the same day you plan to serve, ideally within two to three hours of eating. The glaze stays glossiest in that window, and refrigeration beyond a day or two will gradually dull the shine as the cocoa butter crystals continue settling.
Frequently Asked Questions
Boston Cream Pie Cupcakes
Tender vanilla cupcakes cored and piped with rich pastry cream, finished with a glossy two-stage chocolate ganache. A bakery-style treat in individual portions.
- Standard muffin pan and cupcake liners
- Stand mixer or electric hand mixer
- Medium saucepan
- Fine mesh strainer
- Instant-read or candy thermometer
- Paring knife
- Piping bag with round and star tips
- Wire cooling rack
- 1 1/2 cups (190g) all-purpose flour
- 1 1/2 teaspoons (6g) baking powder
- 1/4 teaspoon (1.5g) fine sea salt
- 1/2 cup (113g) unsalted butter, softened
- 3/4 cup (150g) granulated sugar
- 2 large eggs, room temperature
- 2 teaspoons (8g) vanilla extract
- 1/2 cup (120ml) whole milk, room temperature
- 2 cups (480ml) whole milk
- 1/2 cup (100g) granulated sugar, divided
- 1/4 cup (32g) cornstarch
- Pinch fine sea salt
- 4 large egg yolks
- 2 tablespoons (28g) unsalted butter
- 1 1/2 teaspoons (6g) vanilla extract
- 8 oz (227g) semisweet chocolate, finely chopped, divided
- 3/4 cup (180ml) heavy cream, divided
- 1 tablespoon (14g) unsalted butter
- Make the pastry cream Heat the milk and half the sugar in a saucepan over medium heat until steaming. In a bowl, whisk the egg yolks, remaining sugar, cornstarch, and salt until pale. Slowly stream the hot milk into the yolk mixture while whisking constantly to temper. Return everything to the saucepan and cook over medium heat, whisking constantly, until it reaches a full boil. Continue boiling and whisking for a full 60 seconds and a temperature of 180°F to 190°F. Remove from heat and stir in the butter and vanilla. Strain through a fine mesh sieve into a bowl, press plastic wrap directly onto the surface, and chill at least 2 hours.
- Bake the cupcakes Preheat the oven to 350°F and line a muffin pan with 14 liners. Whisk the flour, baking powder, and salt together and set aside. Cream the butter and sugar on medium speed for 3 minutes until light and fluffy. Beat in the eggs one at a time, then the vanilla. Add the flour mixture in three additions, alternating with the milk in two additions, mixing just until combined after each. Divide the batter evenly among the liners, filling each about two-thirds full. Bake for 16 to 19 minutes until a toothpick comes out clean. Cool in the pan for 5 minutes, then transfer to a wire rack to cool completely.
- Core the cupcakes Once the cupcakes are fully cooled, use a paring knife to cut a cone-shaped cavity into the top of each, angling the knife slightly inward as you go. Twist gently to widen the top of the cone without enlarging the base. Remove the cake plug, trim away the bottom third, and set the trimmed cap aside.
- Fill with pastry cream Whisk the chilled pastry cream briefly to loosen it, then transfer it to a piping bag fitted with a round tip. Pipe the filling into each cavity until it just reaches the top of the cupcake. Replace the trimmed cake cap on top to seal the filling inside.
- Make the glaze ganache Place 4 oz of the chopped chocolate in a heatproof bowl. Heat 1/3 cup of the cream just to a simmer and pour it over the chocolate. Let sit undisturbed for 2 minutes, then whisk gently from the center outward until smooth and glossy. Let the glaze cool for 5 minutes until slightly thickened but still pourable.
- Glaze and chill Dip the top of each filled cupcake into the glaze, twisting slightly to coat evenly. Set on a wire rack and let the glaze firm up at room temperature for 15 minutes before refrigerating for 10 minutes.
- Make the topping ganache and pipe Heat the remaining cream and pour over the remaining chocolate and the butter. Let sit for 2 minutes, then whisk gently until smooth. Cool for 10 to 15 minutes until thickened enough to hold a piped shape but still soft. Transfer to a piping bag fitted with a star tip and pipe a small rosette onto the center of each glazed cupcake.
- Chill before serving Refrigerate the finished cupcakes for at least 30 minutes to set the ganache and firm the filling. Let sit at room temperature for about 20 minutes before serving for the best texture.
Nutritional values are estimates calculated using standard USDA food composition data. Actual values will vary based on specific brands used and exact cupcake size after baking.