Our site contains ads and uses Amazon affiliate links. We may earn a small commission at no extra cost to you. We know ads can be distracting, and we’re sorry for any inconvenience they cause. It helps us keep the site running. Thanks for your understanding and supporting us!
📊Recipe at a Glance
- Prep Time: 15 minutes
- Cook Time: 15 minutes
- Total Time: 30 minutes (plus 1 hour chilling time)
- Servings: 20 bites
- Diet Type: Vegetarian, Gluten-Free
- Cuisine: Fusion
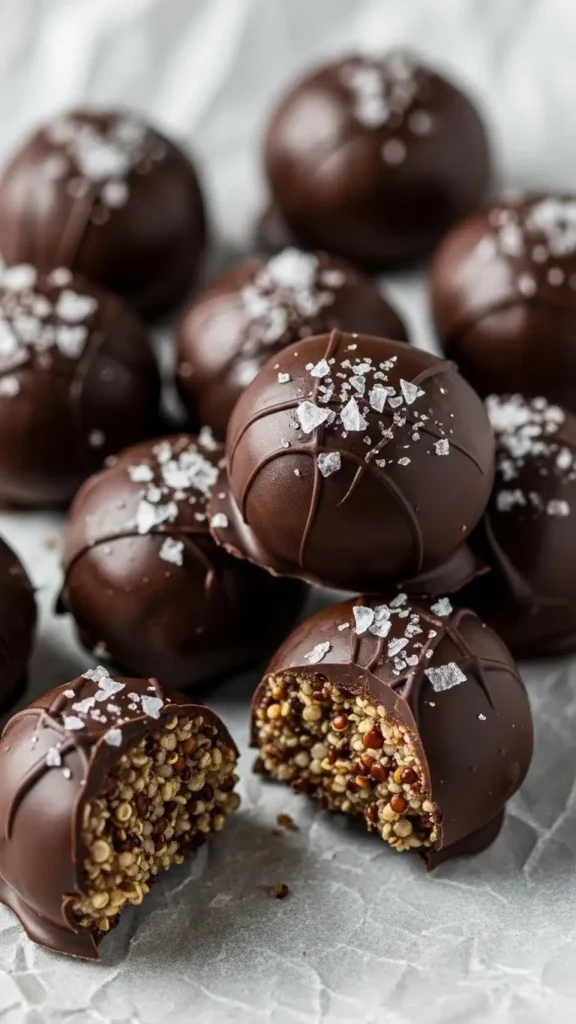
These dark chocolate quinoa bites are the perfect guilt-free treat that combines nutrition with indulgence.
Crispy quinoa meets rich, velvety dark chocolate in every bite-sized morsel.
The subtle crunch of toasted quinoa contrasts beautifully with the smooth chocolate coating.
These energy-packed bites make an ideal snack for busy mornings, post-workout fuel, or a healthier dessert option.
No baking required, and they store beautifully in your freezer for weeks.
Why This Recipe Stands Out
- Nutrient-Dense Powerhouse: Quinoa provides complete protein with all nine essential amino acids, while dark chocolate delivers antioxidants and minerals.
- No-Bake Convenience: Ready in just 30 minutes of active time with minimal cleanup required.
- Naturally Sweetened: Uses honey or maple syrup instead of refined sugar for a wholesome sweetness.
- Customizable Base: Easily adaptable with your favorite mix-ins like nuts, seeds, or dried fruit.
- Perfect Portion Control: Individual bites help manage serving sizes while satisfying chocolate cravings.
- Freezer-Friendly: Make a large batch and store for up to three months for instant healthy snacks.
Ingredients You’ll Need
For the Quinoa Base:
- 1 cup cooked quinoa, cooled
- 1/2 cup rolled oats
- 1/4 cup almond butter or peanut butter
- 3 tablespoons honey or maple syrup
- 2 tablespoons coconut oil, melted
- 1 teaspoon vanilla extract
- 1/4 teaspoon sea salt
- 2 tablespoons chia seeds (optional)
For the Chocolate Coating:
- 1 1/2 cups dark chocolate chips (70% cacao or higher)
- 1 tablespoon coconut oil
Optional Toppings:
- Sea salt flakes
- Crushed nuts
- Shredded coconut
- Cacao nibs
Tools to Use
- Medium saucepan
- Large mixing bowl
- Baking sheet
- Parchment paper
- Cookie scoop or tablespoon
- Double boiler or microwave-safe bowl
- Fork or dipping tool
- Wire cooling rack
How to Make the Dark Chocolate Quinoa Bites
Step-1: Prepare and Toast the Quinoa
Cook quinoa according to package directions if not already prepared.
Spread the cooked quinoa on a baking sheet lined with parchment paper.
Let it cool completely to room temperature.
For extra crunch, toast the cooled quinoa in a dry skillet over medium heat for 3-4 minutes, stirring frequently.
The quinoa should turn golden and smell nutty.
Transfer to a large mixing bowl.
Step-2: Mix the Base Ingredients
Add rolled oats to the bowl with cooled quinoa.
Pour in the almond butter, ensuring it’s at room temperature for easy mixing.
Drizzle the honey and melted coconut oil over the mixture.
Add vanilla extract and sea salt.
Sprinkle in chia seeds if using for added nutrition and binding.
Stir everything together vigorously until well combined and the mixture holds together when pressed.
Step-3: Shape the Bites
Line a baking sheet with fresh parchment paper.
Using a cookie scoop or tablespoon, portion out about 1 tablespoon of mixture per bite.
Roll each portion between your palms to form smooth, compact balls.
Apply firm pressure while rolling to ensure the bites hold together.
Place each ball on the prepared baking sheet, spacing them about an inch apart.
Transfer the baking sheet to the freezer for 30 minutes to firm up.
Step-4: Melt the Chocolate
Set up a double boiler by placing a heat-safe bowl over a pot of simmering water.
Alternatively, use a microwave-safe bowl for quicker melting.
Add dark chocolate chips and coconut oil to the bowl.
If using a double boiler, stir constantly until chocolate is completely smooth and glossy.
For microwave method, heat in 30-second intervals, stirring between each interval.
The chocolate should be fluid but not too hot.
Let it cool for 2-3 minutes before dipping.
Step-5: Coat the Bites
Remove the chilled quinoa balls from the freezer.
Working quickly, drop one bite at a time into the melted chocolate.
Use a fork to roll the bite in chocolate, coating it completely.
Lift the bite with the fork, allowing excess chocolate to drip back into the bowl.
Gently tap the fork on the bowl’s edge to remove more excess.
Place the coated bite back on the parchment-lined baking sheet.
Repeat with remaining bites.

Step-6: Add Toppings and Set
While the chocolate coating is still wet, sprinkle your chosen toppings over each bite.
Sea salt flakes add a sophisticated sweet-salty contrast.
Work quickly as the chocolate sets fast.
Once all bites are coated and topped, return the baking sheet to the freezer.
Freeze for at least 30 minutes until the chocolate is completely hardened.
The bites should have a shiny, firm shell.
Step-7: Store Properly
Transfer the hardened bites to an airtight container.
Layer them with parchment paper between each layer to prevent sticking.
Store in the refrigerator for up to 2 weeks.
For longer storage, keep them in the freezer for up to 3 months.
Allow frozen bites to sit at room temperature for 5 minutes before eating.
The texture is perfect when slightly chilled but not frozen solid.
Related Recipes You’ll Love to Try
- Easy Keto Coconut Flour Cookies That Taste Like a Treat, Not a Diet
- Vegan Coconut Chocolate Brownies: Rich, Fudgy & Completely Dairy-Free
- Sweet, Simple & No-Bake: Peanut Butter Banana Bites You’ll Make on Repeat
- Soft, Sweet & High-Protein: Easy Vanilla Protein Mug Cake
Nutritional Information
Per Serving (1 bite):
- Calories: 95
- Protein: 2g
- Total Fat: 6g
- Carbohydrates: 10g
- Fiber: 2g
- Sugar: 5g
- Sodium: 25mg
Note: Nutritional values are approximate and vary based on specific ingredients used.
Tips for Success
- Use Dry Quinoa: Excess moisture prevents the bites from holding together properly. Pat cooked quinoa with paper towels if needed.
- Room Temperature Nut Butter: Cold nut butter won’t mix evenly. Let it sit out for 15 minutes before using.
- Don’t Skip Chilling: Freezing the bites before dipping makes coating much easier and prevents crumbling.
- Quality Chocolate Matters: Choose chocolate with at least 70% cacao for best flavor and health benefits. Lower quality chocolate may seize or taste waxy.
- Add Coconut Oil to Chocolate: This creates a thinner, smoother coating that hardens with a satisfying snap.
- Work in Batches: Keep half the bites in the freezer while coating the other half to maintain firmness.
- Test Consistency First: Roll one bite before shaping all of them. If the mixture doesn’t hold, add more nut butter or a splash of honey.
- Cool Chocolate Slightly: If chocolate is too hot, it will melt the quinoa base. Let it cool for 2-3 minutes after melting.
Common Mistakes to Avoid
- Using Hot Quinoa: Warm quinoa creates a mushy mixture that won’t form proper bites. Always cool it completely first.
- Skipping the Binding Agent: Nut butter and honey act as binders. Reducing these makes crumbly bites that fall apart.
- Overheating Chocolate: Chocolate burned above 120°F becomes grainy and dull. Use low heat and stir constantly.
- Not Pressing Firmly: Loosely packed bites crumble when dipping. Press and roll firmly to create dense, cohesive balls.
- Dipping Warm Bites: Room temperature bites melt the chocolate coating and create a messy appearance.
- Using Water Near Chocolate: Even a single drop of water causes chocolate to seize and become unusable. Keep all tools completely dry.
- Coating Too Thickly: Multiple thin coats work better than one thick coat that slides off. Let the first coat set, then add a second if desired.
- Storing at Room Temperature: These bites soften and lose their shape without refrigeration, especially in warm climates.
Creative Serving Ideas
- Breakfast Bowl Topper: Crumble bites over Greek yogurt with fresh berries for a protein-packed morning meal.
- Trail Mix Addition: Chop bites into quarters and mix with nuts, seeds, and dried fruit for hiking fuel.
- Ice Cream Garnish: Place whole bites on top of vanilla nice cream or frozen yogurt for textural contrast.
- Gift Boxes: Arrange in small boxes with tissue paper for homemade gifts. They look elegant and taste luxurious.
- Party Platter: Serve alongside fresh strawberries, orange slices, and mint leaves on a dessert board.
- Smoothie Bowl Enhancement: Press whole bites into thick smoothie bowls for an Instagram-worthy presentation.
- Coffee Companion: Serve two bites with afternoon coffee or tea as a sophisticated pick-me-up.
- Lunchbox Treat: Pack 2-3 bites in kids’ lunches as a healthier alternative to candy bars.
- Post-Workout Snack: Eat 3-4 bites within 30 minutes after exercise for quick energy and protein.
- Dessert Board Centerpiece: Arrange on a wooden board with fresh fruit, dark chocolate squares, and nut butter for dipping.
Frequently Asked Questions
Can I Use Uncooked Quinoa for This Recipe?
No, uncooked quinoa will be too hard and crunchy to bite through comfortably.
Always cook the quinoa fully first, then cool and optionally toast it for texture.
Raw quinoa also has a bitter coating that needs to be removed through rinsing and cooking.
How Do I Make These Bites Vegan?
Simply replace honey with maple syrup or agave nectar in the same amount.
Ensure your dark chocolate is dairy-free by checking the label for milk ingredients.
Most dark chocolate above 70% cacao is naturally vegan but always verify.
Can I Substitute the Quinoa With Another Grain?
Yes, cooked brown rice, millet, or amaranth work as alternatives.
Rice creates a slightly softer texture while amaranth adds more earthiness.
The texture will differ slightly from quinoa but the recipe still works well.
Why Are My Bites Falling Apart?
The mixture likely needs more binding agents like nut butter or honey.
Add one tablespoon at a time until the mixture holds together when squeezed.
Insufficient chilling time can also cause structural issues during coating.
Can I Use Milk Chocolate Instead of Dark?
Yes, though milk chocolate is sweeter and less nutritious than dark chocolate.
It also melts at a lower temperature, so be extra careful not to overheat it.
The bites will have a milder chocolate flavor with milk chocolate.
How Long Do These Bites Last?
Refrigerated bites stay fresh for up to 2 weeks in an airtight container.
Frozen bites maintain quality for up to 3 months without flavor loss.
Always store with parchment paper between layers to prevent sticking.
Can I Add Protein Powder to This Recipe?
Yes, add 2-3 tablespoons of protein powder to the base mixture.
You may need to increase the wet ingredients slightly for proper consistency.
Chocolate or vanilla protein powder works best with the flavor profile.
What If My Chocolate Coating Is Too Thick?
Add more coconut oil, one teaspoon at a time, stirring until you reach desired consistency.
The chocolate should be fluid enough to drip smoothly off a spoon.
Reheating gently can also help thin chocolate that has started to set.


