Our site contains ads and uses Amazon affiliate links. We may earn a small commission at no extra cost to you. We know ads can be distracting, and we’re sorry for any inconvenience they cause. It helps us keep the site running. Thanks for your understanding and supporting us!
Recipe at a Glance
- Prep Time: 30 minutes (plus 12-18 hours fermentation)
- Cook Time: 45 minutes
- Total Time: 13-19 hours (mostly hands-off)
- Servings: 1 loaf (10-12 slices)
- Diet Type: Vegan, Dairy-Free
- Cuisine: American Artisan
Father’s Day brunch starts the night before, when your dough quietly does its work.
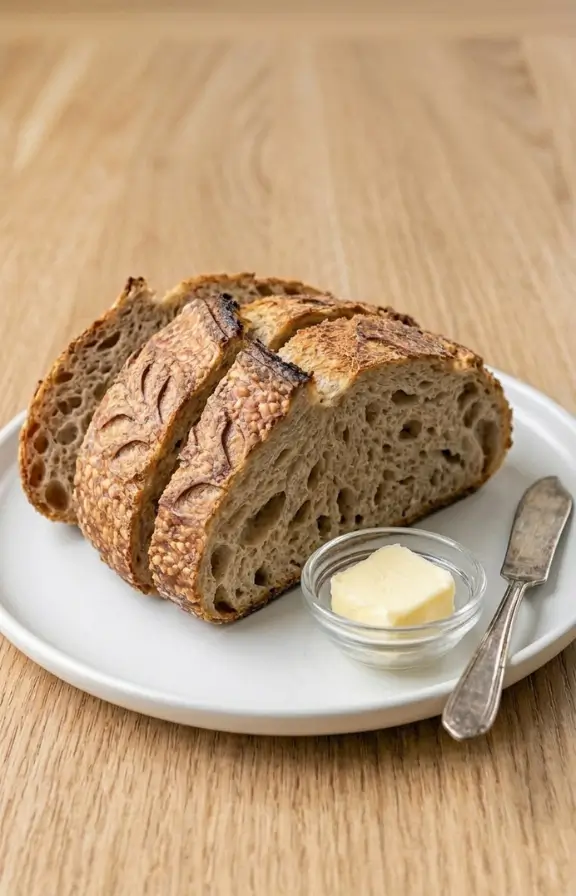
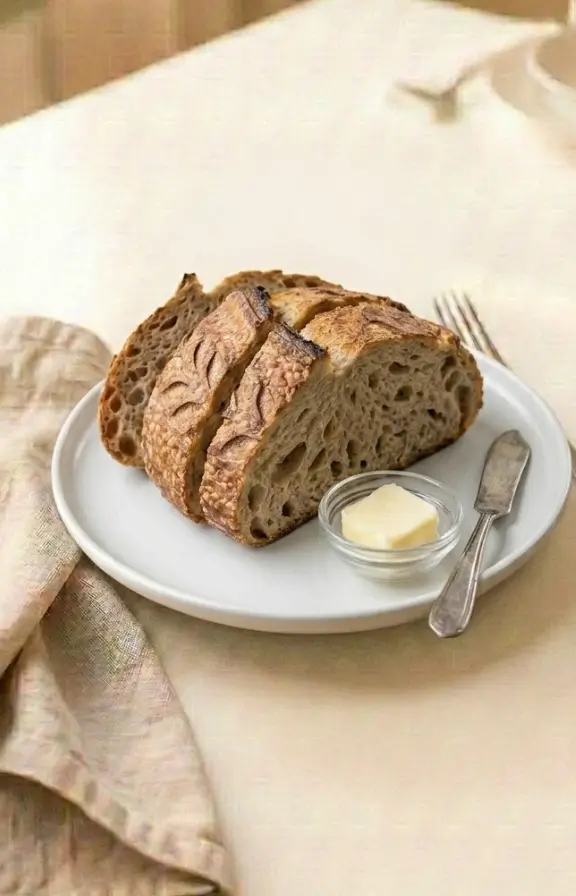
By morning, Dutch oven sourdough bread fills the kitchen with a smell no store-bought loaf can match.
The crackling crust and open, tangy crumb make this the kind of gift you eat with your hands. It needs just 4 ingredients and mostly asks you to wait.
Why This Recipe Stands Out
- The Dutch oven acts as a steam chamber. It traps moisture from the dough during the first 20 minutes of baking. This keeps the crust soft long enough for the bread to fully rise before it crisps and browns.
- No commercial yeast is used. The wild yeast in your sourdough starter drives fermentation. This creates a deeper, more complex tang than any store-bought bread flour recipe can achieve.
- Stretch-and-fold replaces kneading. You build gluten structure through a series of gentle folds over time. This method requires no strength or special technique, just a little patience between folds.
- Overnight cold proofing develops flavour. Placing shaped dough in the fridge slows fermentation overnight. The result is a more complex, sour crumb with a better rise in the oven the next morning.
- High heat creates a bakery-style ear. Starting at 500°F for the first 20 minutes causes rapid oven spring. This pushes the scored crust upward into the dramatic, blistered ear that defines an artisan boule.
Tips for Success
- Feed your starter 8–12 hours before mixing. Your starter should be at peak activity domed on top, bubbly throughout, and roughly doubled in size. Using starter past its peak means sluggish fermentation and a dense crumb.
- Use a kitchen scale, not measuring cups. Bread flour absorbs water differently based on brand and humidity. Weighing your flour to the gram removes that variable and gives you consistent results every time.
- Keep the dough temperature between 75°F and 80°F during bulk fermentation. If your kitchen is cool, place the covered dough in the oven with only the oven light on. This provides steady, gentle warmth without activating any heat element.
- Wet your hands before every fold, not flour them. Damp hands grip sticky dough without adding excess flour to the surface. Too much added flour tightens the dough and reduces the final crumb openness.
- Score at a 45-degree angle, not straight down. A shallow, angled cut with a lame or sharp razor guides the bread to open along the score rather than burst randomly at the sides.
- Use parchment paper as a sling to load the dough. Lower the dough gently into the preheated Dutch oven using the paper edges as handles. This protects your hands from the extremely hot cast iron and prevents deflating the loaf.
Common Mistakes to Avoid
- Using an underripe or overripe starter. Many bakers add starter before it peaks or after it has collapsed. An underripe starter lacks enough wild yeast to leaven the dough. An overripe one has exhausted its food supply and produces a flat, overly sour loaf.
- Cutting the bread straight from the oven. The interior of a sourdough loaf is still setting when it leaves the Dutch oven. Slicing it before it cools for at least one hour causes the steam inside to escape, turning the crumb gummy and dense.
- Removing the lid too early during baking. Some bakers lift the lid at 15 minutes to check progress. This releases the trapped steam the bread needs to rise fully. The result is a loaf that browns before it finishes springing, producing a thick, tight crust over a dense interior.
- Skipping the cold proof after shaping. Bakers in a hurry sometimes skip refrigeration and bake after a short room-temperature proof. Cold dough holds its shape when dropped into the Dutch oven and produces more dramatic oven spring than warm dough does.
- Adding too much flour during shaping. Excess bench flour during the shaping stage prevents the dough from building surface tension. Without that tension, the boule spreads flat instead of holding a tall, round shape.
Creative Serving Ideas for Father’s Day Brunch
- Build a smoked salmon board around the loaf. Slice the boule thick and set it at the center of a board with cream cheese, capers, red onion, and dill. Let dad assemble each bite at his own pace.
- Use thick slices for a Father’s Day eggs Benedict base. The dense, tangy crumb holds poached eggs and hollandaise without turning soggy the way English muffins do. Toast the slices lightly first for a sturdier base.
- Serve warm with whipped brown butter and sea salt. Beat softened butter until fluffy, fold in a pinch of flaky salt, and present it alongside the just-sliced loaf. The contrast of warm crumb and cold, airy butter is worth the extra five minutes.
- Score a message or design into the top before baking. Use a lame or small knife to carve a simple design, the word “Dad,” or a monogram into the dough just before it goes into the Dutch oven. The score blooms open beautifully during baking.
- Pair with a soft-boiled egg flight. Serve 3-4 eggs at different cook times. 6-minute, 8-minute, and 10-minute, each sliced and lined up next to torn bread pieces. It turns brunch into an interactive tasting moment.
Frequently Asked Questions
Can I Use All-Purpose Flour Instead of Bread Flour?
Yes, all-purpose flour works and many bakers use it exclusively for Dutch oven sourdough bread.
Bread flour has a higher protein content, which gives a slightly chewier crumb and better structure.
If using all-purpose, reduce the water by about 10 grams to account for the lower absorption rate.
My Starter Is New – Is It Ready to Bake With?
A starter needs to pass the float test before it is strong enough to leaven bread.
Drop a small spoonful into a glass of water – if it floats, it is ready to use.
Most starters need at least 7–10 days of regular feeding before they are reliably active.
What Size Dutch Oven Do I Need?
A 5-quart to 7-quart Dutch oven is ideal for a standard sourdough boule.
A pot that is too small crowds the dough and causes it to press against the walls as it rises.
A larger pot gives the dough an air buffer on all sides, which promotes even heat distribution.
Can I Make This Sourdough Bread Ahead for Father’s Day?
Yes, mix and shape the dough on the evening before Father’s Day and refrigerate overnight.
Bake it the next morning directly from the fridge, with no need to bring it to room temperature first.
The baked loaf stays fresh at room temperature for 2–3 days wrapped in a clean kitchen towel.
Why Is My Crust Soft After Baking?
A soft crust usually means too much moisture remained in the oven after the lid came off.
In the last 10 minutes of baking, crack the oven door slightly to let steam escape.
You can also place the finished loaf directly on the oven rack for 5 minutes after baking for extra crispness.
How Do I Know When the Bread Is Fully Baked?
The safest method is using a digital thermometer inserted into the center of the loaf.
The target internal temperature for Dutch oven sourdough bread is between 205°F and 210°F.
You can also tap the bottom of the loaf – a hollow sound indicates the crumb has set completely.
Can I Add Mix-Ins Like Seeds or Herbs?
Seeds, dried herbs, and even cheese can be added during the second or third fold of bulk fermentation.
Sprinkle your add-ins over the dough before folding so they incorporate without tearing the gluten structure.
Rosemary and flaky salt, sesame seeds, or toasted sunflower seeds are especially popular with artisan sourdough.
Ingredients You’ll Need
- 500g (4 cups) bread flour or unbleached all-purpose flour
- 375g (1½ cups + 1 tbsp) lukewarm water (about 80°F)
- 100g (½ cup) active sourdough starter, at peak activity
- 10g (1¾ tsp) fine sea salt
- Rice flour or cornmeal, for dusting the proofing basket
- Extra flour or water for hands during folding
Tools to Use
- Digital kitchen scale
- Large mixing bowl
- Banneton proofing basket (9-inch round) or a bowl lined with a floured towel
- 5–7 quart Dutch oven with lid
- Parchment paper
- Bread lame or sharp razor blade
- Digital thermometer
- Wire cooling rack
- Bench scraper (optional)
- Oven mitts
How to Make Dutch Oven Sourdough Bread
Step-1: Feed Your Starter (8–12 Hours Before Mixing)
Discard all but 50g of your sourdough starter. Add 50g of water and 50g of flour, stir until smooth, and cover loosely.
Leave it at room temperature for 8 to 12 hours. It is ready when it has doubled, smells yeasty, and passes the float test.
Step-2: Mix the Dough
In a large bowl, combine the lukewarm water and starter.
Stir until the starter is fully dissolved and the mixture looks slightly frothy.
Add the bread flour and stir with a wooden spoon until no dry flour remains.
The dough will be shaggy and rough – this is correct. Cover the bowl and rest for 30 minutes.
Step-3: Add Salt and Begin Bulk Fermentation
Sprinkle the sea salt evenly over the rested dough. Work it in with wet fingers until fully incorporated, about 2 minutes.
Cover the bowl with a damp towel or plastic wrap. Begin bulk fermentation at room temperature for 4 to 6 hours total.
Step-4: Stretch and Fold (4 Sets, 30 Minutes Apart)
With damp hands, grab one side of the dough, stretch it upward, and fold it over the center.
Rotate the bowl 90 degrees and repeat until all four sides have been folded once.
This counts as one set. Complete 4 sets total, spaced 30 minutes apart, during the first 2 hours of bulk fermentation.
Step-5: Rest and Check for Rise
After the final fold, leave the dough undisturbed and covered for 2 to 4 more hours.
The dough is ready when it has increased by 50–75% in size and looks airy and domed.
You should see bubbles beneath the surface and along the walls of the bowl.
Do not move forward if the dough has not risen noticeably – give it more time.
Step-6: Shape the Boule
Gently turn the dough onto a clean, unfloured surface.
Lightly flour your hands and use a bench scraper to fold the edges inward toward the center.
Flip the dough seam-side down and use your hands to drag it toward you in a circular motion.
This builds surface tension and forms a tight, round boule shape.
Step-7: Load into Banneton and Cold Proof Overnight
Dust your banneton or lined bowl generously with rice flour.
Place the shaped boule seam-side up into the basket and dust the exposed surface lightly.
Cover with a plastic bag or shower cap and refrigerate for 8 to 16 hours.
For Father’s Day brunch, shape at night and bake fresh the next morning.
Step-8: Preheat the Oven and Dutch Oven
Place your Dutch oven with the lid on inside the oven.
Set the oven to 500°F (260°C) and preheat for at least 30 to 45 minutes.
The Dutch oven must be thoroughly hot before the dough goes in.
Use this time to cut a piece of parchment paper large enough to use as a sling.
Step-9: Score and Bake Covered
Remove the cold dough from the fridge and flip it onto the parchment paper.
Score the top quickly with a lame at a 45-degree angle – a single long slash or a cross both work well.
Carefully lower the dough, using the parchment as a sling, into the hot Dutch oven.
Put the lid on immediately and bake covered at 500°F for 20 minutes.
Step-10: Bake Uncovered and Cool
After 20 minutes, reduce the oven to 450°F (230°C) and remove the lid.
Continue baking for 20 to 25 more minutes, until the crust is deep golden brown.
Check the internal temperature – it should read between 205°F and 210°F.
Transfer to a wire rack and cool for at least 1 hour before slicing.
Nutritional Information
- Calories: 165 kcal
- Carbohydrates: 34g
- Protein: 6g
- Fat: 0.5g
- Fiber: 1.5g
- Sodium: 290mg
- Sugar: 0g
- Serving Size: 1 slice (approximately 75g)
Note: Nutritional values are approximate and may vary based on specific ingredient brands used.


