Our site contains ads and uses Amazon affiliate links. We may earn a small commission at no extra cost to you. We know ads can be distracting, and we’re sorry for any inconvenience they cause. It helps us keep the site running. Thanks for your understanding and supporting us!
Recipe at a Glance
- Prep Time: 15 minutes
- Cook Time: 15 minutes
- Total Time: 30 minutes plus chilling
- Servings: 12 bars
- Diet Type: Ketogenic, gluten-free
- Cuisine: American
The rich aroma of melting chocolate and creamy peanut butter fills your kitchen instantly.
Keto Chocolate Peanut Butter Bars deliver the indulgent sweetness you crave without derailing your low-carb goals.
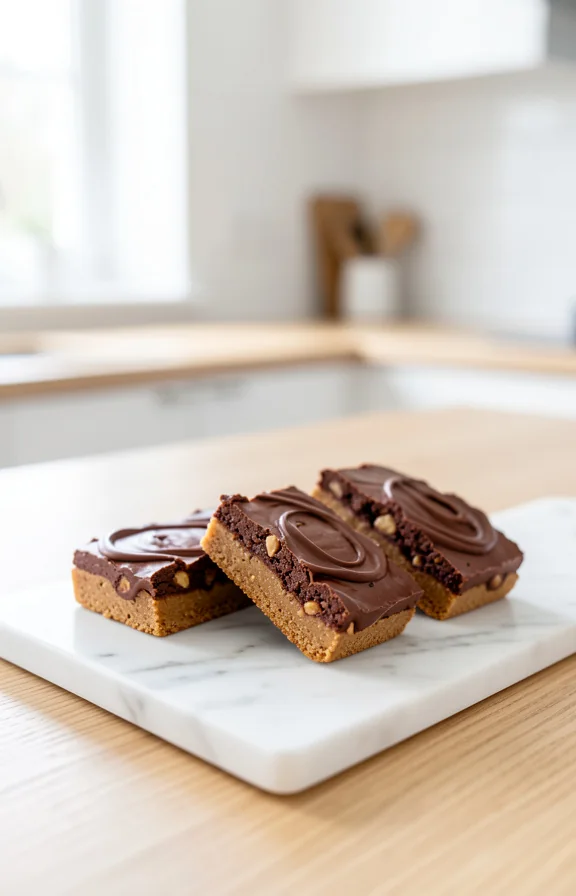
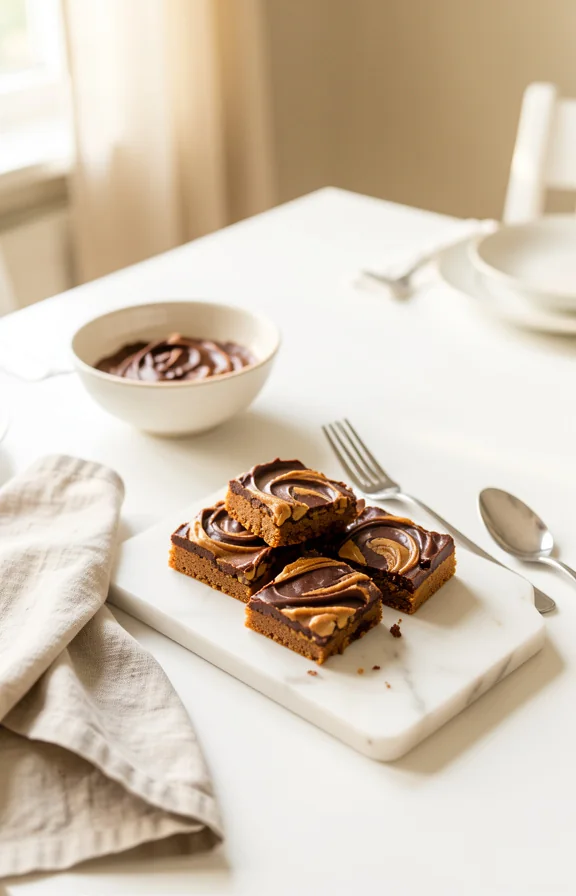
These bars feature a fudgy chocolate base topped with silky peanut butter and finished perfectly.
Your family won’t believe they’re eating a keto treat that tastes like pure decadence.
Why This Recipe Stands Out
- Uses allulose instead of sugar substitutes for authentic sweetness without aftertaste.
- Requires only seven simple ingredients you likely have on hand right now.
- Delivers a three-layer texture with fudgy base, creamy middle, and crispy chocolate top.
- Ready in under 30 minutes active time, no mixer or complex techniques needed.
- Stays shelf-stable for five days without refrigeration due to minimal moisture content.
Tips for Success
- Use natural peanut butter with only peanuts and salt listed as ingredients.
- Melt chocolate and butter together over gentle heat, stirring constantly for smoothness.
- Press the chocolate base firmly into the pan using an offset spatula.
- Let the base layer cool five minutes before adding the peanut butter layer.
- Spread peanut butter in an even, thin layer to prevent overpowering the chocolate.
- Refrigerate the bars for at least two hours before slicing for clean edges.
- Use a warm knife dipped in hot water between cuts for precise portions.
Common Mistakes to Avoid
- Adding wet ingredients to melting chocolate causes it to seize into lumps instantly.
- Using store-bought chocolate chips instead of baking chocolate creates a grainy, thin texture.
- Skipping the cooling step allows layers to mix together into a muddy appearance.
- Cutting bars while warm makes them crumble apart instead of slicing cleanly.
- Overmixing the peanut butter layer creates an oily, separated consistency that pools.
Creative Serving Ideas
- Crumble cooled bars over Greek yogurt with crushed almonds for a parfait.
- Sandwich bars between two almond flour cookies for an indulgent treat.
- Warm a bar for ten seconds and serve with a scoop of keto ice cream.
- Gift bars in parchment paper layers inside a decorated mason jar for friends.
- Chop bars into bite-sized pieces and serve at keto-friendly dinner parties.
Frequently Asked Questions
Can I substitute peanut butter with almond butter?
Yes, use equal amounts of almond butter in place of peanut butter easily.
The flavor will be milder but equally delicious in these bars.
Both nut butters create the same creamy texture and consistency.
Why did my chocolate layer crack when cooling?
Temperature changes cause the chocolate to contract and crack at the surface.
Let the layer cool at room temperature for five minutes first.
Then refrigerate slowly to prevent sudden temperature shifts that cause cracking.
How should I store these bars long-term?
Keep bars in an airtight container in the refrigerator for up to one week.
You can also freeze them in a freezer bag for two months total.
Thaw at room temperature for ten minutes before eating for best texture.
Are these bars suitable for beginners in keto cooking?
Absolutely, Keto Chocolate Peanut Butter Bars require zero baking skills or experience.
This recipe uses only basic melting and mixing techniques anyone can master.
Your first batch will taste as good as any professional bakery version.
Can I make these bars dairy-free?
Use coconut oil instead of butter in equal amounts for dairy-free results.
Substitute dairy chocolate with coconut-based or vegan dark chocolate varieties instead.
The bars will taste slightly different but remain delicious and fully keto.
Ingredients You’ll Need
- 8 ounces unsweetened baking chocolate, chopped
- 6 tablespoons unsalted butter
- 1/2 cup allulose sweetener
- 1 cup natural peanut butter
- 1/4 cup powdered allulose sweetener
- 1/2 teaspoon vanilla extract
- Pinch of sea salt
Tools to Use
- 8×8-inch baking pan
- Parchment paper
- Double boiler or heat-safe bowl
- Rubber spatula
- Offset spatula
- Sharp knife
- Measuring cups and spoons
How to Make the Keto Chocolate Peanut Butter Bars
Step-1: Prepare Your Pan
Line an 8×8-inch baking pan with parchment paper for easy removal.
Let the paper hang over two sides to create handles.
Step-2: Melt the Chocolate and Butter
Place chopped chocolate and butter in a double boiler over gentle heat.
Stir constantly until completely melted and smooth, about three to four minutes.
Step-3: Add Sweetener to the Chocolate
Remove the bowl from heat and stir in 1/2 cup allulose sweetener.
Mix until no grains remain and the mixture is silky smooth.
Step-4: Pour the Chocolate Base
Pour the chocolate mixture into the prepared pan in an even layer.
Use an offset spatula to spread it firmly to all corners.
Step-5: Cool the Base Layer
Let the chocolate base cool at room temperature for exactly five minutes. This prevents the peanut butter layer from sinking into warm chocolate.
Step-6: Prepare the Peanut Butter Layer
In a small bowl, mix peanut butter with powdered allulose sweetener thoroughly. Add vanilla extract and sea salt, then stir until fully combined.
Step-7: Spread the Peanut Butter Layer
Spread the peanut butter mixture evenly over the cooled chocolate base. Use an offset spatula to create an even, thin layer throughout.
Step-8: Chill the Bars Completely
Refrigerate the pan for at least two hours until very firm. The bars need this time to set properly for clean cutting.
Step-9: Cut Into Portions
Remove the pan from the refrigerator and lift bars using parchment handles. Place on a cutting board and slice into 12 equal bars.
Step-10: Serve and Store
Serve bars at room temperature or chilled, depending on your preference. Store in an airtight container in the refrigerator for up to seven days.
Nutritional Information
- Calories: 285 per bar
- Protein: 8 grams
- Total Fat: 26 grams
- Saturated Fat: 12 grams
- Net Carbohydrates: 2 grams
- Total Carbohydrates: 4 grams
- Fiber: 2 grams
- Sodium: 95 milligrams
Note: Nutritional values are approximate and may vary based on specific ingredient brands used.


