Our site contains ads and uses Amazon affiliate links. We may earn a small commission at no extra cost to you. We know ads can be distracting, and we’re sorry for any inconvenience they cause. It helps us keep the site running. Thanks for your understanding and supporting us!
📊Recipe at a Glance
- Prep Time: 25 minutes
- Cook Time: 35 minutes
- Total Time: 1 hour (plus cooling time)
- Servings: 16 brownies
- Diet Type: Vegetarian
- Cuisine: American
Let me tell you about the dessert that changed my baking game experience.
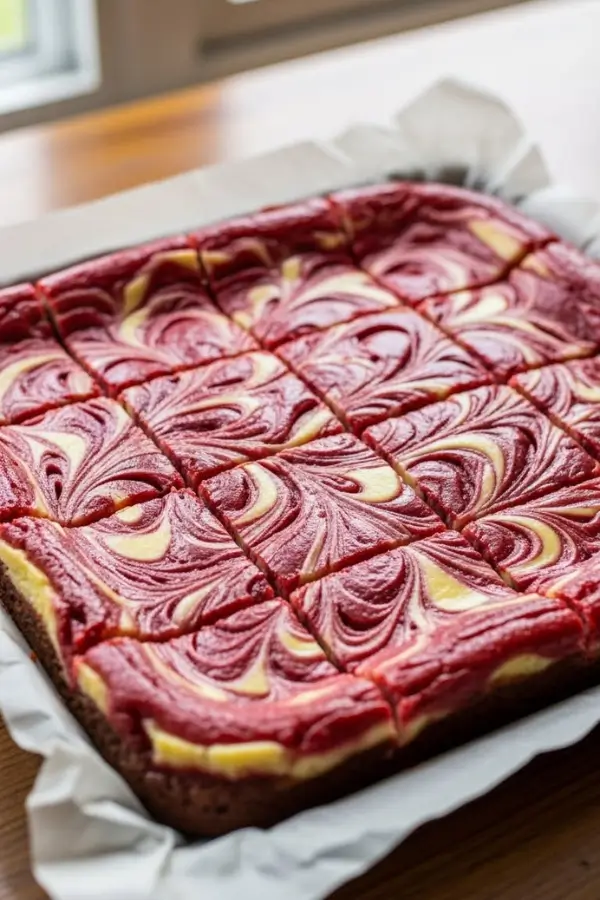
These marbled red velvet cheesecake brownies look like they belong in a fancy bakery window, but they come together in your own kitchen with ingredients you probably already have.
The first bite is pure magic: your fork sinks through a tangy cream cheese swirl before hitting that dense, fudgy red velvet layer underneath.
What I love most is how forgiving this recipe is.
No fancy techniques, no temperamental ingredients, just two simple batters swirled together to create something that’ll have everyone asking for the recipe.
Trust me, once you master these brownies, they’ll become your go-to dessert whenever you need to impress without the stress.
Why This Recipe Stands Out
- Stunning Visual Appeal: The dramatic red and white swirls create an Instagram-worthy dessert that looks as amazing as it tastes.
- Triple Texture Experience: You’ll enjoy fudgy brownie, creamy cheesecake, and crispy edges all in one bite.
- Perfect Balance of Flavors: The slight tang from cream cheese cuts through the sweetness, while cocoa adds depth without overpowering.
- Make-Ahead Friendly: These brownies actually taste better the next day, making them ideal for parties and gatherings.
- No Mixer Required: Simple mixing by hand means less cleanup and perfectly textured layers.
Ingredients You’ll Need
For the Red Velvet Brownie Layer:
- 1/2 cup unsalted butter, melted
- 1 cup granulated sugar
- 2 large eggs
- 1 teaspoon vanilla extract
- 1 tablespoon red food coloring
- 3/4 cup all-purpose flour
- 2 tablespoons unsweetened cocoa powder
- 1/4 teaspoon salt
- 1/4 teaspoon baking powder
For the Cheesecake Layer:
- 8 oz cream cheese, softened to room temperature
- 1/4 cup granulated sugar
- 1 large egg
- 1/2 teaspoon vanilla extract
Tools to Use
- 9×9 inch square baking pan
- Parchment paper
- Two medium mixing bowls
- Whisk
- Spatula
- Butter knife or skewer for swirling
- Measuring cups and spoons
- Cooling rack
How to Make the Marbled Red Velvet Cheesecake Brownies
Step-1: Prepare Your Baking Pan
Preheat your oven to 350°F.
Line your 9×9 inch baking pan with parchment paper, leaving some overhang on the sides for easy removal.
Lightly grease the parchment with butter or cooking spray.
This step ensures your brownies lift out cleanly without sticking.
Step-2: Mix the Red Velvet Brownie Batter
In a medium bowl, whisk together the melted butter and 1 cup of sugar until well combined.
Add the 2 eggs and 1 teaspoon vanilla extract, whisking until the mixture becomes smooth and glossy.
Stir in the red food coloring until the color is vibrant and evenly distributed.
The batter should have a striking crimson hue.
Step-3: Add Dry Ingredients to Brownie Batter
In a separate small bowl, whisk together the flour, cocoa powder, salt, and baking powder.
Gently fold the dry ingredients into the wet ingredients using a spatula.
Mix just until no flour streaks remain.
Be careful not to overmix, as this can make the brownies tough instead of fudgy.
Step-4: Prepare the Cheesecake Layer
In another medium bowl, beat the softened cream cheese with 1/4 cup sugar until smooth and creamy.
Make sure there are no lumps remaining.
Add the egg and 1/2 teaspoon vanilla extract, mixing until just combined.
The mixture should be silky and pourable.
Step-5: Layer the Batters
Pour about three-quarters of the red velvet brownie batter into your prepared pan.
Spread it evenly across the bottom using a spatula.
Dollop the cheesecake mixture over the brownie layer in several spoonfuls.
Drop the remaining brownie batter in dollops over the cheesecake layer.

Step-6: Create the Marble Effect
Take a butter knife or wooden skewer and insert it into the batter.
Gently swirl in figure-eight patterns and S-curves throughout the pan.
Don’t overmix or the layers will blend together completely.
You want distinct swirls of red and white that create a beautiful marbled pattern.
Step-7: Bake to Perfection
Place the pan in the preheated oven and bake for 30-35 minutes.
The brownies are done when the edges look set and slightly pull away from the pan.
The center should still have a slight jiggle when you gently shake the pan.
A toothpick inserted into the brownie portion should come out with a few moist crumbs.
Step-8: Cool and Cut
Remove the pan from the oven and place it on a cooling rack.
Let the brownies cool completely in the pan for at least 1 hour.
For the cleanest cuts, refrigerate for 2-3 hours or overnight.
Use the parchment paper overhang to lift the brownies out, then cut into 16 squares with a sharp knife.
Wipe the knife clean between cuts for neat edges.
Related Recipes You’ll Love to Try
- Chocolate Bread Pudding: Warm, Rich & Comforting Dessert Perfection
- Chocolate Peanut Butter Puppy Chow: Addictive Snack Everyone Loves
- Chocolate Ganache Raspberry Tart: Ultimate Show-Stopping Dessert
- Dreamy Raspberry Mousse: Pretty in Soft Pink
Nutritional Information
Per Serving (1 brownie):
- Calories: 185
- Protein: 3g
- Fat: 10g
- Carbohydrates: 22g
- Sodium: 95mg
Note: Nutritional values are approximate and may vary based on specific brands used.
Tips for Success
- Room Temperature Matters: Make sure your cream cheese is truly softened to room temperature to avoid lumps in your cheesecake layer.
- Don’t Overbake: The center should still wobble slightly when you remove them from the oven, as they’ll continue cooking while cooling.
- Chill Before Cutting: Cold brownies cut much cleaner than warm ones, giving you those picture-perfect slices.
- Use Gel Food Coloring: Gel or paste food coloring gives a more vibrant red without adding excess liquid to your batter.
- Swirl Strategically: Less is more when creating the marble effect; 6-8 swirls is plenty to create beautiful patterns.
- Line with Parchment: Always use parchment paper with overhang for effortless removal and serving.
- Fresh Ingredients: Check the expiration date on your cream cheese and ensure your baking powder is still active for best results.
Common Mistakes to Avoid
- Using Cold Cream Cheese: This creates lumps in your cheesecake layer that won’t smooth out, ruining the creamy texture.
- Overswirling: Too much swirling blends the layers together into a muddy color instead of distinct marbling.
- Skipping the Parchment Paper: Brownies may stick to the pan, making it impossible to remove them cleanly.
- Overmixing the Brownie Batter: This develops too much gluten, resulting in cakey brownies instead of fudgy ones.
- Cutting While Warm: Warm brownies will crumble and the layers may separate; patience pays off with clean slices.
- Baking at Too High Temperature: This causes the edges to overbake while the center remains underdone.
- Not Measuring Food Coloring: Too little results in pink brownies, while too much can affect the taste.
Creative Serving Ideas
- Classic à la Mode: Serve warm brownies with a scoop of vanilla ice cream that melts into the swirls.
- Elegant Plating: Dust with powdered sugar and add fresh raspberries for a restaurant-style presentation.
- Brownie Sundae Bar: Set out toppings like whipped cream, chocolate sauce, chopped nuts, and sprinkles for guests to customize.
- Coffee Pairing: Serve alongside hot coffee or cold brew for an afternoon treat that balances sweet and bitter.
- Mini Dessert Bites: Cut into smaller 1-inch squares and serve on decorative picks for party appetizers.
- Cream Cheese Frosting Drizzle: Top with a simple cream cheese glaze for extra tangy sweetness.
- Warm and Gooey: Microwave individual portions for 10-15 seconds to enjoy with a molten center.
Frequently Asked Questions
Can I Make These Brownies Ahead of Time?
Yes, these brownies are perfect for advance preparation.
Store them in an airtight container in the refrigerator for up to 5 days.
They actually taste better after sitting overnight as the flavors meld together.
Can I Freeze Marbled Red Velvet Cheesecake Brownies?
Absolutely, these brownies freeze wonderfully for up to 3 months.
Wrap individual brownies in plastic wrap, then place in a freezer-safe container.
Thaw in the refrigerator overnight before serving.
Why Did My Cheesecake Layer Sink?
Overbaking is the most common cause of sinking cheesecake layers.
The center should still jiggle slightly when you remove the pan from the oven.
Also ensure your cream cheese was at room temperature before mixing.
Can I Use Natural Food Coloring Instead?
Yes, but natural food coloring won’t produce the same vibrant red color.
Beet powder is a popular natural alternative but creates more of a burgundy shade.
You may need to use more natural coloring to achieve visible color.
How Do I Know When the Brownies Are Done?
The edges should look set and pull slightly away from the pan.
Insert a toothpick into the brownie portion; it should come out with moist crumbs, not wet batter.
The center will have a slight wobble that firms up during cooling.
Can I Double This Recipe?
Yes, simply double all ingredients and use a 9×13 inch baking pan.
The baking time may increase by 5-10 minutes.
Check for doneness using the same toothpick test.
What Can I Substitute for Red Food Coloring?
You can omit the food coloring entirely for chocolate cheesecake brownies.
Alternatively, use beet juice powder for a natural option.
The taste will remain the same regardless of coloring choice.
Why Are My Brownies Cakey Instead of Fudgy?
Overbaking or overmixing the batter are the usual culprits.
Make sure to mix just until the flour disappears.
Remove from the oven when the center still has a slight jiggle.


