Our site contains ads and uses Amazon affiliate links. We may earn a small commission at no extra cost to you. We know ads can be distracting, and we’re sorry for any inconvenience they cause. It helps us keep the site running. Thanks for your understanding and supporting us!
Recipe at a Glance
- Prep Time: 15 minutes
- Cook Time: 45 minutes
- Total Time: 24 hours (mostly hands-off)
- Servings: 6-8
- Diet Type: Vegan, Vegetarian
- Cuisine: Italian
You’ve probably felt frustrated watching bread recipes demand endless kneading, folding, and your constant attention.
The beauty of this Dutch oven focaccia is that it does almost all the work while you sleep or go about your day.
Your oven becomes the workhorse, creating bakery-quality crust and tender crumb with virtually no effort on your part.
This recipe proves that stunning, restaurant-worthy focaccia is completely achievable for beginners.
Why This Recipe Stands Out
- Zero kneading required, making it truly beginner-friendly and forgiving.
- The Dutch oven traps steam to create that coveted crispy exterior and soft, pillowy interior.
- Long, slow fermentation develops complex flavors that improve with time.
- Ready in 24 hours with minimal active time, fitting perfectly into busy schedules.
- Uses just five basic pantry ingredients, so you likely have everything on hand already.
Tips for Success
- Use filtered or bottled water if your tap water is heavily chlorinated, as chlorine can inhibit yeast activity.
- Keep your kitchen temperature between 70-75°F for optimal fermentation timing and flavor development.
- Don’t skip the dimpling step, as it creates those signature shallow pockets that trap olive oil and toppings.
- Preheat your Dutch oven for at least 45 minutes so it’s screaming hot when the dough hits it.
- Trust the process and resist opening the oven lid during the first 30 minutes of baking.
- Let the finished loaf cool completely before slicing to allow the crumb structure to set properly.
Common Mistakes to Avoid
- Using water that’s too warm will kill the yeast, so always check temperature with a thermometer.
- Skipping the bench rest before dimpling makes the dough tear instead of stretch beautifully.
- Removing the Dutch oven lid too early releases steam and prevents proper oven spring and browning.
- Over-dimpling or pressing too hard deflates the dough and creates dense, flat bread.
- Using a regular pot instead of a Dutch oven will not create the same steamy environment needed for crust development.
- Slicing while warm is tempting but causes the interior to dry out and compress.
Creative Serving Ideas
- Slice horizontally and use as a canvas for creamy burrata, heirloom tomatoes, and fresh basil.
- Tear into chunks and serve alongside a warm white bean and rosemary dip for entertaining.
- Brush with garlic-infused olive oil and pair with a simple arugula salad for lunch.
- Top with caramelized onions, fresh thyme, and fleur de sel for an elegant appetizer.
- Cube and dry in a low oven to create homemade croutons for soups and salads.
- Slice and toast lightly, then top with roasted red peppers and marinated artichokes for a quick snack.
Frequently Asked Questions
Can I Speed Up the Fermentation?
Yes, you can ferment at a warmer temperature around 80-85°F to reduce total time to 12-16 hours.
However, cooler, slower fermentation develops deeper flavor, so the 24-hour timeline is worth the patience.
Room temperature fermentation is ideal for beginners because it’s more forgiving.
What If I Don’t Have a Dutch Oven?
You can use a heavy covered baking vessel, but results won’t be quite the same.
A covered cast iron skillet or even an upturned baking pan can trap some steam.
The Dutch oven’s design is specifically engineered for steam retention, which makes it the gold standard.
Can I Freeze the Dough?
Absolutely, you can freeze the dough after the first 8 hours of fermentation.
Thaw overnight in the refrigerator, then continue with the remaining fermentation and baking steps.
This makes the recipe even more convenient for your busy schedule.
Why Is My Focaccia Dense?
Dense focaccia usually results from over-handling, over-dimpling, or using water that was too hot.
Make sure your water is between 80-90°F and handle the dough gently throughout the process.
Trust the long fermentation, as it’s what creates those wonderful air pockets.
How Should I Store Leftover Focaccia?
Store cooled focaccia in an airtight container at room temperature for up to 3 days.
You can also wrap it well and freeze for up to 3 months, then thaw at room temperature.
Refresh slightly stale bread by wrapping in foil and warming in a 350°F oven for 10 minutes.
Ingredients You’ll Need
- 3 cups all-purpose flour or bread flour
- 1.5 teaspoons salt
- 0.5 teaspoon instant yeast or active dry yeast
- 1.5 cups warm water (80-90°F)
- 3 tablespoons extra virgin olive oil, divided
- 2 teaspoons fresh or dried rosemary
- 1 teaspoon coarse sea salt for topping
Tools to Use
- Dutch oven with lid
- Large mixing bowl
- Kitchen scale (optional but recommended)
- Wooden spoon or bench scraper
- Instant read thermometer
- Parchment paper
- Measuring cups and spoons
- Cooling rack
How to Make the Dutch Oven Focaccia Bread without Kneading
Step-1: Mix Your Dough
Combine 3 cups flour, 1.5 teaspoons salt, and 0.5 teaspoon yeast in a large bowl.
Pour in 1.5 cups warm water (between 80-90°F) and stir with a wooden spoon until shaggy, wet dough forms.
The dough will look rough and sticky, which is exactly what you want.
Cover the bowl tightly with a damp kitchen towel or plastic wrap.
Step-2: Begin Long Fermentation
Let the covered dough rest at room temperature (ideally 70-75°F) for 12-18 hours.
During this time, the yeast slowly works, developing flavor and creating air pockets naturally.
You’ll notice the dough puffing up and becoming more elastic as fermentation progresses.
Step-3: Perform a Stretch and Fold
After the initial fermentation, wet your hand with cool water and gently stretch one side of the dough up and fold it over itself.
Rotate the bowl 90 degrees and repeat this stretch-and-fold motion three more times around the bowl.
This technique builds strength without any kneading.
Let the dough rest for 30 minutes covered.
Step-4: Shape and Oil Your Pan
Drizzle 1.5 tablespoons of olive oil onto a piece of parchment paper laid on your work surface.
Gently turn the dough out onto the oiled parchment, letting it spread naturally under its own weight.
Drizzle another 1.5 tablespoons of olive oil over the top of the dough and let it rest for 15 minutes.
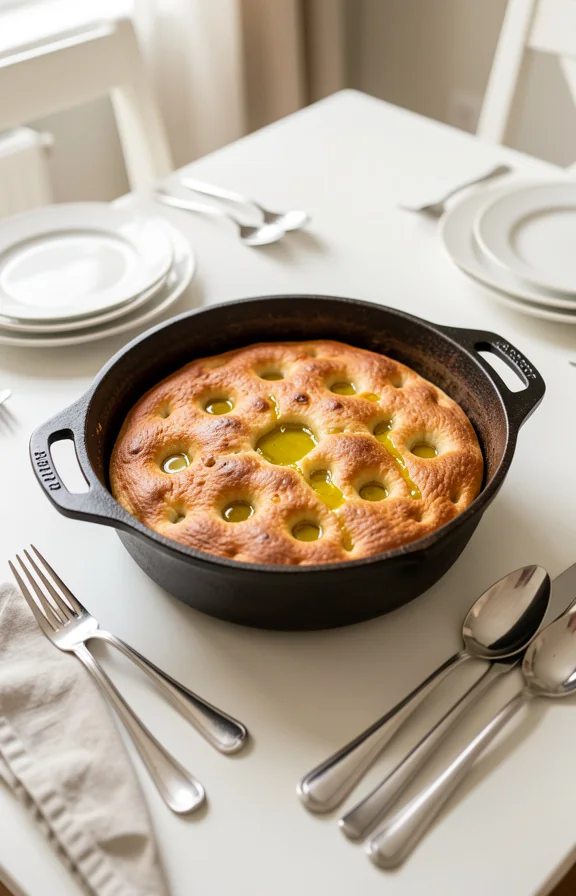
Step-5: Dimple and Season
Using your fingertips, gently create shallow dimples across the entire surface of the dough.
Press down softly, creating those signature focaccia indentations that hold olive oil and toppings.
Sprinkle 2 teaspoons rosemary and 1 teaspoon coarse sea salt evenly over the surface.
Let the dimpled dough rest for another 15 minutes to recover.
Step-6: Preheat Your Dutch Oven
Place your Dutch oven (with the lid on) in a cold oven, then set the temperature to 500°F.
Let it preheat for at least 45 minutes until it’s extremely hot.
This intense heat creates the steam needed for a crispy, golden crust.
Step-7: Transfer and Bake Covered
Carefully remove the screaming hot Dutch oven from the oven using heavy oven mitts.
Lift the parchment paper with the dough and gently lower it into the hot Dutch oven.
Cover with the lid and return to the oven immediately.
Bake covered for 30 minutes without peeking, as escaping steam is essential for that gorgeous crust.
Step-8: Finish Baking Uncovered
Remove the lid and bake for an additional 12-15 minutes until the top is deep golden brown.
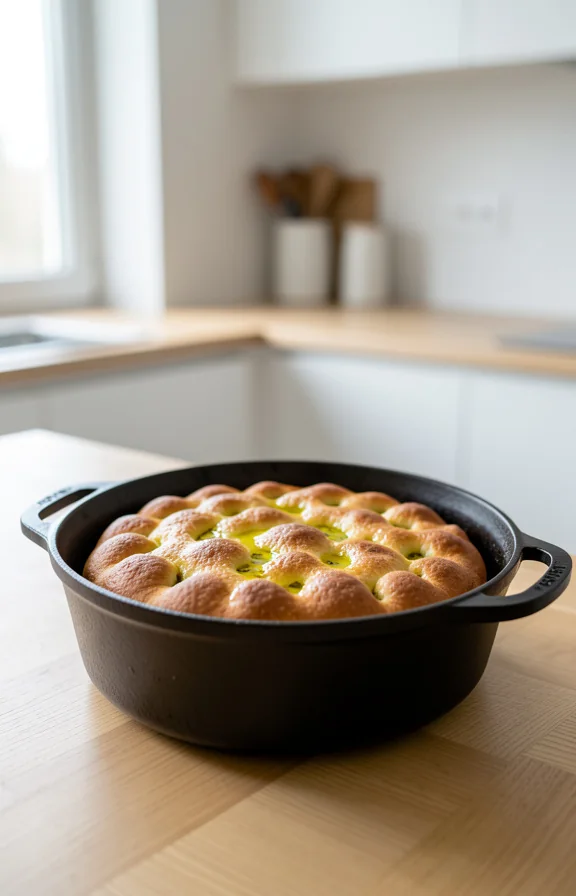
The focaccia should sound hollow when tapped on the bottom and smell absolutely intoxicating.
The crust will be crackly and the color will be rich mahogany.
Step-9: Cool Before Slicing
Let the focaccia cool in the Dutch oven for 5 minutes before removing.
Transfer to a cooling rack and wait at least 30 minutes before slicing.
Cutting too early causes steam to escape and compresses the interior crumb structure.
Nutritional Information
- Calories: 245 per serving
- Protein: 6g
- Fat: 8g
- Carbohydrates: 37g
- Fiber: 1g
- Sodium: 580mg
Note: Nutritional values are approximate and may vary based on specific ingredient brands used.


