Our site contains ads and uses Amazon affiliate links. We may earn a small commission at no extra cost to you. We know ads can be distracting, and we’re sorry for any inconvenience they cause. It helps us keep the site running. Thanks for your understanding and supporting us!
Most peach crisp recipes get two things wrong.
The butter goes in too warm, so the topping bakes into a dense paste instead of crumbly golden clusters. And the filling is under-thickened, so the oat topping sinks into a pool of peach juice before it can go golden.
This article fixes both problems with zero special equipment. No mixer. No pastry cutter. Just your fingers and one bowl.
Whether you are using ripe summer peaches or frozen peaches in January, the technique stays identical. Only the cornstarch amount changes, and that is covered below.
Why the No-Mixer Method Produces a Better Topping
Every recipe that calls for a pastry cutter or mixer is working against the physics of a crisp topping.
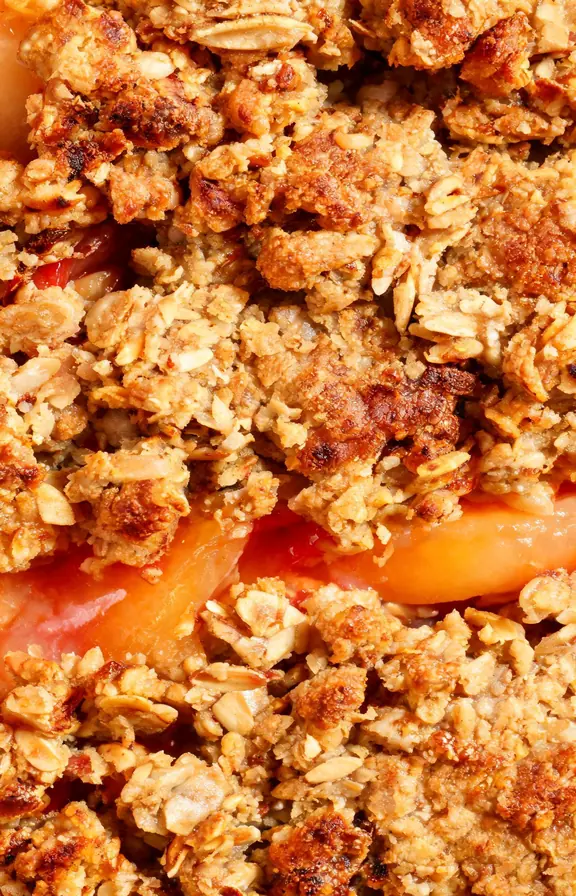
A good oat topping needs uneven fat distribution. Some pockets of pure butter surrounded by dry oat clusters, other areas where the fat has coated the flour. That unevenness creates distinct golden clusters with varied crunch.
Fingers give you control in real time. You feel each butter piece as you work. You stop when it looks right. A mixer cannot do that. It homogenizes the fat completely, which produces a denser, more uniform topping that lacks the signature crunch.
The second reason is heat. Cold butter is non-negotiable. The moment your hands warm it past a certain point, the fat coats the oats in a thin layer instead of leaving visible pea-sized chunks.
Those butter chunks are what steam open during baking, creating lift and separation in the topping. Work fast, keep the butter cold, and the topping handles itself.
The Butter Temperature Science: What Each State Produces
Butter state is the single most impactful variable in a crisp topping. Here is exactly what happens at each temperature.
Cold butter (35°F, straight from fridge): Stays in visible chunks during mixing. During baking, water inside those chunks converts to steam. The steam expands outward, creating individual golden clusters with air pockets between them. This is the texture everyone pictures when they think of a great crisp.
Room temperature butter (65°F): Soft enough to fully blend with dry ingredients during hand mixing. You end up with a uniformly fat-coated mixture. It bakes into a solid, cookie-like slab across the top of the filling. Still edible, but not crispy.
Melted butter: Produces a wet mixture that soaks into the oats before baking even begins. The result is a dense, granola-like topping that compresses under its own weight. Some recipes call for this deliberately, but it is a different textural goal than a true crisp.
The Peach Guide: Fresh, Frozen, and Canned With Exact Adjustments
This recipe works year-round. Peaches in all three forms produce excellent results when handled correctly. The only variable that changes is the cornstarch amount.
Fresh Peaches (Peak Season: May through September)
Fresh ripe peaches give the deepest flavor and the most vibrant filling color.
Use 2 tablespoons of cornstarch for every 6 medium peaches. The natural pectin in ripe peaches helps the filling set without becoming gluey.
Ripeness test: press gently near the stem end. It should yield slightly, like a ripe avocado. The skin should show a color blush and the peach should smell intensely fruity at room temperature.
An underripe peach has no aroma. Leave it on the counter for one to two more days before using.
Peeling is optional. The skin softens completely during baking and takes on a slightly jammy, candied texture. If you prefer a smoother filling, blanch whole peaches in boiling water for 30 seconds, then transfer to ice water. The skin slips off cleanly.
Frozen Peaches (Best Off-Season Option)
Frozen peaches are picked at peak ripeness and frozen within hours. Their flavor is often better than out-of-season fresh peaches.
Use 3 tablespoons of cornstarch to account for the extra moisture released during baking. Do not thaw them before adding to the dish. Baking time increases by 10 to 15 minutes when starting from frozen.
Canned Peaches (Fastest, Year-Round)
Use peaches packed in juice, not syrup. Drain completely and pat dry with paper towels.
Canned peaches are already cooked, so they soften faster than fresh or frozen. Reduce baking time by 5 minutes and check the filling early. Use 1.5 tablespoons of cornstarch since these peaches release less additional moisture than fresh fruit.
The Filling Flavor Architecture: Brown Sugar, Cinnamon, and the Lemon Rule
The peach filling uses four flavor elements. Each one does a specific job the others cannot replicate.
Brown sugar adds sweetness and depth. The molasses in dark brown sugar creates a slight caramel undertone that pairs directly with the peach’s stone-fruit sweetness. Light brown sugar works but produces a paler filling with less complexity.
Cinnamon adds warmth without masking the peach. Use 1/2 teaspoon for fresh ripe peaches, where you want the fruit to lead. Use up to 3/4 teaspoon for canned or off-season peaches, where the spice compensates for diminished natural flavor.
Vanilla extract rounds out the acidity in the filling. Add it directly to the peaches before tossing, not to the topping. One teaspoon is enough. More tips the flavor toward artificial rather than warm.
Lemon juice is the most misunderstood ingredient here. Its job is not to add lemon flavor. It brightens the existing peach flavor through contrast and slows oxidation in cut peaches. Use one tablespoon. More than that and the lemon competes with the peach.
Oat Type Decision: Rolled vs Quick vs Steel-Cut
Not all oats perform the same way in a crisp topping. This single choice changes the final texture more than almost any other variable.
Old-fashioned rolled oats are the correct choice for this recipe. They retain their shape during baking, creating visible oat flakes in the finished topping with distinct chewy-crisp edges. The larger surface area also browns more evenly.
Beyond texture, rolled oats carry meaningful nutritional value. Healthline’s breakdown of oat health benefits covers why the beta-glucan fiber in oats makes them one of the most nutritionally dense grains you can bake with.
Quick oats absorb moisture faster because they are cut thinner. They partially dissolve into the butter-sugar mixture before baking is complete. The topping will still taste good but will be denser and more compact. Use them if that is all you have on hand.
Steel-cut oats are not suitable here. They do not soften enough during the standard baking time. The topping will have a hard, chewy bite that does not match the soft peach filling below.
The Baking Dish Decision: Size, Material, and Depth
Most recipes just say “baking dish” without explaining what that choice actually does to the final result.
8×8-inch square dish: Produces a deeper filling layer with more fruit-to-topping ratio in each spoonful. The filling takes longer to fully bubble through, so add 5 minutes to the bake time compared to a wider dish.
9×13-inch dish: Spreads the filling thin, which means it reaches temperature faster. The topping has a higher ratio of crisp surface area relative to filling depth. Ideal if you want maximum topping crunch in every bite.
Cast iron skillet: Runs hotter than glass or ceramic because it retains and radiates heat more aggressively. Reduce oven temperature by 25°F and check the filling early. For more on what cast iron does to fruit desserts, see our cast iron peach upside down cake guide, which covers the same heat dynamics.
Glass and ceramic dishes are the most forgiving. They heat evenly and slowly, so the filling and topping finish at nearly the same time. This is what you want as a beginner.
Make-Ahead Strategy: Which Component to Prepare First
Peach crisp is one of the best make-ahead desserts because both components can be prepared separately and stored without any quality loss.
The oat topping can be assembled and refrigerated in a sealed container for up to five days, or frozen for up to three months. Frozen topping goes directly onto the filling without thawing. Add 5 minutes to the bake time.
The peach filling can be assembled in the baking dish, covered, and refrigerated for up to 24 hours before baking. Do not add the topping to a cold filling and then refrigerate overnight. The topping will absorb moisture from the peaches and bake up dense.
Assemble right before baking for the best result. Prepare both components separately, store them, and combine them cold when you are ready to bake. Total bake time increases by about 5 to 8 minutes from a cold start.
For another crowd-sized no-fuss peach dessert, our cast iron skillet peach cobbler uses a similar filling approach with a biscuit-style topping instead of oat streusel.
Serving and Reheating: Keeping the Topping Crisp
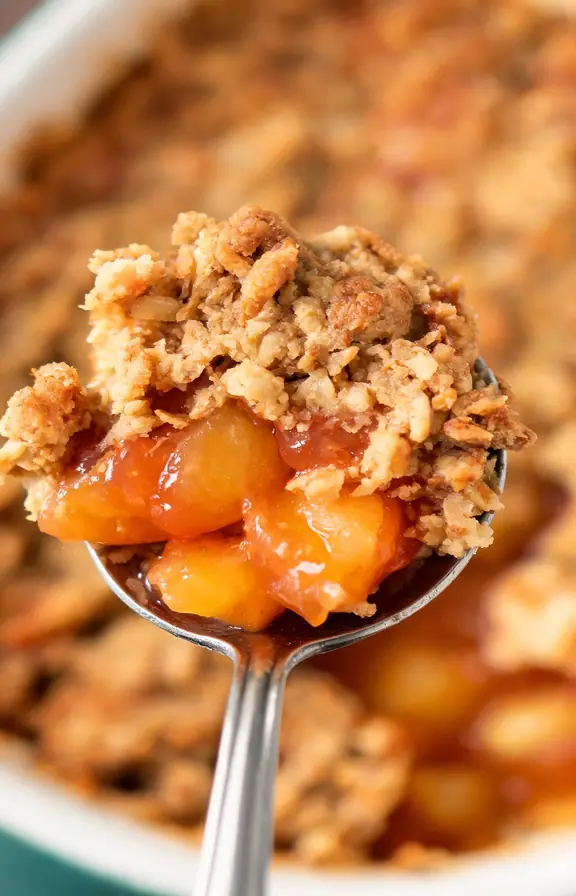
Peach crisp is best served warm, 15 to 20 minutes after it comes out of the oven.
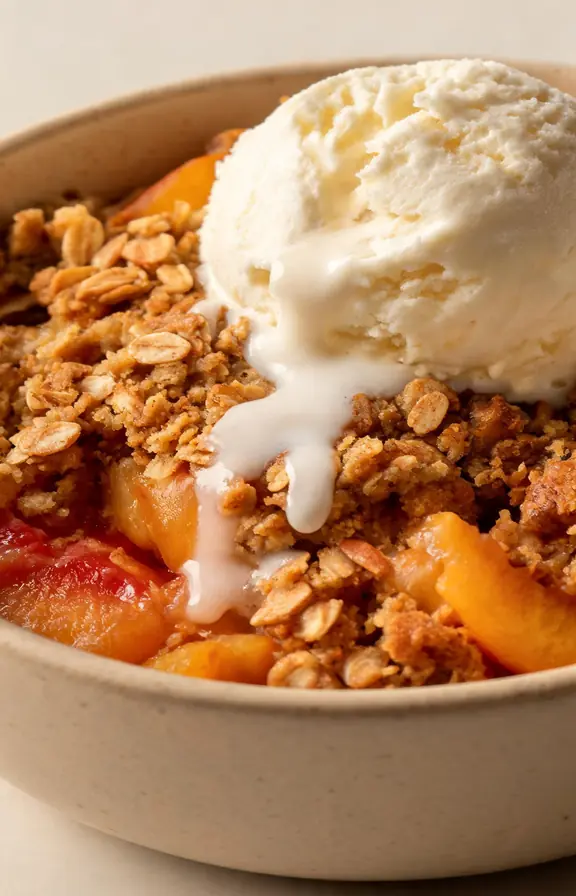
At that point the filling is still loose enough to spoon easily and the topping has set from residual heat. Serve with vanilla ice cream or cold whipped cream. The temperature contrast between the hot filling and cold topping is a core part of the experience.
After refrigerating, the topping softens as it absorbs moisture from the filling overnight. Reheat in a 350°F oven for 15 to 20 minutes to restore crunch. Do not microwave. The microwave steams the topping from below, which softens it further.
To restore maximum crunch on a stored batch, scatter a tablespoon of fresh dry oat topping over the crisp before reheating. It bakes in during the reheat cycle and adds a fresh crisp layer.
Pairing and Serving Ideas for Every Occasion
Peach crisp works beyond the dinner table dessert. It is equally good warm for breakfast the next morning, spooned over yogurt, or served alongside a scoop of vanilla ice cream at a summer cookout.
For a crowd, bake it in a 9×13-inch dish and double the topping. The extra topping layer adds a thicker crunch that holds up better when serving large groups and sitting out longer before being eaten.
It also pairs well with stone fruit companions. Add a handful of blueberries or raspberries to the peach filling before baking. They bring tartness that cuts through the sweetness of the caramelized brown sugar topping.
For more no-mixer fruit bakes, see our blueberry muffins with streusel topping which uses the same cold-butter rubbing technique on the crumble.
Frequently Asked Questions
Golden Peach Crisp with Oat Topping
Easy golden peach crisp made with fresh, frozen, or canned peaches and a cold-butter oat streusel topping. No mixer needed. One bowl. Ready in 55 minutes with a deeply golden, cluster-crisp topping every time.
- 8×8-inch or 9×9-inch baking dish (glass or ceramic recommended)
- Large mixing bowl
- Small mixing bowl
- Cutting board and sharp knife
- Measuring cups and spoons
- Wooden spoon or silicone spatula
- 6 medium ripe peaches (about 900g / 2 lbs), sliced 1/2-inch thick (or 3 cups frozen, or 2 cans drained)
- 3 tablespoons (38g) granulated sugar
- 2 tablespoons (16g) cornstarch (increase to 3 tbsp for frozen peaches)
- 1 tablespoon (15ml) fresh lemon juice
- 1 teaspoon (5ml) pure vanilla extract
- 1/2 teaspoon ground cinnamon
- 1/8 teaspoon fine sea salt
- 1 cup (90g) old-fashioned rolled oats
- 1/2 cup (63g) all-purpose flour
- 1/2 cup (100g) packed dark brown sugar
- 1/2 teaspoon ground cinnamon
- 1/4 teaspoon fine sea salt
- 6 tablespoons (85g) cold unsalted butter, cut into 1/2-inch cubes
- Preheat oven Set your oven to 350°F (175°C). Place a rack in the center position. Lightly butter your 8×8-inch or 9×9-inch baking dish and set aside.
- Make the peach filling Slice peaches into 1/2-inch thick pieces. Place in a large bowl. Add granulated sugar, cornstarch, lemon juice, vanilla extract, cinnamon, and salt. Toss gently until every slice is coated. Pour the filling into the prepared baking dish and spread into an even layer.
- Make the oat topping In a medium bowl, combine the oats, flour, dark brown sugar, cinnamon, and salt. Stir to mix. Add the cold butter cubes. Using your fingertips, rub the butter into the dry ingredients by pressing each cube flat and breaking it apart. Work quickly to keep the butter cold. Continue until the mixture looks like coarse crumbs with visible pea-sized butter pieces throughout. Some dry patches are fine and desirable. Do not overwork into a paste.
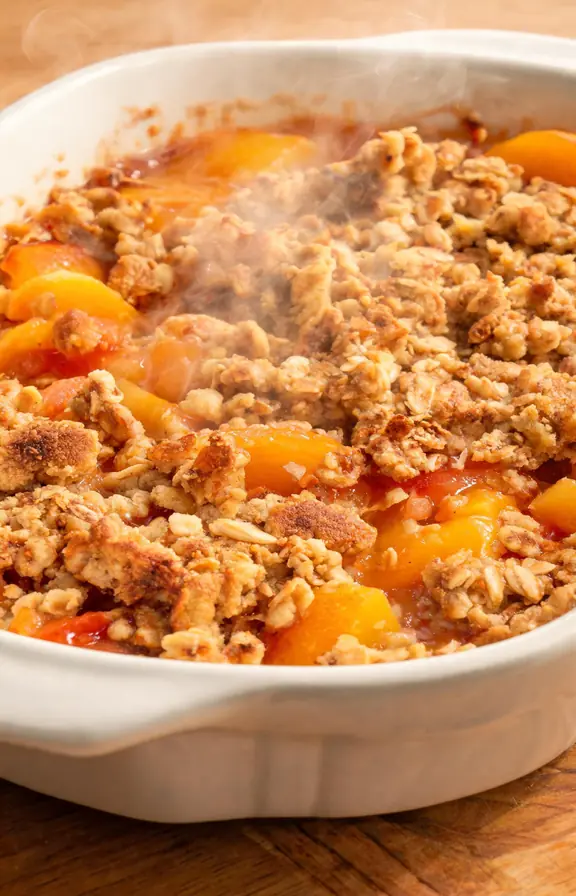
- Assemble and bake Scatter the oat topping evenly over the peach filling. Do not press it down. Let it sit loosely on top. Place the dish on the center oven rack. Bake for 35 to 45 minutes, until the topping is deep amber-gold across the full surface and the filling is bubbling at the center of the dish, not just around the edges.
- Rest before serving Remove from the oven and let the crisp rest on a wire rack for 15 minutes before serving. The filling continues to thicken as it cools slightly. Serve warm with a scoop of vanilla ice cream or cold whipped cream.
Nutritional values are estimates calculated using standard USDA food data for fresh peaches and unsalted butter. Actual values will vary based on peach type (fresh, frozen, or canned), ripeness level, dish size, and serving portion.