Our site contains ads and uses Amazon affiliate links. We may earn a small commission at no extra cost to you. We know ads can be distracting, and we’re sorry for any inconvenience they cause. It helps us keep the site running. Thanks for your understanding and supporting us!
📊Recipe at a Glance
- Prep Time: 25 minutes
- Cook Time: 22 minutes
- Total Time: 4 hours 47 minutes (including rise time)
- Servings: 15 rolls
- Diet Type: Vegetarian
- Cuisine: American / Hawaiian-Inspired
Every sourdough baker knows that guilty feeling of throwing discard down the drain.
If you bake sourdough regularly, you always have discard on hand. The real question is what to do with it.
You fed your starter, scraped out the excess, and just tossed it.
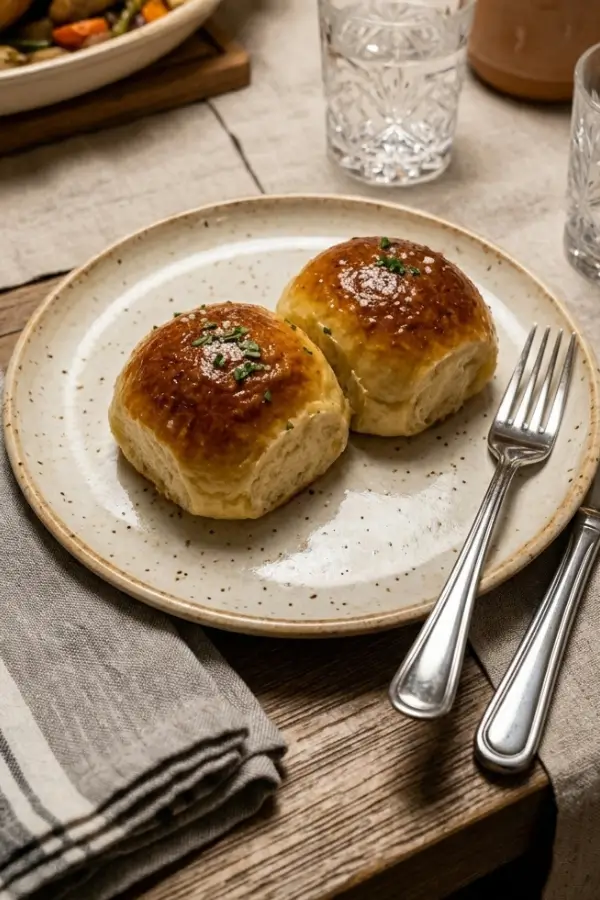
These Sourdough Discard Hawaiian Rolls turn that “waste” into something truly magical.
Soft, pillowy, and sweetened with real pineapple juice, they are the rolls your dinner table has been missing. One bite and you will never discard your discard again.
Why This Recipe Stands Out
- Uses Up Discard Easily: No more wasting your sourdough discard. This recipe uses a generous amount in one go.
- Faster Than Traditional Sourdough: Instant yeast speeds up the rise. You get fresh, homemade rolls in under 5 hours.
- Naturally Sweet Dough: Canned pineapple juice and brown sugar create that signature Hawaiian sweetness. No artificial flavors needed.
- Incredibly Soft Texture: Coconut oil and an egg enrich the dough. The result is a feathery, pull-apart crumb.
- Make-Ahead Friendly: Shape the rolls the night before and refrigerate them. Bake fresh in the morning for effortless hosting.
- Customizable for Dietary Needs: Easily made dairy-free with plant-based milk and butter. The egg can also be swapped out.
- Kid-Approved and Crowd-Pleasing: The mild tang and tropical sweetness make these rolls loved by all ages.

Ingredients You’ll Need
For the Dough:
- 200 grams (¾ cup heaping) sourdough discard, room temperature
- ¾ cup canned pineapple juice (do NOT use fresh)
- ½ cup whole milk, lukewarm
- 2¼ teaspoons (1 packet) instant yeast
- 3 tablespoons brown sugar
- 2 tablespoons granulated white sugar
- 1 teaspoon vanilla extract
- 1 teaspoon salt
- 1 large egg, beaten
- 3 tablespoons coconut oil (or any neutral oil), melted
- 3½ to 4 cups bread flour (or all-purpose flour)
For the Egg Wash:
- 1 egg yolk
- ½ tablespoon melted butter
Tools to Use
- Stand mixer with dough hook attachment (or large mixing bowl for hand mixing)
- Measuring cups and spoons
- Digital kitchen scale
- Large mixing bowl
- Small saucepan
- Whisk
- Plastic wrap or damp kitchen towel
- 9×13 inch baking dish
- Pastry brush
- Wire cooling rack
How to Make the Sourdough Discard Hawaiian Rolls
Step-1: Activate the Yeast
Pour the lukewarm milk into the bowl of your stand mixer.
Add the instant yeast and a pinch of sugar to the warm milk.
Stir gently and let it sit for 5 to 7 minutes until it looks creamy and foamy.
This step confirms your yeast is alive and active.
If the mixture does not foam, your yeast may be expired. Start with a fresh packet.
Step-2: Combine the Wet Ingredients
Add the sourdough discard, canned pineapple juice, beaten egg, melted coconut oil, vanilla extract, brown sugar, and white sugar to the yeast mixture.
Whisk everything together until smooth and well combined.
You will notice a faint fruity, tangy aroma already starting to develop.
Step-3: Mix the Dough
Attach the dough hook to your stand mixer.
Add the salt and bread flour, starting with 3½ cups.
Mix on low speed for 2 minutes until a shaggy dough forms.
Increase speed to medium and knead for 8 to 10 minutes.
The dough should pull away from the sides of the bowl but stick slightly to the bottom.
It should feel soft, smooth, and just slightly tacky when touched.
If the dough feels too sticky, add flour one tablespoon at a time.
Do not add too much flour or the rolls will turn out dense.
Step-4: First Rise (Bulk Fermentation)
Lightly grease a large bowl with oil or cooking spray.
Transfer the dough to the greased bowl and turn it once to coat.
Cover the bowl tightly with plastic wrap or a damp kitchen towel.
Place it in a warm, draft-free spot in your kitchen.
Let the dough rise for 1.5 to 2 hours until it has doubled in size.
In a cold kitchen, place the covered bowl in an oven with just the light on.
The warmth from the light is enough to encourage a good rise.
Step-5: Shape the Rolls
Once the dough has doubled, gently punch it down to release the gas.
Turn the dough out onto a lightly floured surface.
Divide the dough into 15 equal pieces using a bench scraper or knife.
Roll each piece into a tight, smooth ball by cupping your hand over the dough and rolling in a circular motion.
Place the shaped rolls snugly into a greased 9×13 inch baking dish.
The rolls should be touching each other slightly. This helps them rise upward and create that classic pull-apart shape.
Step-6: Second Rise (Proofing)
Cover the baking dish loosely with plastic wrap.
Let the rolls proof for 1 to 1.5 hours in a warm spot.
They are ready when they look puffy, domed, and are touching each other.
Gently press one with your fingertip. If it springs back slowly, the rolls are perfectly proofed.
If it springs back immediately, give them a little more time.
Step-7: Prepare the Egg Wash and Preheat Oven
About 15 minutes before baking, preheat your oven to 375°F (190°C).
In a small bowl, whisk together the egg yolk and melted butter.
Gently brush this glossy egg wash over the tops of the proofed rolls.
This gives them that beautiful deep golden, shiny finish straight from the oven.
Step-8: Bake the Rolls
Place the baking dish in the center rack of your preheated oven.
Bake for 20 to 22 minutes, until the tops are deep golden brown.
The rolls will sound hollow when tapped gently on top.
Your kitchen will fill with the most irresistible warm, sweet, buttery aroma at this point.
Remove the rolls from the oven and let them cool in the pan for 10 minutes before serving.
Serve warm and pull apart for the full experience.
Related Recipes You’ll Love to Try
- No Eggs Sourdough Discard Vegan Muffins: Irresistibly Fluffy & Moist
- Easy to Make Sourdough Discard Strawberry Muffins You Will Ever Bake
- Sourdough Discard Chocolate Muffins: Moist, Fudgy Treat You Can’t Stop Eating
- Sourdough Discard Chocolate Chip Muffins: Soft Bakery-Style Breakfast Treat
Nutritional Information
Estimated per roll (based on 15 servings):
| Nutrient | Amount |
|---|---|
| Calories | 220 kcal |
| Carbohydrates | 38 g |
| Protein | 6 g |
| Fat | 5 g |
| Sodium | 195 mg |
Note: These values are estimates and may vary based on specific ingredients used.
Tips for Success
- Use Room Temperature Discard: Cold discard straight from the fridge slows down the yeast activity. Pull it out 1 to 2 hours before baking.
- Do Not Use Fresh Pineapple Juice: Fresh pineapple contains an enzyme called bromelain that breaks down gluten. Always use canned pineapple juice for reliable results.
- Resist Adding Extra Flour: The dough will feel slightly sticky. This is completely normal. Resist the urge to add more flour. A slightly tacky dough produces the softest rolls.
- Warm Kitchen is Key: Enriched doughs with butter, sugar, and egg rise more slowly than lean doughs. A warm environment (75 to 80°F) speeds up the process considerably.
- Use Fresher Discard for Milder Flavor: Younger discard (1 to 3 days old) gives a milder, sweeter roll. Older discard (5 to 7 days) produces a more tangy, pronounced sourdough flavor.
- Make it Ahead: After shaping, cover tightly and refrigerate the rolls overnight. The next morning, let them come to room temperature and finish proofing before baking.
- Check for Doneness with a Thermometer: The internal temperature of fully baked rolls should read 190 to 200°F (88 to 93°C) on an instant-read thermometer.
Common Mistakes to Avoid
- Using Hot Liquid: Liquid hotter than 110°F (43°C) will kill your yeast. Always use warm, not hot, milk and let the pineapple juice come to room temperature before using.
- Skipping the Windowpane Test: Before the first rise, stretch a small piece of dough thin. If it tears, knead longer. If it stretches without tearing, the gluten is well-developed.
- Under-Proofing the Rolls: Rushing the second rise leads to dense, tough rolls. Wait until they are visibly puffy and pass the poke test before baking.
- Over-Proofing the Rolls: Leaving the rolls to rise too long causes them to collapse in the oven. Watch the dough, not just the clock.
- Opening the Oven Too Early: Peeking too soon can cause the rolls to sink before they set. Wait at least 15 minutes before checking.
- Baking at Too High a Temperature: A temperature above 400°F can over-brown the tops before the centers are fully baked. Stick to 375°F for even, golden results.
- Pulling Apart While Hot: The rolls need 10 minutes to set after baking. Pulling them apart too soon results in a gummy, underset interior.
Creative Serving Ideas
- Classic Dinner Rolls: Serve warm alongside roasted chicken, glazed ham, or a hearty beef stew. The slight sweetness pairs beautifully with savory mains.
- Holiday Slider Station: Slice the rolls horizontally and fill with sliced turkey, cranberry sauce, and a smear of Dijon mustard for the perfect holiday slider.
- Breakfast Sandwiches: Split a roll and fill it with scrambled eggs, a slice of cheese, and crispy turkey bacon for a tropical-inspired breakfast sandwich.
- Dipping in Soup: Serve alongside a warm bowl of tomato bisque or butternut squash soup. The soft, pillowy texture soaks up broth perfectly.
- French Toast Rolls: Day-old rolls make incredible French toast. Slice thickly, dip in a vanilla egg custard, and pan-fry until golden for a dreamy brunch treat.
- Garlic Butter Pull-Apart Bread: Brush leftover rolls with herb garlic butter and warm them in the oven for 5 minutes. They transform into the most addictive pull-apart bread.
- Mini Dessert Rolls: Serve with softened honey butter or a pineapple cream cheese spread for a sweet, simple dessert option after dinner.
Frequently Asked Questions
Can I Use Active Sourdough Starter Instead of Discard?
Yes, you can substitute active sourdough starter 1:1 for the discard.
If you do this, omit the instant yeast and expect longer rise times.
Watch the dough rather than the clock when using wild yeast only.
Why Shouldn’t I Use Fresh Pineapple Juice?
Fresh pineapple contains an enzyme called bromelain that breaks down gluten proteins in the dough.
This makes the dough sticky, weak, and unable to hold its shape.
Always use canned pineapple juice, which has been heat-treated to deactivate this enzyme.
How Should I Store Leftover Rolls?
Store cooled rolls in an airtight container at room temperature for up to 3 days.
For longer storage, freeze them in a sealed freezer bag for up to 3 months.
To reheat, wrap them in foil and warm in a 325°F oven for 8 to 10 minutes.
Can I Make These Rolls Dairy-Free?
Yes, simply substitute any plant-based milk such as oat or almond milk for the whole milk.
Replace the butter with a neutral plant-based oil or vegan butter.
Coconut milk is a particularly delicious option as it complements the pineapple flavor.
Can I Freeze the Rolls Before Baking?
Yes, you can freeze shaped, unbaked rolls on a baking sheet until solid, then transfer to a freezer bag.
When ready to bake, place them in a greased baking dish and let them thaw and proof at room temperature.
This can take 3 to 5 hours depending on your kitchen temperature, then bake as directed.
My Dough Is Not Rising. What Went Wrong?
The most common reason is inactive yeast. Make sure your liquid was warm, not hot, when you added the yeast.
Old or expired yeast will not foam and must be replaced with a fresh packet.
Also ensure your kitchen is warm enough. A cold kitchen can significantly slow down the rise time.
Can I Make These Without a Stand Mixer?
Absolutely. You can mix the ingredients by hand in a large bowl until a shaggy dough forms.
Then transfer to a floured surface and knead by hand for 12 to 15 minutes until the dough is smooth and elastic.
Alternatively, after a 1-hour rest, you can perform 3 sets of stretch-and-folds instead of traditional kneading.


