Our site contains ads and uses Amazon affiliate links. We may earn a small commission at no extra cost to you. We know ads can be distracting, and we’re sorry for any inconvenience they cause. It helps us keep the site running. Thanks for your understanding and supporting us!
Most strawberry crinkle cookie recipes fail in one of three places. The color turns orange-brown instead of pink.
The powdered sugar dissolves into a grainy crust before the cookie even cools. Or the crinkle never forms at all and you get a smooth, puffed dome that looks nothing like the photo.
None of these are random bad luck. Each one has a specific cause and a specific fix. This article covers all three in detail, plus the baking pan comparison that no other recipe bothers to explain.
Here is what you will learn:
- Why freeze-dried strawberry powder protects both flavor and texture
- The physics behind crinkle formation and why dough temperature is everything
- A humidity-proof double-coating method that keeps your powdered sugar bright white
- How your baking pan color affects spreading and crinkle quality
Why Freeze-Dried Strawberries Are Non-Negotiable in This Recipe
Fresh strawberries are mostly water. When you fold them into cookie dough, that water releases during baking and turns your dough into a spreading, flat mess. The surface never gets a chance to dry and crack, so you never get a crinkle.
Frozen strawberries have the same problem. They release even more water as they thaw inside the dough.
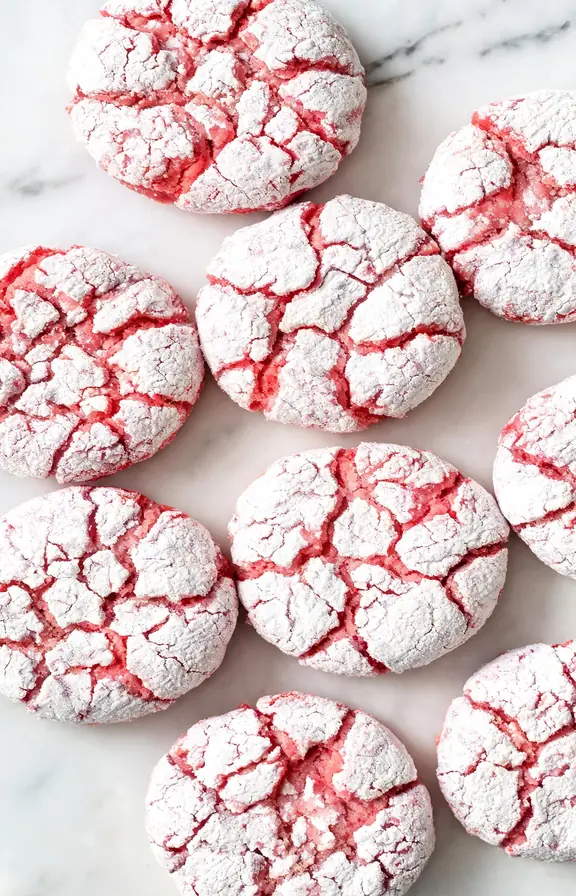
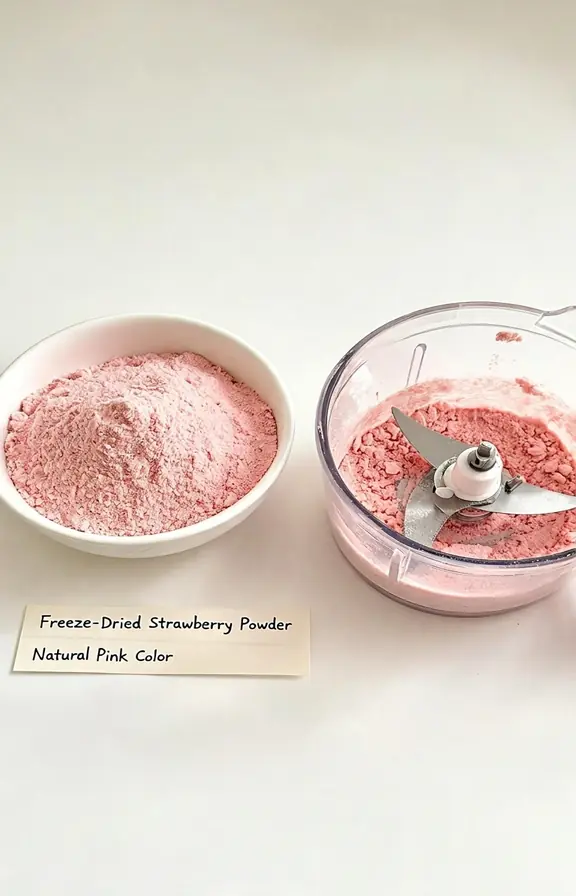
Freeze-dried strawberries have had nearly all moisture removed. When you blend them into a fine powder using a food processor, you get a concentrated flavor ingredient that behaves like a dry spice.
It distributes evenly through the dough, colors the crumb pink all the way through, and contributes real fruit flavor without shifting your wet-to-dry ratio.
According to food science research on freeze-drying, the process preserves up to 97 percent of original nutrients and flavor compounds that would otherwise degrade with heat drying.
That concentration is exactly what makes these cookies taste unmistakably of strawberry rather than a faint, artificial ghost of it.
The Physics of Crinkle Formation: What Is Actually Happening in Your Oven
A crinkle cookie forms its signature crack through a specific sequence of events. When cold dough enters a hot oven, the outer layer of the cookie heats up and begins to dry and set first.
Meanwhile, the interior is still cold and expanding as it warms. This creates a tension between the stiff, dried outer shell and the still-rising interior. Eventually, that tension fractures the surface into the irregular crack pattern we call a crinkle.
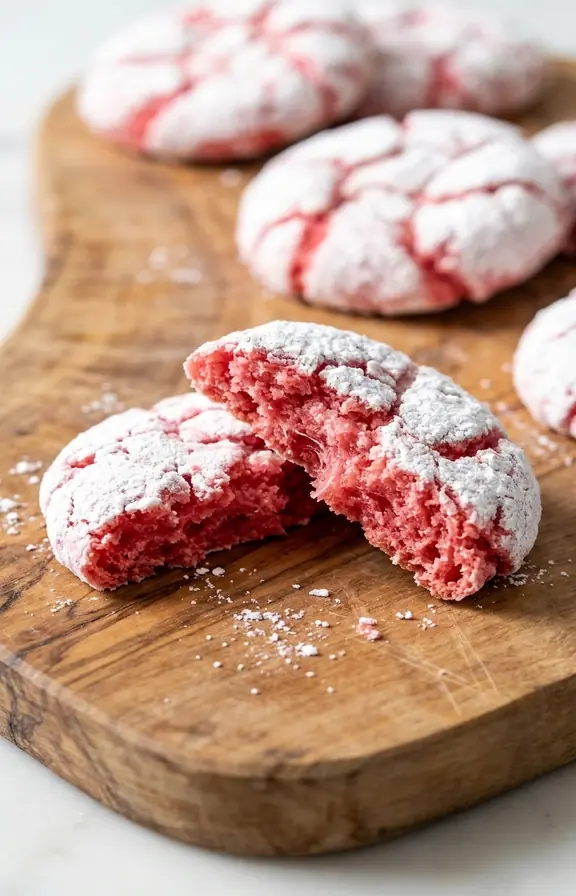
The powdered sugar coating amplifies this effect. As the outer surface sets and cracks, the white sugar remains behind in the valleys of the fracture lines. The result is that dramatic white-on-pink contrast.
Three things can prevent this sequence from working correctly. If the dough is warm when it hits the oven, the outside and inside heat at the same rate and the cookie just spreads flat.
If the dough has too much moisture, the outer shell never sets fast enough to create tension. And if the oven temperature is too low, the interior rises too slowly relative to the outer set and you get a smooth dome instead of cracks.
The Humidity Problem and the Double-Coat Solution
Powdered sugar is hygroscopic, meaning it actively absorbs moisture from the air around it.
On a humid day or in a warm kitchen, a single coat of powdered sugar can partially dissolve during the 10 to 12 minutes the cookies spend in the oven. The result is a translucent, patchy coating instead of the bright white you want.
The fix is a two-step coating process. Roll each chilled dough ball first in plain granulated sugar. The granulated sugar creates a thin, moisture-resistant shell around the outside of the dough ball.
Then immediately roll it in powdered sugar. The granulated layer underneath shields the powdered sugar from absorbing moisture from the dough, so the white coating stays intact through baking.
This technique works regardless of your kitchen’s humidity level. If you live in a particularly humid climate or are baking on a rainy day, you can roll the powdered sugar coating extra thick for even more visual contrast.
If you enjoy decorating cookies beyond the crinkle itself, our guide on the best royal icing that hardens fast for sugar cookie decorating covers every consistency you need from outlining to flooding.
Baking Pan Color: The Variable Every Recipe Ignores
This is the detail that almost no strawberry crinkle cookie recipe covers, and it makes a real difference in your results.
A light-colored or shiny aluminum baking sheet reflects heat and produces cookies that spread more slowly and evenly. The bottoms stay pale and soft.
The edges and tops have time to develop their structure before overbrowning at the base. For a pink crinkle cookie where you want the color to stay strawberry-pink rather than brown, this is the right choice.
A dark or non-stick baking pan absorbs heat and transfers it aggressively to the base of the cookie. This causes faster spreading, quicker edge-set, and darker bottoms.
The cookie may also spread more before the surface tension has time to crack, which reduces the visibility of your crinkle lines.
Use a light-colored aluminum baking sheet lined with parchment paper for the best combination of controlled spread, bright color, and well-defined crinkle cracks.
Natural Pink Color Without Food Dye
Most strawberry crinkle cookie recipes call for pink or red gel food dye in addition to freeze-dried strawberry powder. The dye is optional if you use enough strawberry powder.
One and a half ounces of freeze-dried strawberry powder in a standard batch of 22 cookies produces a medium rose-pink dough. After baking, that color deepens slightly because the sugars in the powder brown very gently and push the hue toward a richer strawberry-red pink.
If you want a more vivid, bright pink closer to bubblegum or Valentine’s Day candy, add two drops of high-quality gel food dye.
Do not use liquid food coloring. Liquid dye adds water to the dough, which works against your crinkle formation by increasing surface moisture.
Skip the dye entirely if you are making these for someone who prefers natural, additive-free baking. The freeze-dried strawberry color alone is beautiful and completely real.
Cream Cheese Stuffed Variation: The Upgrade No Competitor Covers
Freeze a teaspoon of full-fat cream cheese per cookie in advance, at least two hours before baking.
When you portion your dough, flatten each ball slightly, press a frozen cream cheese cube into the center, and wrap the dough around it completely before rolling in sugar.
The frozen cream cheese stays solid long enough for the dough to set around it in the oven.
The result is a strawberry crinkle cookie with a cold, tangy cream cheese center that melts on the tongue as the cookie cools slightly. It tastes like a strawberry cheesecake in cookie form.
If you love cream cheese in desserts, our foolproof silky cream cheese frosting for cakes and cupcakes pairs beautifully with these cookies served as sandwich cookies for parties.
Frequently Asked Questions
Strawberry Crinkle Cookies Recipe
Soft, chewy strawberry crinkle cookies made from scratch with freeze-dried strawberry powder for real fruit flavor and natural pink color. Double-coated in granulated and powdered sugar for a bold white crackle that stays bright through baking. No cake mix, no artificial flavoring.
- Food processor (for blending freeze-dried strawberries into powder)
- Stand mixer or hand mixer
- Light-colored aluminum baking sheet
- Parchment paper
- Medium cookie scoop (1.5 tablespoon capacity)
- Two shallow bowls (one for granulated sugar, one for powdered sugar)
- Wire cooling rack
- 1.5 oz (about 1 cup loosely packed) freeze-dried strawberries, blended into fine powder
- 1 and 3/4 cups (220g) all-purpose flour
- 1 teaspoon cornstarch
- 1/2 teaspoon baking soda
- 1/2 teaspoon fine sea salt
- 3/4 cup (150g) unsalted butter, softened to room temperature
- 3/4 cup (150g) granulated sugar
- 1/4 cup (55g) light brown sugar, packed
- 1 large egg, room temperature
- 1 teaspoon pure vanilla extract
- 1/2 teaspoon strawberry extract (optional but recommended)
- 2 drops pink gel food dye (optional, for a more vivid pink)
- 1/2 cup (100g) granulated sugar, for rolling
- 3/4 cup (90g) powdered sugar, sifted, for rolling
- Make the strawberry powder Add the freeze-dried strawberries to a food processor and blend on high for 30 to 45 seconds until you have a completely uniform fine powder with no visible flakes or chunks. Sift through a fine mesh sieve and discard any pieces that do not pass through. Set aside. This powder is the flavor and color backbone of the entire cookie, so take the time to get it fully smooth.
- Mix dry ingredients Whisk together the all-purpose flour, cornstarch, baking soda, salt, and the strawberry powder in a medium bowl until the powder is fully distributed and the mixture is a uniform pink color throughout. Set aside.
- Cream butter and sugars In the bowl of a stand mixer fitted with the paddle attachment, beat the softened butter, granulated sugar, and brown sugar together on medium-high speed for 2 full minutes. The mixture should look pale and fluffy. Under-creaming at this stage produces dense, tight cookies. Add the egg, vanilla extract, and strawberry extract if using. Mix on medium speed until fully combined, about 30 seconds. Add the gel food dye now if you want a more vivid pink color.
- Combine and chill the dough Add the dry ingredient mixture to the butter mixture and mix on low speed just until no dry flour streaks remain. Do not overmix. The dough will be soft and slightly sticky. Cover the bowl tightly with plastic wrap and refrigerate for a minimum of 60 minutes, or up to 48 hours. Do not skip this chilling step. It is what controls spread and creates the crinkle.
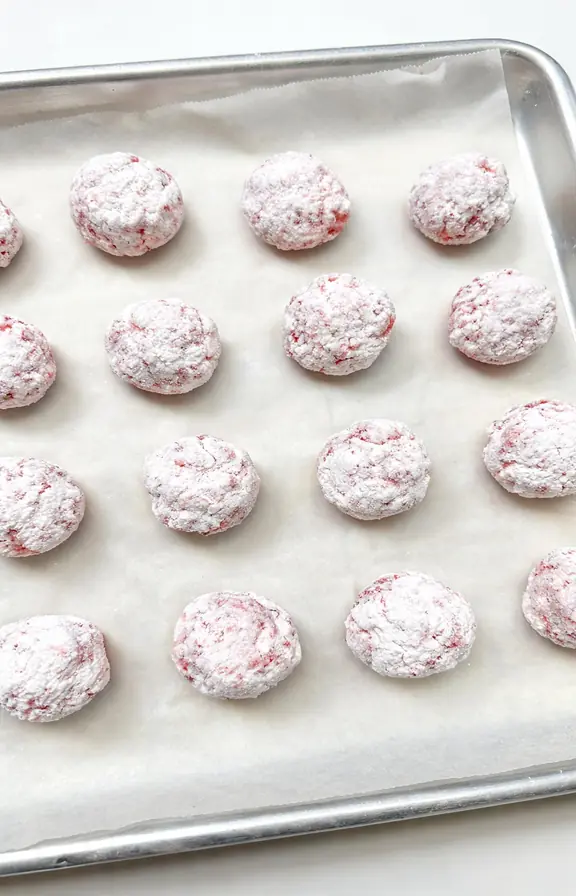
- Preheat and prepare coating bowls When you are ready to bake, preheat your oven to 375°F (190°C) and line your light-colored baking sheet with parchment paper. Set up two shallow bowls side by side: one with the 1/2 cup of granulated sugar and one with the sifted powdered sugar.
- Portion, roll, and coat Use a 1.5-tablespoon cookie scoop to portion the cold dough. Roll each portion briefly between your palms to form a smooth ball. Roll the ball first in the granulated sugar, coating it completely, then immediately roll it in the powdered sugar, coating it heavily. Place each coated ball on the prepared baking sheet, spacing them 2 inches apart. Work quickly and keep the remaining dough in the refrigerator between batches so it stays cold.
- Bake Bake one sheet at a time on the center rack for 10 to 12 minutes. At 10 to 11 minutes, the edges should look fully set and the tops should show open crack lines with the pink dough visible inside. The centers will still look soft and slightly underdone. Pull the cookies at this point. They will finish setting on the hot pan outside the oven. Overbaking past 12 minutes produces a crispy cookie instead of a chewy one.
- Cool before moving Leave the cookies on the baking sheet for exactly 5 minutes after removing from the oven. This brief rest lets the centers firm up enough to handle without crumbling. Transfer to a wire cooling rack and cool for another 10 minutes before eating. Moving them too early causes the soft centers to collapse slightly and the crinkle lines to close up.
Nutritional values are estimates calculated using standard USDA food composition data. Actual values will vary based on the specific brand of freeze-dried strawberries used, butter fat content, and exact cookie weight after baking.