Our site contains ads and uses Amazon affiliate links. We may earn a small commission at no extra cost to you. We know ads can be distracting, and we’re sorry for any inconvenience they cause. It helps us keep the site running. Thanks for your understanding and supporting us!
📊Recipe at a Glance
- Prep Time: 10 Minutes
- Cook Time: 0 Minutes
- Total Time: 10 Minutes
- Servings: 24 Cookies (about 3 cups of frosting)
- Diet Type: Vegetarian
- Cuisine: American
Ever pulled a perfect batch of sugar cookies out of the oven, only to struggle with the frosting?
You mix it too thick, it tears the cookie. You add too much milk, it slides right off.
Sound familiar? After many trial and error, I finally found the formula that works every single time.
This sugar cookie frosting is smooth, creamy, and sets beautifully without cracking.
It takes just 10 minutes and simple pantry staples. Your cookie decorating days just got a whole lot easier.
Why This Recipe Stands Out
- Ready in Just 10 Minutes: No cooking, no fuss. Just mix and frost.
- Perfect Consistency Every Time: Works beautifully for spreading, piping, or dipping.
- Rich Vanilla and Almond Flavor: The almond extract adds a bakery-level depth that vanilla alone cannot match.
- Hardens Softly on Top: It sets firm enough to stack but stays tender when you bite in.
- Beginner Friendly: No special skills needed. If you can stir, you can make this.
- Fully Customizable: Color it, flavor it, or keep it classic white. The choice is yours.
- Made with Simple Pantry Staples: No fancy ingredients required.
Understanding the Three Types of Sugar Cookie Frosting
Before you start mixing, it helps to know what you are working with. There are three main types of sugar cookie frosting you will encounter in the baking world.
Royal Icing is the hard icing people use to create intricate cookie decorations. While it creates beautiful cookies, many bakers find the flavor less enjoyable compared to other options.
Buttercream Frosting is the thick, fluffy, buttery frosting you see on soft-baked, Lofthouse-style sugar cookies. It is delicious but can be tricky to stack on a cookie tray or pack into a gift tin.
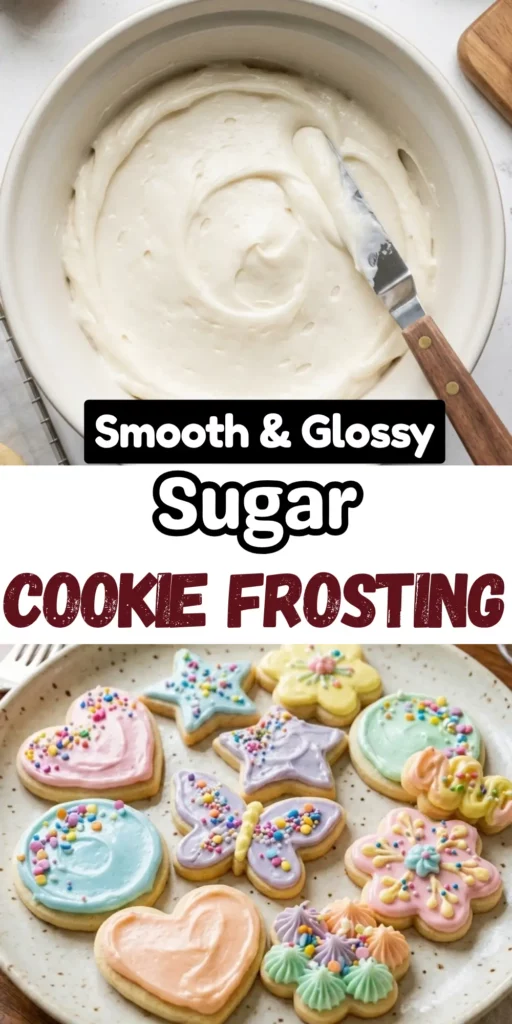
Sugar Cookie Icing has a powdered sugar base that is thinned with liquid, usually milk. It is thinner than frosting and is often spread simply on the cookie with a butter knife.
This recipe focuses on a vanilla buttercream-style frosting that combines the best of all worlds. It pipes cleanly, spreads smoothly, and tastes absolutely incredible.
Ingredients You’ll Need
For the Frosting:
- 1 cup (2 sticks) unsalted butter, softened to room temperature
- 4 cups powdered sugar (confectioners sugar), sifted
- 3 to 4 tablespoons whole milk (or any milk of your choice)
- 1 teaspoon pure vanilla extract
- ½ teaspoon almond extract
- 1 pinch of salt
- 1 tablespoon light corn syrup (optional, for a glossy finish)
- Gel food coloring (optional)
- Sprinkles for topping (optional)
Tools to Use
- Stand mixer or hand electric mixer
- Large mixing bowl
- Rubber spatula
- Measuring cups
- Measuring spoons
- Butter knife or offset spatula
- Piping bags (optional)
- Piping tips (optional)
- Small bowls (for dividing colors)
- Plastic wrap
How to Make the Sugar Cookie Frosting
Step-1: Soften Your Butter Properly
Take your butter out of the refrigerator 30 to 60 minutes before you begin.
Use softened butter slightly below room temperature, ideally between 64 and 67°F.
This makes the butter much easier to whip into a smooth, lump-free base.
Do not microwave it. Melted butter will ruin the texture of your frosting.
Step-2: Whip the Butter Until Fluffy
Place the softened butter in the bowl of your stand mixer fitted with the paddle attachment.
Beat the butter on medium-high speed for about 1 to 2 minutes.
Scrape down the bowl, then add vanilla and almond extract, and beat for another 3 to 5 minutes until light and fluffy.
The butter should look pale, creamy, and almost cloud-like before you move on.

Step-3: Add the Powdered Sugar
With the mixer on low speed, slowly pour in the powdered sugar along with the pinch of salt.
Add it gradually to prevent a powdery cloud from exploding out of your bowl.
Mix on low until the sugar is mostly incorporated, then increase speed to medium-high.
Beat for another 2 minutes until the mixture looks thick and smooth.
Step-4: Adjust the Consistency with Milk
Add 2 tablespoons of milk first and mix on medium speed.
Add more milk until the frosting reaches your desired consistency. For spreading, keep it slightly thicker. For piping, add a touch more milk so it flows smoothly.
If the frosting is too thin, add in the remaining powdered sugar. If the frosting feels too thick, add in more milk.
Add milk one small splash at a time. Patience here saves you from a runny disaster.

Step-5: Add Corn Syrup for Gloss (Optional)
Stir in 1 tablespoon of light corn syrup at this stage if you want a beautiful glossy finish.
Light corn syrup gives the sugar cookie frosting a glossy, shiny finish and helps it set firmly.
This is optional but highly recommended for that bakery-style sheen.
Step-6: Add Color (Optional)
Divide your frosting into small bowls if you want multiple colors.
If you want vibrant colors, gel food coloring is the best option. Liquid food coloring may thin out the icing, which would require you to add extra powdered sugar to thicken it back up.
Start with just a tiny drop of gel coloring and mix well before adding more.
Step-7: Frost Your Cookies
Make sure your baked sugar cookies are completely cooled before you begin frosting.
The easiest way to frost sugar cookies is to spread the vanilla buttercream on your cooled cookies with a butter knife or even the back of a spoon.
For a fancier look, load the frosting into a piping bag and pipe swirls, rosettes, or outlines.
If using sprinkles, add them immediately before the frosting begins to set.
Step-8: Let the Frosting Set
Allow the frosted cookies to sit at room temperature for 30 to 60 minutes.
The frosting will develop a soft, slightly firm outer layer that makes cookies easy to handle and stack.
Do not rush this step by refrigerating them immediately, as condensation can affect the texture.
Related Recipes You’ll Love to Try
- German Chocolate Cake Frosting: Coconut Pecan Classic for Special Occasions
- Sweet and Spiced Carrot Cake Bars with Cream Cheese Frosting
- Foolproof Silky Cream Cheese Frosting for Cakes and Cupcakes
- Easy Whipped Cream Frosting Recipe That Holds Its Shape All Day
Nutritional Information
Estimated per serving (approximately 2 tablespoons of frosting)
| Nutrient | Amount |
|---|---|
| Calories | 145 kcal |
| Carbohydrates | 22g |
| Protein | 0.2g |
| Fat | 6g |
| Sodium | 30mg |
Note: Nutritional values are estimates only and will vary based on specific ingredients used.
Tips for Success
- Use Real Butter: Margarine or butter substitutes will not give you the same rich flavor or smooth texture.
- Sift Your Powdered Sugar: This removes lumps and gives you a silky, professional-grade frosting.
- Start with Less Milk: You can always add more milk to thin it, but you cannot take it back once it is in.
- Beat Long Enough: Do not rush the whipping step. The fluffier your butter, the lighter your frosting will be.
- Use Gel Food Coloring: Gel colors are more concentrated and will not water down your frosting the way liquid coloring can.
- Room Temperature is Key: Frosting that is too cold will be stiff and hard to spread. Too warm and it will slide right off your cookie.
- Taste as You Go: Adjust vanilla, almond, or a pinch of salt to find your perfect flavor balance.
- Make Ahead When Needed: You can prepare this frosting 1 to 2 days in advance and store it in an airtight container in the refrigerator. Set it out ahead of time to come to room temperature before using it.
Common Mistakes to Avoid
- Using Cold Butter: Cold butter will not whip properly and will leave your frosting lumpy and dense.
- Adding Too Much Milk at Once: Pouring in all the milk at once makes it very easy to overshoot and end up with runny frosting.
- Skipping the Sifting Step: Unsifted powdered sugar causes frustrating lumps that are hard to smooth out later.
- Frosting Warm Cookies: Frosting melts and slides off cookies that have not fully cooled. Always wait until they reach room temperature.
- Using Liquid Food Coloring in Large Amounts: This can dramatically thin your frosting and dull the colors.
- Over-mixing After Adding Color: Too much mixing can cause air bubbles that leave an uneven finish on decorated cookies.
- Not Covering Stored Frosting: Exposed frosting develops a dry, crusty skin. Always press plastic wrap directly onto the surface before storing.
Creative Serving Ideas
- Holiday Cookie Boxes: Color the frosting in seasonal shades, decorate festive cutout shapes, and package them in pretty gift boxes for neighbors and friends.
- Cookie Decorating Party: Set out bowls of frosting in several colors alongside sprinkles, edible glitter, and candy pearls, and let guests go wild.
- Frosted Cookie Sandwiches: Spread a thick layer of frosting between two cookies to make irresistible cookie sandwiches.
- Dipped Cookie Pops: Insert a stick into each cookie, thin the frosting slightly, and dip the tops for a fun fair-style treat.
- Rainbow Cookie Platters: Frost each cookie in a different color to create a stunning rainbow display for birthdays or celebrations.
- Monogram or Message Cookies: Use a small piping tip to write names, initials, or short messages on each cookie for a personal touch at weddings or baby showers.
- Themed Classroom Treats: Match frosting colors to school colors or season themes for an easy, crowd-pleasing classroom snack.
Frequently Asked Questions
How Long Does Sugar Cookie Frosting Last?
Icing can be stored at room temperature for up to three days.
If you want it to last longer, it can be refrigerated for up to a week. Cover it with plastic wrap to keep it from drying out.
Can I Freeze Cookies with Frosting on Them?
You can freeze iced cookies. Allow the frosting to totally set up first.
Place cookies in an airtight container, and if you are stacking them, place a piece of wax paper or parchment paper between the layers.
They can stay frozen for up to three months.
Can I Make This Frosting Without a Stand Mixer?
Yes, absolutely. A hand electric mixer works just as well.
You can even mix it by hand with a whisk, though the frosting will be slightly less fluffy.
The key is to beat the butter long enough to get it light and airy before adding the sugar.
Why is My Frosting Too Thick?
Your frosting is likely too thick because you used too little milk or your butter was slightly too cold.
Add milk one teaspoon at a time and mix well after each addition until you reach your desired consistency.
Make sure your butter is properly softened before you start.
Why is My Frosting Too Runny?
For a thinner frosting, add an additional teaspoon of milk and mix on medium-high speed for 15 seconds.
If your frosting is already too runny, add more sifted powdered sugar, a tablespoon at a time, until it thickens back up.
Avoid adding too much milk all at once to prevent this problem from the start.
Can I Use Dairy-Free Milk in This Recipe?
Yes, you can substitute any plant-based milk such as almond, oat, or coconut milk.
Note that if you are using a lower-fat milk, you may need less than the recipe calls for, as it tends to be thinner.
Just be aware that some plant-based milks may add a subtle flavor of their own to the frosting.
Does the Almond Extract Make a Big Difference?
Yes, it truly does. Almond extract adds a warm, slightly nutty, bakery-style depth that vanilla alone cannot replicate.
Start with just ¼ teaspoon if you are new to it, and increase to taste.
Many bakers say it is their single favorite secret ingredient in sugar cookie frosting.
What is the Difference Between Frosting and Icing for Sugar Cookies?
Frosting is thicker, creamier, and butter-based. It holds its shape well and is perfect for spreading and piping.
Icing is thinner, made mostly from powdered sugar and milk, and dries to a harder finish.
Both work beautifully on sugar cookies, but this recipe uses a frosting-style base for the best flavor and texture.


