Our site contains ads and uses Amazon affiliate links. We may earn a small commission at no extra cost to you. We know ads can be distracting, and we’re sorry for any inconvenience they cause. It helps us keep the site running. Thanks for your understanding and supporting us!
📊Recipe at a Glance
- Prep Time: 30 minutes
- Cook Time: 12 minutes
- Total Time: 2 hours 45 minutes (including decorating and drying time)
- Servings: 24 cookies
- Diet Type: Vegetarian
- Cuisine: American
Royal Icing Love Cookies aren’t just desserts; they’re tiny canvases where your creativity meets irresistible flavor.
The moment you pipe that first smooth outline and watch glossy icing pool into perfect hearts, you’ll understand why these cookies have captured hearts for generations.
Each bite delivers a satisfying snap followed by buttery sweetness that melts on your tongue.
Whether you’re a seasoned baker or picking up a piping bag for the first time, these cookies promise both impressive results and pure joy in the making.
Why This Recipe Stands Out
- Perfect Consistency Every Time: The royal icing formula ensures smooth application without the frustration of runny or too-thick icing that many recipes produce.
- Stable Cookie Base: These cookies hold their shape beautifully during baking, maintaining crisp edges and detailed cutouts.
- Beginner-Friendly Technique: Simple flood and outline method makes professional-looking results achievable even for first-time decorators.
- Long Shelf Life: Properly stored cookies stay fresh and beautiful for up to two weeks, perfect for advance preparation.
- Customizable Colors: The basic white icing easily transforms into any color palette to match your celebration theme.
- No Special Ingredients: Uses pantry staples without requiring hard-to-find specialty items.
Ingredients You’ll Need
For the Sugar Cookies:
- 3 cups all-purpose flour
- 1 teaspoon baking powder
- 1/2 teaspoon salt
- 1 cup unsalted butter, softened
- 1 cup granulated sugar
- 1 large egg
- 2 teaspoons pure vanilla extract
- 1 tablespoon whole milk
For the Royal Icing:
- 4 cups powdered sugar, sifted
- 3 tablespoons meringue powder
- 6 to 8 tablespoons warm water
- 1 teaspoon vanilla extract
- Gel food coloring (optional)
Tools to Use
- Stand mixer or hand mixer
- Large mixing bowls
- Whisk
- Rolling pin
- Heart-shaped cookie cutters (various sizes)
- Parchment paper
- Baking sheets
- Wire cooling rack
- Piping bags
- Piping tips (size 2 or 3 for outlining)
- Squeeze bottles for flooding
- Toothpicks
- Spatula
How to Make the Royal Icing Love Cookies
Step 1: Prepare the Cookie Dough
Combine the flour, baking powder, and salt in a medium bowl.
Whisk together until evenly distributed.
Set aside while you prepare the wet ingredients.
In your stand mixer fitted with the paddle attachment, cream the softened butter and sugar together on medium speed for 3 to 4 minutes.
The mixture should become light and fluffy with a pale color.
Scrape down the sides of the bowl to ensure even mixing.

Step 2: Mix the Wet Ingredients
Add the egg, vanilla extract, and milk to the creamed butter mixture.
Beat on medium speed until fully incorporated, about 1 minute.
The mixture may look slightly curdled, but this is normal.
Scrape down the bowl again to catch any unmixed ingredients.
Step 3: Combine Dry and Wet Ingredients
Reduce mixer speed to low.
Gradually add the flour mixture to the wet ingredients, about one cup at a time.
Mix until just combined and no flour streaks remain.
Do not overmix, as this creates tough cookies.
The dough should come together in a soft, slightly sticky ball.
Step 4: Chill the Dough
Divide the dough into two equal portions.
Flatten each portion into a disk about 1 inch thick.
Wrap tightly in plastic wrap.
Refrigerate for at least 1 hour or up to 3 days.
Chilling prevents spreading and makes rolling much easier.
Step 5: Roll and Cut the Cookies
Preheat your oven to 350°F (175°C).
Line two baking sheets with parchment paper.
Remove one dough disk from the refrigerator.
Let it sit at room temperature for 5 minutes to soften slightly.
Lightly flour your work surface and rolling pin.
Roll the dough to 1/4 inch thickness, working from the center outward.
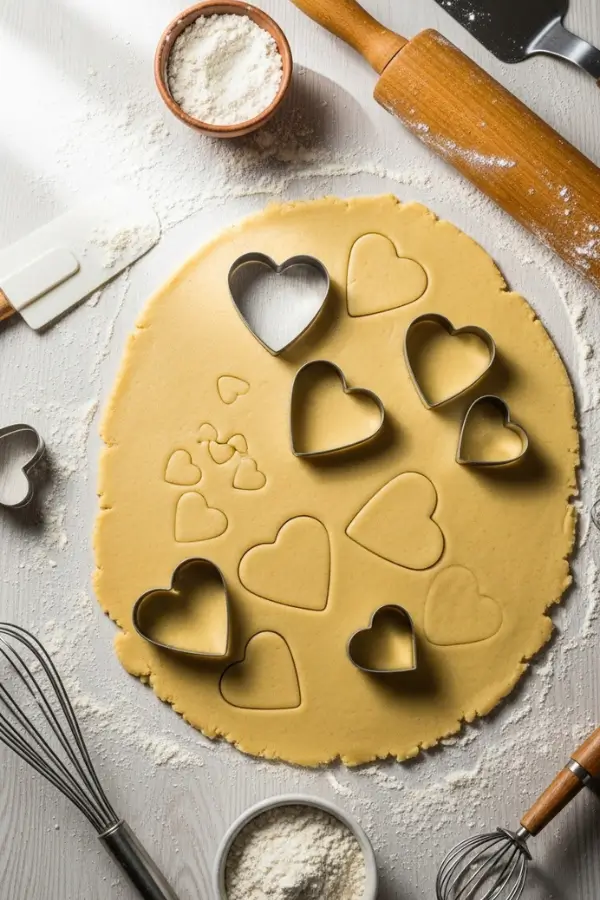
Use heart-shaped cookie cutters to cut out shapes.
Place cookies on prepared baking sheets, spacing them 2 inches apart.
Gather scraps, re-roll once, and cut additional cookies.
Step 6: Bake the Cookies
Bake for 10 to 12 minutes until edges are just barely golden.
The centers should still look slightly soft.
Cookies will firm up as they cool.
Remove from oven and let cookies rest on the baking sheet for 5 minutes.
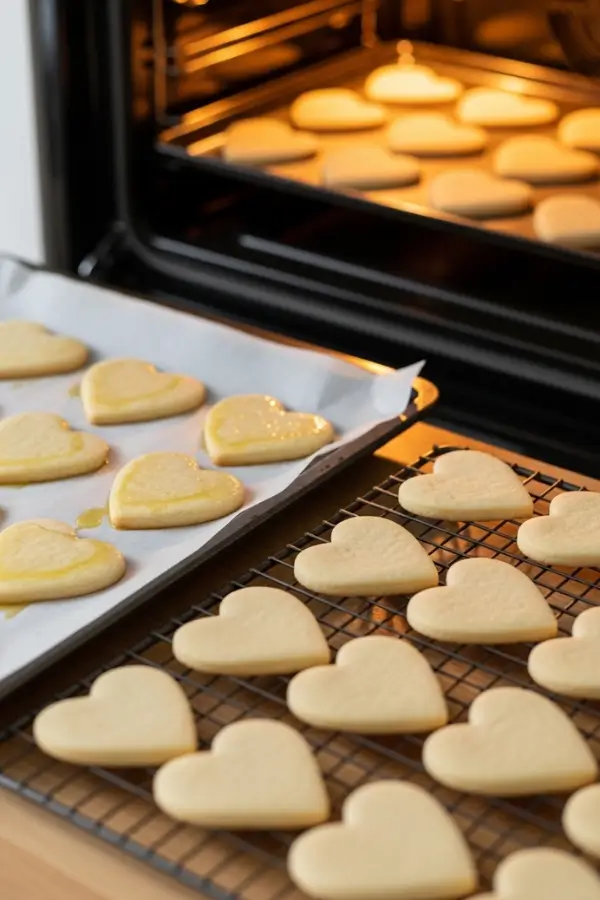
Transfer to a wire cooling rack using a spatula.
Cool completely before decorating, at least 30 minutes.
Step 7: Make the Royal Icing
Sift the powdered sugar into a large mixing bowl to remove any lumps.
Add the meringue powder.
Whisk together the dry ingredients thoroughly.
Add 6 tablespoons of warm water and vanilla extract.
Beat on low speed for 30 seconds to combine.
Increase to medium-high speed and beat for 5 to 7 minutes.
The icing should form stiff peaks that hold their shape.
This is your outlining consistency.
Step 8: Prepare Flooding Consistency
Transfer about two-thirds of the stiff icing to a separate bowl for flooding.
Add water one teaspoon at a time, stirring gently.
Test the consistency by drizzling icing from a spoon.
The ribbon should disappear back into the icing within 10 to 15 seconds.
If it disappears faster, the icing is too thin.
If it sits on top, add more water.
Keep the remaining stiff icing covered with a damp towel.
Step 9: Color the Icing (Optional)
Divide both consistencies of icing into separate bowls if using multiple colors.
Add gel food coloring one drop at a time.
Stir thoroughly until color is evenly distributed.
Remember that colors deepen slightly as the icing dries.
Keep all bowls covered when not in use to prevent crusting.
Step 10: Outline the Cookies
Fill a piping bag fitted with a size 2 or 3 tip with stiff icing.
Hold the bag at a 45-degree angle just above the cookie surface.
Squeeze gently while moving along the cookie edge.
Create a border about 1/4 inch from the edge.
Let the icing flow from the tip rather than dragging it.
Complete the entire outline, ensuring it connects with no gaps.
Allow outlines to set for 15 to 20 minutes before flooding.

Step 11: Flood the Cookies
Transfer flooding consistency icing to squeeze bottles for easier control.
Working on one cookie at a time, squeeze icing inside the outline.
Start from the center and work outward.
Use a toothpick to spread icing into corners and edges.
Pop any air bubbles with the toothpick.
The icing should settle into a smooth, even surface.
Gently tap the cookie on the counter to help icing level out.
Step 12: Dry and Finish
Leave cookies undisturbed on the cooling rack.
Allow them to dry at room temperature for 6 to 8 hours or overnight.
The icing should be completely hard and dry to the touch.
Once dry, add additional decorative details if desired using stiff icing.
Pipe dots, lines, names, or patterns on the dried base coat.
Let any additional decorations dry for 2 to 3 hours.
Store in an airtight container between layers of parchment paper.
Related Recipes You’ll Love to Try
- Famous Pickle Dump Cake Recipe: Sweet Meets Tangy
- Marbled Red Velvet Cheesecake Brownies: Rich, Swirled & Irresistible
- Easy Marshmallow Fluff at Home: You’ll Want to Spoon on Everything
- Best Dark Chocolate Brown Sugar Cookie: Deep, Bold & Chewy
Nutritional Information
- Calories: 185 per cookie
- Protein: 2g
- Fat: 8g
- Carbohydrates: 28g
- Sodium: 65mg
Note: Nutritional values are approximate and may vary based on specific brands and ingredients used.
Tips for Success
- Room Temperature Butter is Key: Butter should be soft enough to leave an indent when pressed but not melting or greasy for proper creaming.
- Don’t Skip the Chill: Cold dough prevents cookies from spreading and losing their heart shape during baking.
- Sift Your Powdered Sugar: This simple step prevents lumps in your royal icing that can clog piping tips.
- Test Icing Consistency First: Practice on a spare cookie or plate before committing to your best cookies.
- Work in Small Batches: Royal icing dries quickly, so only prepare what you can use within 30 minutes.
- Keep Icing Covered: Air exposure creates a crust that ruins smooth application.
- Use Gel Colors, Not Liquid: Gel food coloring won’t thin your icing like liquid varieties.
- Let Layers Dry Completely: Rushing between decorating steps causes colors to bleed together.
- Low Humidity Helps: Royal icing dries best in dry conditions; avoid decorating on rainy days if possible.
- Practice Piping Pressure: Consistent pressure creates even lines and smooth floods.
Common Mistakes to Avoid
- Overmixing the Dough: This develops too much gluten, resulting in tough, hard cookies instead of tender ones.
- Rolling Dough Too Thin: Cookies thinner than 1/4 inch become too fragile and break easily when handling.
- Skipping the Outline Step: Flooding without an outline causes icing to run off the edges.
- Adding Too Much Water at Once: This instantly ruins icing consistency with no easy fix except making a new batch.
- Decorating Warm Cookies: Heat melts royal icing and prevents it from setting properly.
- Using Old Meringue Powder: Expired powder won’t create the stable structure needed for royal icing.
- Not Sealing Icing Properly: Exposed icing forms a thick crust that makes piping impossible.
- Rushing the Drying Process: Moving or stacking cookies before icing fully sets causes smudges and dents.
- Overworking Re-rolled Dough: Scraps can be re-rolled once, but doing so multiple times creates tough cookies.
- Ignoring Oven Hot Spots: Rotate baking sheets halfway through for even baking.
Creative Serving Ideas
- Cookie Bouquet Display: Attach cookies to lollipop sticks before decorating, then arrange in a vase filled with decorative stones for an edible centerpiece.
- Personalized Gift Boxes: Stack 3 to 4 cookies in clear cellophane bags tied with ribbon for individual party favors.
- Dessert Board Centerpiece: Arrange cookies among fresh strawberries, chocolate truffles, and pink macarons for an elegant Valentine’s spread.
- Ice Cream Sandwiches: Use two cookies to sandwich softened strawberry or vanilla ice cream, then freeze until firm.
- Breakfast Surprise: Place a cookie on a breakfast tray with coffee and fresh flowers for a romantic morning treat.
- Cookie Garland: String cookies with holes punched before baking onto ribbon to create an edible decoration.
- Tiered Stand Presentation: Display cookies on a cake stand with varying heights for visual impact at parties.
- Paired with Hot Chocolate: Serve alongside mugs of creamy hot chocolate topped with whipped cream and heart sprinkles.
- Message Cookies: Pipe sweet messages or names on each cookie for a personalized touch at dinner parties.
- Mixed Size Display: Use different sized heart cutters to create visual variety when arranging on serving platters.
Frequently Asked Questions
Can I Make the Cookie Dough Ahead of Time?
Yes, wrapped dough keeps refrigerated for up to 3 days or frozen for 3 months.
Thaw frozen dough overnight in the refrigerator before rolling.
This actually improves flavor as the butter and vanilla have time to meld.
Why Is My Royal Icing Too Runny?
You’ve added too much water to the mixture.
Add more sifted powdered sugar, 1 tablespoon at a time, and beat until desired consistency returns.
Always add water very gradually to prevent this issue.
How Long Do Decorated Cookies Stay Fresh?
Properly stored cookies remain fresh for up to 2 weeks in an airtight container.
Keep them at room temperature away from humidity and direct sunlight.
Do not refrigerate, as this introduces moisture that softens cookies.
Can I Use Egg Whites Instead of Meringue Powder?
Yes, use 3 fresh egg whites in place of meringue powder and water.
However, meringue powder is safer as it contains pasteurized egg whites.
Fresh egg white icing also has a shorter shelf life.
What If I Don’t Have Heart-Shaped Cookie Cutters?
Use any shaped cutter you have or create a cardboard template to cut around with a knife.
Round cookies work beautifully with royal icing decoration too.
The technique remains the same regardless of cookie shape.
How Do I Fix Air Bubbles in My Flooded Icing?
Pop them immediately with a clean toothpick before the icing begins to set.
Gently tap the cookie on your work surface to bring bubbles to the surface.
Working quickly prevents bubbles from drying in place.
Can I Add Flavoring to the Royal Icing?
Yes, replace vanilla with almond, lemon, or peppermint extract.
Keep the amount to 1 teaspoon to avoid thinning the icing.
Clear extracts prevent discoloration in white or pastel icings.
Why Did My Cookies Spread During Baking?
Your dough wasn’t chilled long enough or your butter was too warm.
Oven temperature may also be too low, causing cookies to spread before setting.
Always verify oven temperature with an oven thermometer for accuracy.


