Our site contains ads and uses Amazon affiliate links. We may earn a small commission at no extra cost to you. We know ads can be distracting, and we’re sorry for any inconvenience they cause. It helps us keep the site running. Thanks for your understanding and supporting us!
📊Recipe at a Glance
- Prep Time: 20 minutes (plus 1 to 2 hours rise time)
- Cook Time: 12 to 15 minutes
- Total Time: About 2 hours
- Servings: 2 medium pizzas (about 8 slices each)
- Diet Type: Vegan, Dairy-Free
- Cuisine: Italian-American
That jar of sourdough discard in your fridge keeps growing, and throwing it away every week feels wasteful and frustrating.
You want to use it, but most recipes feel too complicated or too time-consuming for a busy weeknight.
This sourdough discard pizza dough recipe solves both problems in one shot.
It uses up your discard beautifully, comes together in under two hours, and produces a crust that is golden, chewy, and full of that gentle tangy flavor you just cannot get from store-bought dough.
Pizza night just got a serious upgrade.
Why This Recipe Stands Out
- Same-Day Ready: You do not need to wait overnight. The dough rises in about 1 to 2 hours and is ready for pizza night the same day.
- Uses Up Discard Smartly: Instead of tossing your sourdough discard, this recipe puts it to delicious use with zero waste.
- Deep, Tangy Flavor: The discard adds a gentle sourdough tang that store-bought dough simply cannot match.
- Beginner-Friendly: No advanced baking skills are needed. If you can stir and knead, you can make this dough.
- Totally Customizable: Go thin and crispy or thick and chewy. The dough adapts to your preference easily.
- Freezer-Friendly: Make a batch, freeze a portion, and enjoy homemade pizza whenever the craving hits.
- Vegan and Dairy-Free: No butter or eggs. This dough is clean, simple, and works for a variety of diets.

Ingredients You’ll Need
Makes 2 medium pizzas
For the Dough:
- 1 cup (227g) sourdough discard, unfed, at room temperature
- 3/4 cup (180ml) warm water (around 105°F to 110°F)
- 2 tablespoons (30ml) extra virgin olive oil, plus more for greasing
- 2 1/4 teaspoons (7g) instant yeast (one standard packet)
- 1 teaspoon granulated sugar
- 1 1/2 teaspoons fine sea salt
- 2 1/2 cups (300g) bread flour, plus more for dusting
- 1/2 cup (60g) whole wheat flour
- 1/2 teaspoon garlic powder (optional, but recommended)
- 1/2 teaspoon cornmeal, for dusting the pan (optional)
Tools to Use
- Stand mixer with dough hook attachment (or large mixing bowl)
- Kitchen scale
- Measuring cups and spoons
- Dough scraper
- Large mixing bowl
- Plastic wrap or damp kitchen towel
- Pizza stone or heavy baking sheet
- Pizza peel or flat cutting board
- Oven thermometer
- Rolling pin or hands (hands preferred)
- Pastry brush
How to Make the Sourdough Discard Pizza Dough
Step-1: Activate the Yeast
In a small bowl, combine the warm water and sugar.
Sprinkle the instant yeast over the top and give it a gentle stir.
Let it sit for about 5 minutes.
The mixture should turn foamy and smell yeasty. This tells you the yeast is alive and ready to work.
If it does not foam, your water may have been too hot or too cold. Start over with fresh yeast.
Step-2: Mix the Dough
In the bowl of a stand mixer fitted with a dough hook, combine the bread flour, whole wheat flour, salt, and garlic powder.
Give the dry ingredients a quick stir to combine.
Add the sourdough discard to the bowl.
With the mixer running on low speed, pour in the yeast mixture and olive oil slowly.
Increase the speed to medium and mix for about 8 to 10 minutes.
The dough should pull away from the sides of the bowl and feel soft, smooth, and slightly tacky to the touch.

If mixing by hand, stir everything together in a large bowl and knead on a lightly floured surface for 8 to 10 minutes until smooth and elastic.
Step-3: Adjust the Dough Consistency
Check the dough texture during mixing.
If it feels too sticky and sticks to your hands, add flour one tablespoon at a time.
If it feels too stiff and dry, add a splash of warm water one tablespoon at a time.
The perfect dough should feel like soft, warm putty. It should spring back slowly when you poke it with a finger.
Step-4: First Rise (Bulk Ferment)
Lightly oil a large clean bowl with olive oil.
Shape the dough into a smooth ball and place it into the oiled bowl.
Turn the dough once so that all sides are lightly coated in oil.
Cover the bowl tightly with plastic wrap or a damp kitchen towel.
Place it in a warm spot in your kitchen. An oven with just the light on works well.
Let the dough rise for 1 to 2 hours, or until it has doubled in size.
The dough should look puffy and airy when it is ready. You will notice a faint, tangy sourdough aroma filling your kitchen. That is a good sign.
Step-5: Preheat the Oven
While the dough is in its final moments of rising, preheat your oven to 475°F (245°C).
If you are using a pizza stone, place it in the oven during preheating so it gets scorching hot.
A properly preheated stone is the secret to a crispy, restaurant-style crust bottom.
Allow the oven to preheat for at least 30 minutes so the stone or pan reaches the right temperature.
Step-6: Divide and Shape the Dough
Once the dough has doubled, gently punch it down to release the air.
Transfer it to a lightly floured surface.
Divide the dough into two equal portions using a dough scraper or knife.
Let the dough balls rest on the counter, loosely covered, for 10 minutes. This bench rest relaxes the gluten and makes shaping much easier.
Using your hands or a rolling pin, gently stretch each dough ball into a round or oval shape about 10 to 12 inches wide.
Do not use a rolling pin if you can help it. Stretching by hand preserves the airy bubbles and gives the edge a beautiful, puffy crust.
For a thin crust, stretch it wider. For a thick crust, keep it compact and about 1/2 inch thick.
Step-7: Add Toppings
Transfer the stretched dough to a pizza peel or a flat baking sheet lightly dusted with cornmeal or flour.
Spread your pizza sauce evenly over the surface, leaving about a 1-inch border around the edge for the crust.
Add your favorite toppings now, but hold off on the cheese for the moment.
Adding cheese at the beginning can trap moisture and make the crust soggy. You will add it partway through baking instead.
Step-8: Par-Bake the Crust
Slide the pizza onto the hot pizza stone or baking sheet.
For thin crust: bake for 5 minutes without cheese.
For thick crust: bake for 10 minutes without cheese.
You will start to see the edges puff up and turn a light golden color. The kitchen will smell absolutely magnificent at this point.
Step-9: Add Cheese and Finish Baking
Pull the pizza out of the oven carefully using the pizza peel or oven mitts.
Scatter your cheese generously over the top of the toppings.
Slide the pizza back into the oven and bake for another 5 to 7 minutes.
Watch for the cheese to bubble and brown in spots and the crust edges to turn a deep golden brown.
The bottom should sound hollow when you tap it with your knuckle.
Step-10: Rest and Serve
Remove the pizza from the oven and let it rest for 2 to 3 minutes before slicing.
This short rest allows the cheese to set slightly so your toppings do not slide off when you cut.
Slice, serve hot, and enjoy every chewy, crispy, tangy bite.
Related Recipes You’ll Love to Try
- Sourdough Discard Pop Tarts: Tasty Way to Reduce Waste in Your Kitchen
- Sourdough Discard Magic: Bake Up a Batch of Blueberry Muffins
- Fresh & Flavorful: The Best Sourdough Discard Tortillas Recipe
- Sourdough Discard Cheese Crackers: Crispy, Cheesy & Zero Waste
Nutritional Information
Per serving (1 slice, based on 8 slices per pizza, dough only without toppings):
- Calories: Approximately 185 kcal
- Protein: 6g
- Fat: 4g
- Carbohydrates: 32g
- Sodium: 290mg
Note: Nutritional values are estimates and will vary based on exact ingredients used and toppings added.
Tips for Success
- Use Room-Temperature Discard: Cold discard straight from the fridge can slow down yeast activity. Let it sit on the counter for 30 minutes before mixing.
- Weigh Your Ingredients: A kitchen scale gives you the most accurate results. Flour in particular can vary a lot by volume depending on how you scoop it.
- Do Not Over-Flour: A slightly tacky dough is perfectly normal. Adding too much flour makes the crust dense and dry rather than chewy and light.
- Let the Oven Get Really Hot: A blazing hot oven (475°F or higher) is the key to a golden, crispy crust. Do not rush the preheat.
- Add Cheese at the Halfway Point: This one step dramatically improves your crust texture. The base cooks faster without the weight of cheese trapping steam.
- Make It Overnight for More Flavor: If time allows, refrigerate the shaped dough balls overnight after the first rise. The cold, slow ferment deepens the sourdough flavor considerably.
- Use a Pizza Stone for the Best Bottom: A hot pizza stone mimics a wood-fired oven and gives you that satisfying crunch on the bottom of the crust.
- Freeze Extra Dough: After the first rise, portion the dough, wrap tightly, and freeze for up to 6 weeks. Thaw overnight in the fridge before using.
Common Mistakes to Avoid
- Using Water That Is Too Hot: Water above 115°F will kill the yeast. Always check the temperature with a thermometer before adding yeast to it.
- Skipping the Rise Time: Rushing the rise leads to dense, flat dough with no flavor. Give the dough the full time it needs to puff up and develop.
- Adding Cheese Too Early: Melted cheese acts like a lid and traps steam. This leads to a soggy, undercooked crust. Always par-bake first.
- Using a Rolling Pin Aggressively: Pressing down hard with a rolling pin pops the bubbles in the dough. Stretch it gently with your hands for a lighter crust.
- Not Preheating the Pizza Stone: Placing dough on a cold stone is one of the most common reasons for a pale, limp crust. Always preheat for at least 30 minutes.
- Overloading with Toppings: Too many toppings make the pizza heavy and prevent the crust from cooking through properly. Less is more when it comes to pizza.
- Using Very Old or Inactive Discard: Discard that smells too sharp or has turned a strange color should be discarded for real. Use discard that smells pleasantly tangy.
- Forgetting to Let the Dough Rest Before Shaping: Skipping the bench rest means the dough will keep snapping back when you try to stretch it. Patience here saves effort later.
Creative Serving Ideas
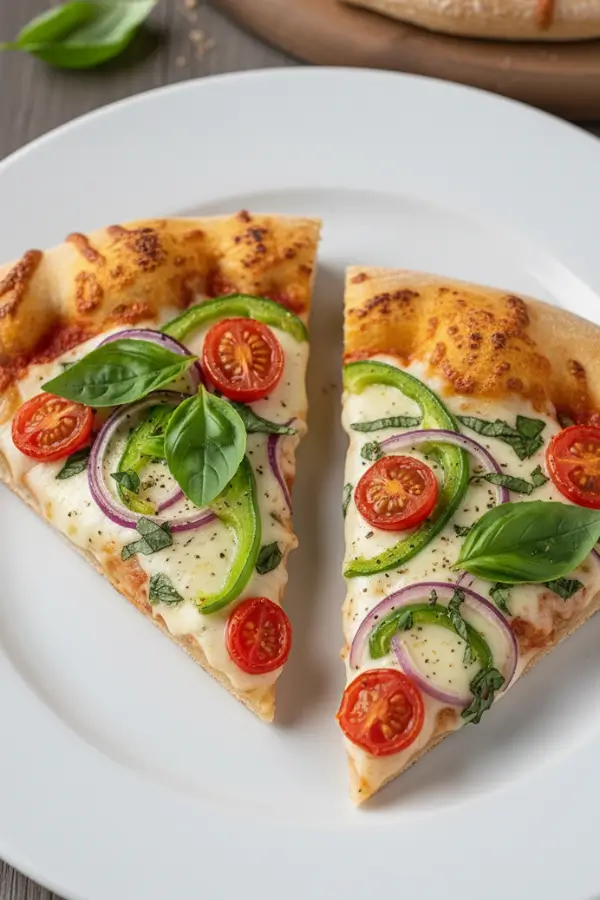
- Classic Margherita Style: Top with crushed tomatoes, fresh mozzarella, and a handful of fresh basil leaves torn just before serving for a timeless combination.
- White Pizza with Garlic and Herbs: Skip the tomato sauce and brush the crust with garlic-infused olive oil. Top with ricotta, fresh thyme, and a drizzle of honey after baking.
- Pesto and Roasted Vegetable Pizza: Spread a generous layer of basil pesto, then pile on roasted zucchini, cherry tomatoes, and crumbled goat cheese for a vibrant, fresh option.
- Breakfast Pizza: Top the par-baked crust with scrambled eggs, shredded cheddar, sautéed peppers, and onions for a morning twist on classic pizza.
- Flatbread Style with Dips: Cut the finished pizza into strips and serve alongside hummus, marinara, or a yogurt-based dip for a crowd-pleasing appetizer.
- Mini Personal Pizzas: Divide the dough into four smaller portions and let everyone build their own pizza with their favorite toppings. It is perfect for families with picky eaters.
- Chicken Alfredo Pizza: Use a homemade cream sauce made with garlic, cream, and parmesan as the base. Top with cooked shredded chicken, mushrooms, and mozzarella for an indulgent option.
- Serve with a Fresh Side Salad: Pair each pizza with a simple arugula salad dressed with lemon juice and olive oil to balance the richness of the cheese and dough.
Frequently Asked Questions
Can I Use Sourdough Discard Straight from the Fridge?
Yes, you can use cold discard from the fridge in this recipe.
However, letting it warm to room temperature for about 30 minutes before mixing gives better results.
Room-temperature discard blends more easily and supports yeast activity during the rise.
Do I Need to Use Yeast if I Am Using Sourdough Discard?
In this recipe, yes. Sourdough discard is unfed and inactive, so it does not have enough leavening power on its own.
Instant yeast does the heavy lifting to make the dough rise in a manageable amount of time.
If you want a yeast-free version, use active, bubbly sourdough starter and allow much longer rise times.
Can I Make the Dough the Night Before?
Yes, and it is actually recommended for a deeper flavor.
After the first rise, punch down the dough, cover it, and place it in the refrigerator overnight.
The next day, let it sit at room temperature for 20 to 30 minutes before shaping and baking.
Can I Freeze This Pizza Dough?
Yes, this dough freezes beautifully for up to 6 weeks.
After the first rise, divide the dough, wrap each portion tightly in plastic wrap, and place in a freezer bag.
To use, thaw overnight in the refrigerator and then let it rest at room temperature for 30 minutes before shaping.
What Kind of Flour Works Best for This Dough?
Bread flour is the top choice because its higher protein content creates a chewier, more structured crust.
All-purpose flour also works well and produces a slightly softer result.
A combination of bread flour and whole wheat flour, as used in this recipe, gives great flavor and texture.
Why Is My Dough Not Rising?
The most common reason is that the yeast was killed by water that was too hot (above 115°F).
Another reason could be that the room is too cold. Try placing the covered bowl in a warmer spot, like near a preheating oven.
Also check that your yeast is not expired, as old yeast loses its potency over time.
Can I Make This Recipe Without a Stand Mixer?
Absolutely. A large mixing bowl and your hands work just as well.
Stir the ingredients together until a shaggy dough forms, then turn it out onto a lightly floured surface and knead by hand for 8 to 10 minutes.
The dough is ready when it feels smooth, soft, and springs back when poked.
How Do I Store Leftover Pizza?
Store leftover pizza slices in an airtight container or wrapped tightly in the refrigerator for up to 5 days.
To reheat, place slices directly on an oven rack or in a skillet over medium heat for the crispiest results.
Avoid the microwave if you want to preserve the crispy crust texture.


