Our site contains ads and uses Amazon affiliate links. We may earn a small commission at no extra cost to you. We know ads can be distracting, and we’re sorry for any inconvenience they cause. It helps us keep the site running. Thanks for your understanding and supporting us!
📊Recipe at a Glance
- Prep Time: 30 minutes (plus 1 hour chilling)
- Cook Time: 25-30 minutes
- Total Time: 2 hours
- Servings: 8 pop tarts
- Diet Type: Vegetarian
- Cuisine: American
Remember rushing to the kitchen before school and tearing open that shiny foil packet?
Pop tarts were pure joy in rectangular form. Now, as a home baker with a sourdough starter living in the fridge, I wanted to recreate that magic, but with real, wholesome ingredients.
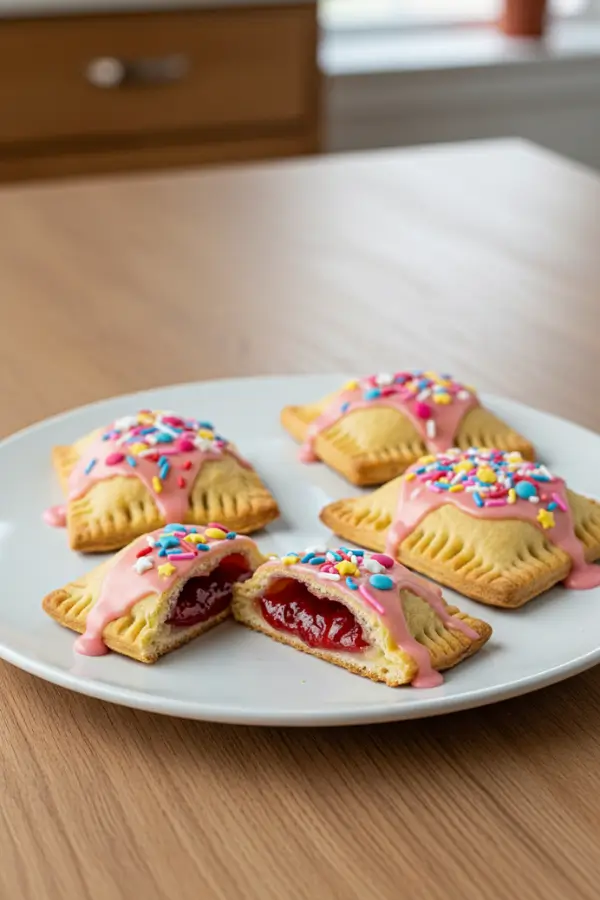
These sourdough discard pop tarts are everything you loved as a kid, with a flaky, golden crust, a jammy sweet filling, and a dreamy glaze on top.
They taste better than the store-bought version, and you will know exactly what is in every bite.
Why This Recipe Stands Out
- Uses sourdough discard wisely: No more throwing away that precious discard. This recipe puts it to delicious use.
- Flakier than store-bought: Cold butter and discard create layers that shatter beautifully with every bite.
- No artificial ingredients: Real flour, real butter, and real jam. That is it.
- Customizable fillings: Strawberry, blueberry, Nutella, brown sugar cinnamon. You pick your favorite.
- Kid-approved and adult-loved: This treat bridges the nostalgia gap for every generation.
- Easy to freeze: Bake a big batch and freeze extras for busy mornings.
- The sourdough tang adds depth: That subtle fermented flavor elevates these far beyond any boxed version.

Ingredients You’ll Need
For the Dough:
- 2 cups (240g) all-purpose flour
- 1 tablespoon granulated sugar
- 1/2 teaspoon salt
- 1 cup (226g) unsalted butter, very cold
- 1/2 cup (120g) sourdough discard, cold
- 1 teaspoon white vinegar or apple cider vinegar
- 2-4 tablespoons ice water (as needed)
For the Filling:
- 1/2 cup strawberry jam (or your favorite flavor)
For the Egg Wash:
- 1 egg
- 1 tablespoon heavy cream
For the Glaze:
- 1 cup powdered sugar
- 2 tablespoons heavy cream or milk
- 1 teaspoon lemon juice (optional)
- 1 tablespoon jam (for color, optional)
- Sprinkles (optional, for topping)
Tools to Use
- Large mixing bowl
- Pastry cutter or cheese grater
- Dough whisk or fork
- Bench scraper
- Plastic wrap
- Rolling pin
- Ruler
- Sharp knife or pizza cutter
- Parchment paper
- Baking sheet
- Pastry brush
- Toothpick
- Wire cooling rack
- Small mixing bowl
How to Make the Sourdough Discard Pop Tarts
Step-1: Make the Dough
In a large mixing bowl, whisk together the flour, sugar, and salt.
Grate your cold butter directly into the flour using a cheese grater, or cut it into small cubes and add it to the bowl.
Use a pastry cutter or your fingertips to work the butter into the flour until it forms pea-sized crumbles.
Add the cold sourdough discard and the vinegar to the bowl.
Use a fork or dough whisk to mix until the dough begins to come together.
Add ice water, one tablespoon at a time, until the dough holds together without crumbling.
Do not overwork it. Stop as soon as the dough forms a cohesive ball.
Step-2: Chill the Dough
Divide the dough into two equal portions using a bench scraper.
Shape each portion into a flat disc or rectangle.
Wrap each piece tightly in plastic wrap.
Refrigerate for at least 1 hour, or up to 3 days for a deeper sourdough flavor.
Longer chilling means flakier, more flavorful pastry.
Step-3: Roll and Cut the Dough
Preheat your oven to 350°F (177°C).
Line a baking sheet with parchment paper.
On a lightly floured surface, roll out one disc of dough to about 1/8-inch thickness.
Using a ruler and a sharp knife or pizza cutter, cut the dough into rectangles measuring approximately 3 x 4 inches.
You should get about 8 bottom pieces and 8 top pieces total from both discs.
Transfer half of the rectangles to the prepared baking sheet. These will be your bases.
Step-4: Add the Filling
Spoon about 1 to 1.5 tablespoons of jam onto the center of each base rectangle.
Leave a clear border of at least half an inch around all edges.
Do not overfill. Too much jam will cause it to burst out during baking.
Step-5: Assemble the Pop Tarts
Whisk together the egg and heavy cream to make the egg wash.
Brush the edges of each base rectangle lightly with the egg wash.
Lay a second rectangle of dough over the top of each filled base.
Press the edges firmly together with your fingertips.
Use a fork to crimp all four edges, sealing the pop tarts completely.
Use a toothpick to poke 3 to 4 small holes in the top of each pop tart to allow steam to escape.
Brush the tops with the remaining egg wash for a gorgeous golden finish.
Step-6: Bake to Golden Perfection
Place the baking sheet in the preheated oven.
Bake for 25 to 30 minutes, or until the pop tarts are deeply golden and your kitchen smells like a bakery.
If baking two trays at once, rotate them halfway through for even browning.
Remove from the oven and let them cool completely on a wire rack.
Resist the urge to glaze them while warm. The glaze will simply slide right off.
Step-7: Make the Glaze and Finish
In a small bowl, whisk together the powdered sugar, heavy cream, and lemon juice until smooth.
Add a tablespoon of jam for a pretty pink glaze, if desired.
Spoon or spread the glaze generously over each cooled pop tart.
Add sprinkles on top for a festive, colorful finish.
Let the glaze set for about 30 minutes before serving for the cleanest presentation.
Related Recipes You’ll Love to Try
- Sourdough Discard Pretzel Bites: A Creative Recipe for Leftover Starter
- Sweet, Soft & Waste-Free Sourdough Discard Banana Bread Recipe
- Royal Icing Love Cookies: The Sweetest Treat for Any Celebration
- Blueberry Curd Cake Filling: Bright, Silky & Bursting with Flavor
Nutritional Information
Estimated per serving (1 pop tart):
- Calories: 380 kcal
- Protein: 4g
- Fat: 20g
- Carbohydrates: 47g
- Sodium: 160mg
Note: Nutritional values are estimates and may vary based on specific ingredients used.
Tips for Success
- Keep everything cold: Cold butter is the secret to a truly flaky crust. If your kitchen is warm, pop the dough back in the fridge between steps.
- Grate your butter: Using a cheese grater to grate frozen butter makes it much easier to incorporate evenly into the flour without warming it up.
- Do not skip the vinegar: It inhibits gluten formation and helps create a tender, flaky texture. White vinegar or apple cider vinegar both work perfectly.
- Ferment longer for more flavor: Chilling the dough for 24 to 48 hours deepens the sourdough tang and makes the crust even more flavorful and digestible.
- Seal the edges tightly: A leaky pop tart is a sad pop tart. Use both the egg wash and a firm fork crimp to lock in all that jammy goodness.
- Cool completely before glazing: Patience here is essential. A warm pop tart will melt your glaze right off.
- Use a scale for accuracy: Weighing your flour and butter in grams gives you the most consistent results every time.
Common Mistakes to Avoid
- Overworking the dough: Mixing too much develops gluten and results in a tough, chewy crust instead of a flaky one. Mix only until just combined.
- Using warm butter: Soft or melted butter will not create flaky layers. Always start with butter straight from the fridge or freezer.
- Overfilling the pop tarts: More jam sounds like a good idea until it bubbles out and burns on your baking sheet. Stick to 1 to 1.5 tablespoons per pop tart.
- Skipping the vent holes: Without holes, steam builds up inside and can cause the pop tarts to puff unevenly or burst open.
- Glazing too soon: If the pop tarts are even slightly warm, the glaze turns into a runny mess. Let them cool fully on the rack first.
- Adding too much water: A little ice water helps the dough come together, but too much makes it sticky and dense. Add just one tablespoon at a time.
- Not chilling the dough: Skipping the rest in the fridge means the butter warms up and you lose those beautiful flaky layers during baking.
Creative Serving Ideas
- Classic breakfast plate: Serve warm with a cup of tea or a tall glass of cold milk for a nostalgic morning treat.
- Dessert bar display: Arrange glazed pop tarts on a tiered stand at parties with different fillings and colorful sprinkle toppings for a show-stopping spread.
- Brown sugar cinnamon version: Swap the jam for a filling made of brown sugar, cinnamon, and a little flour for a cozy, spiced twist.
- Nutella-filled option: Spread a generous layer of Nutella inside for a rich, chocolatey filling that kids absolutely adore.
- Cut into fun shapes: Use heart, star, or Christmas tree cookie cutters instead of rectangles for holiday parties and seasonal celebrations.
- Pack in lunchboxes: These travel beautifully and make a special lunchbox treat that beats any store-bought snack.
- Serve alongside fresh fruit: A handful of fresh strawberries or raspberries alongside these pop tarts makes a balanced and colorful plate.
Frequently Asked Questions
Can I Use Active Sourdough Starter Instead of Discard?
Yes, you absolutely can. Both active starter and discard work equally well in this recipe.
Since the crust does not need any leavening, there is no real difference in the final texture or rise. Use whichever you have on hand.
How do I Store Sourdough Discard Pop Tarts?
Store finished pop tarts in an airtight container at room temperature for up to 3 days.
You can also refrigerate them for up to 6 days. Reheat in a 350°F oven for about 10 minutes to crisp them back up.
Can I Freeze These Pop Tarts?
Yes, these freeze beautifully. For best results, freeze them before baking and before glazing.
When you are ready to enjoy them, bake straight from frozen, adding a few extra minutes to the bake time.
Glaze after they have cooled.
What Fillings Can I Use Besides Strawberry Jam?
The options are nearly endless. Try blueberry jam, raspberry jam, apple butter, Nutella, peanut butter, or a homemade brown sugar cinnamon mixture.
Any thick filling that will not run too much works perfectly.
Why is My Dough Too Crumbly?
This usually means you need a little more moisture. Add ice water one teaspoon at a time, mixing gently between each addition.
You can also use your hands to press the dough together.
The warmth of your hands helps it come together without adding more liquid.
Do I Need a Food Processor to Make These?
No, you do not need any special equipment. A large bowl, a cheese grater, and a fork or pastry cutter are all you need.
A food processor speeds up the process, but handmade dough works just as well and gives you better control over the texture.
Why Did My Filling Leak Out During Baking?
Leaking is usually caused by overfilling or not sealing the edges properly.
Make sure to leave a clear half-inch border around the filling.
Brush the edges with egg wash and press firmly with a fork to create a tight seal before baking.


