Our site contains ads and uses Amazon affiliate links. We may earn a small commission at no extra cost to you. We know ads can be distracting, and we’re sorry for any inconvenience they cause. It helps us keep the site running. Thanks for your understanding and supporting us!
Most strawberry rhubarb pie problems come from the same source: too much liquid in the filling at the wrong time.
Strawberries are more than 90 percent water, and rhubarb releases its own juice as it cooks. Without managing those liquids before they hit the crust, you get a runny filling that never sets.
This recipe fixes that with three mechanics: strategic maceration, the right thickener in the right amount, and a baking temperature sequence that drives moisture out of the filling before the crust can absorb it.
Why the 3:2 Fruit Ratio Matters More Than the Recipe Says
Every strawberry rhubarb pie recipe gives you a fruit ratio. Almost none explains why it matters structurally.
Rhubarb stalks have firm cell walls that hold their shape during baking. Strawberries are delicate and collapse quickly, releasing liquid as they cook.
A higher ratio of rhubarb gives the filling structural integrity while strawberries provide sweetness and color.
At a 3:2 ratio (three cups rhubarb to two cups strawberries), the rhubarb softens but holds enough shape to keep the filling from becoming a soup. Drop below that and the filling loses body. Go above 3:1 and the tartness becomes aggressive without enough sweetness to balance it.
The Maceration Step That Almost Every Recipe Skips
Maceration means tossing the cut fruit with sugar and letting it sit before you build the pie. It looks like a minor step. It is not.
During those 20 minutes, sugar draws moisture out of the fruit through osmosis. The fruit releases a pool of juice before the pie is assembled.
You then have a choice: discard some of that juice and cook down the rest, or transfer only the fruit with a slotted spoon and leave the pooled liquid behind.
Either approach means significantly less liquid enters the pie shell, and the cornstarch works on a smaller, more concentrated volume of juice.
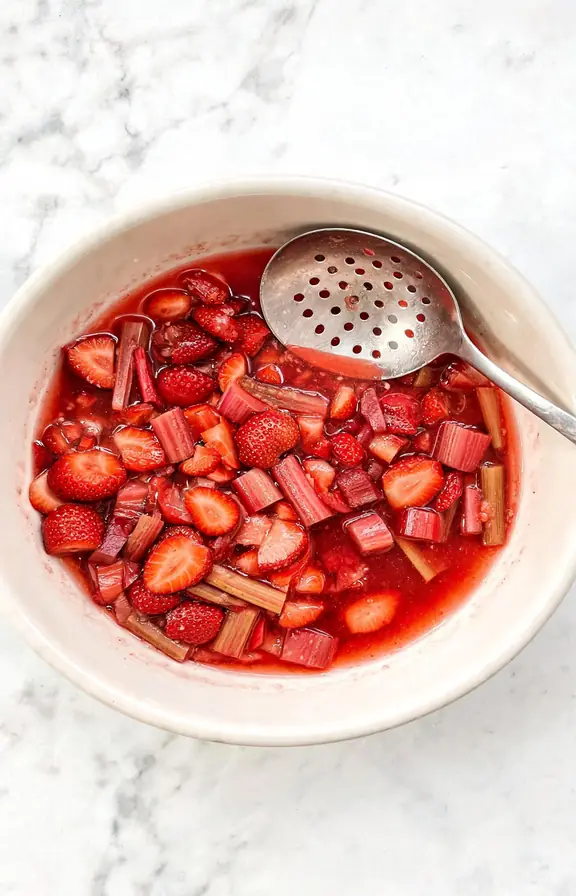
This matters especially for strawberries. Very ripe in-season berries release two to three times more juice than underripe ones. Without maceration, that variability is invisible until the pie is already in the oven.
- Ripe, in-season strawberries: macerate the full 20 minutes and discard up to half the pooled juice
- Underripe or off-season strawberries: macerate 10 minutes, use all the juice
- Frozen strawberries: thaw completely, drain thoroughly, skip maceration
Cornstarch vs. Tapioca vs. Flour: Which Thickener Wins
This is the question every strawberry rhubarb pie discussion eventually reaches. The answer depends on what you want from the finished filling.
Cornstarch sets into a clear, glossy gel that slices cleanly. It activates at high heat and sets firmly as the pie cools. For a filling that holds a sharp edge when cut, cornstarch is the right choice.
Tapioca starch also sets clear, but it remains slightly elastic at room temperature and gives the filling a glossy, almost translucent look that some bakers prefer. It handles temperature fluctuation better than cornstarch after refrigeration.
Flour thickens but produces an opaque, starchy filling that can taste raw if underbaked. It works in a pinch but is not the best tool for fruit pies where the visual clarity of the filling matters.
This recipe uses cornstarch because it sets firmly, stays clear, and requires no pre-cooking. You are already managing liquid through maceration, so you do not need tapioca’s extra forgiveness.
Building a Bottom Crust That Does Not Go Soggy
Soggy bottom crust is a moisture problem, not a recipe problem. The solution has three parts.
First, chill your crust after fitting it into the pie plate and before adding filling. A cold crust firms the fat layer and reduces the window during which liquid can penetrate before the crust sets.
Second, start the pie at a high temperature. This recipe begins at 425°F for the first 15 minutes, then drops to 375°F for the remainder.
The initial blast of high heat sets the crust quickly and drives steam upward through the filling rather than letting it pool at the bottom.
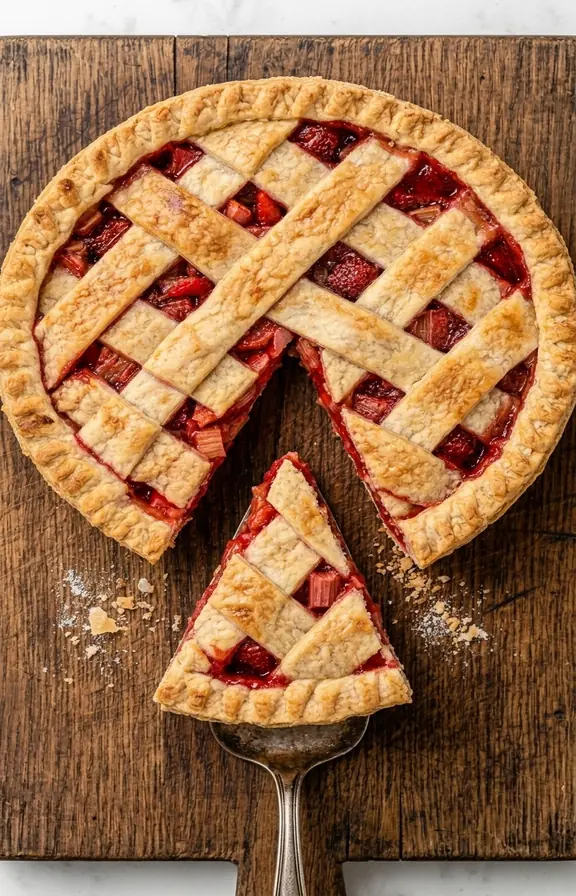
Third, let the pie cool fully on a wire rack, at least two hours, before cutting. The filling continues to set as it cools. Cutting early means cutting into a semi-liquid filling that soaks directly into the already-baked crust from below.
If you want more control over your crust game, the all-butter dough technique in our homemade pop tart crust guide on keeping pastry flaky and properly layered applies directly here.
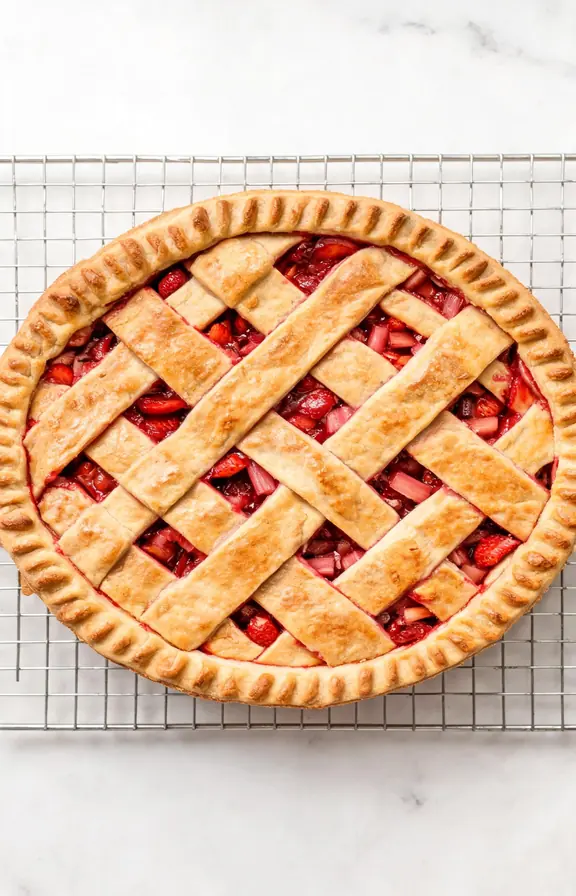
The Lattice Top: Why It Is Not Just Decorative
A lattice top is the correct technical choice for strawberry rhubarb pie, not just an aesthetic one.
Strawberries release steam as they cook. That steam has to escape somewhere. A fully sealed double crust traps it inside and keeps the filling temperature lower for longer, which means the cornstarch takes longer to activate and the bottom crust sits in hot, steamy liquid instead of baking dry.
A lattice allows steam to escape continuously during baking. The filling dehydrates slightly as it bakes, concentrating the fruit flavor and helping the cornstarch activate more efficiently across the full volume of filling.
Even simple cuts or a few large vents in a double crust will work better than no vents at all. A lattice is ideal, but any opening is better than a sealed top on a high-moisture fruit pie.
Rhubarb: What You Actually Need to Know Before You Bake
Rhubarb stalks are safe to eat and cook with. Only the leaves are toxic, containing high concentrations of oxalic acid.
According to National Geographic’s coverage of rhubarb chemistry, you would need to consume several pounds of rhubarb leaves at a sitting to reach a harmful dose. The stalks themselves contain only trace amounts.
Discard every leaf and use only the stalks. That is the single food safety rule for rhubarb. Everything else is just flavor management.
For flavor, choose stalks that are firm and deeply colored. Pale or greenish stalks are less mature and noticeably more tart. Deeply red stalks have more natural sweetness and a slightly less acidic profile, which means you can use slightly less sugar without the filling tasting sharp.
Serving and Storing Strawberry Rhubarb Pie the Right Way
The filling needs time. Two hours of cooling at room temperature is the minimum. Four hours gives you cleaner, more defined slices.
Serve at room temperature for the best flavor. Cold filling dulls the fruit brightness and makes the crust feel less flaky. If you refrigerate the pie, pull it out 30 to 45 minutes before serving.
Store at room temperature covered loosely for up to two days. Refrigerate for up to five days. The crust softens slightly in the fridge but the filling improves as the flavors settle overnight.
If you enjoy fruity desserts with that same sweet-tart balance, you will also want to explore the layered technique behind banoffee pie and why each layer order matters for structure.
Frequently Asked Questions
Strawberry Rhubarb Pie
Jammy, deeply flavored strawberry rhubarb pie with a flaky all-butter crust and a filling that holds clean slices. Maceration technique controls liquid. Two-temperature baking keeps the bottom crust crisp. Freezer-friendly for make-ahead baking.
- 9-inch pie plate
- Large mixing bowl (for maceration)
- Colander or slotted spoon (to drain macerating fruit)
- Rolling pin
- Pastry brush (for egg wash)
- Pie weights or dried beans (for blind bake option)
- Wire cooling rack
- Instant-read thermometer (optional but useful)
- 2 and 1/2 cups (315g) all-purpose flour
- 1 tablespoon (12g) granulated sugar
- 1 teaspoon (6g) fine sea salt
- 1 cup (227g) unsalted butter, very cold, cut into 1/2-inch cubes
- 6 to 8 tablespoons ice water, added one tablespoon at a time
- 3 cups (360g) fresh rhubarb, cut into 1/2-inch pieces
- 2 cups (300g) fresh strawberries, hulled and halved
- 3/4 cup (150g) granulated sugar
- 4 tablespoons (32g) cornstarch
- 1 tablespoon fresh lemon juice
- 1 teaspoon lemon zest
- 1/4 teaspoon fine sea salt
- 1/2 teaspoon pure vanilla extract
- 1 large egg, beaten with 1 tablespoon whole milk
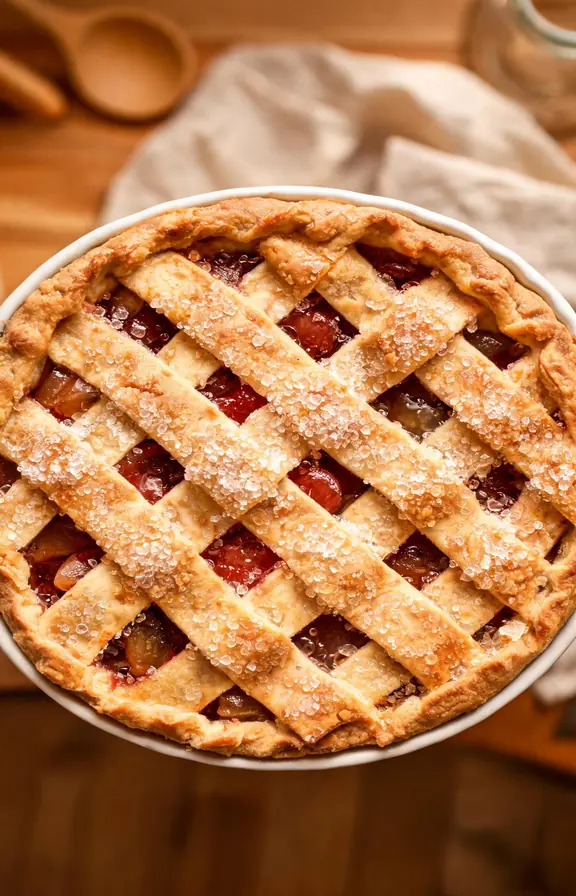
- 1 to 2 tablespoons turbinado or coarse sugar (for sprinkling)
- Make the pie crust Whisk flour, sugar, and salt together in a large bowl. Add the cold butter cubes and work them into the flour using a pastry cutter or your fingertips until the mixture resembles coarse crumbs with some flat, pea-sized butter pieces remaining. Those flat pieces create flaky layers. Add ice water one tablespoon at a time, tossing with a fork after each addition, until the dough just begins to hold together when pressed. Divide into two equal discs, wrap tightly in plastic, and refrigerate for at least 1 hour or up to 2 days.
- Macerate the fruit Combine the rhubarb, strawberries, and sugar in a large bowl. Toss well and let the mixture sit for 20 minutes. The sugar will draw out juice from both fruits. After 20 minutes, use a slotted spoon to transfer the fruit to a separate bowl, leaving behind the pooled juice. Discard or save the juice for another use. This single step prevents a runny filling.
- Season the filling Sprinkle the cornstarch, lemon juice, lemon zest, salt, and vanilla over the drained fruit. Toss gently until everything is evenly coated. The filling should look glossy but not wet. Set aside while you roll out the crust.
- Roll and fit the bottom crust On a lightly floured surface, roll one chilled disc into a 12-inch circle, rotating after each pass to keep it even. Drape over the pie plate and ease it gently into the bottom and sides without stretching. Trim the overhang to 1/2 inch beyond the rim. Refrigerate the lined plate while you prepare the lattice.
- Prepare the lattice top Roll the second disc into a 12-inch circle. Cut into strips about 1 inch wide using a pastry wheel or sharp knife. Lay half the strips parallel across a parchment-lined baking sheet and refrigerate while you fill the pie.
- Fill and assemble Pour the seasoned fruit filling into the chilled crust, mounding it slightly in the center. Weave the lattice strips over the filling: lay half the strips one direction, fold back alternating strips, lay a cross strip, then unfold. Repeat across the pie. Trim the lattice ends flush with the bottom crust overhang, then fold both edges under together and crimp firmly to seal.
- Egg wash and chill Brush the lattice and crust edge evenly with the egg wash mixture. Sprinkle with coarse sugar. Place the assembled pie on a rimmed baking sheet (to catch drips) and refrigerate for 20 minutes while the oven heats. This chilling step helps the crust hold its shape in the initial blast of high heat.
- Bake with the two-temperature method Preheat the oven to 425°F (220°C). Place the pie on the baking sheet on the lower oven rack. Bake for 15 minutes at 425°F, then reduce heat to 375°F (190°C) and continue baking for 40 to 45 minutes. Tent the crust edge with foil after the first 25 minutes if it darkens too quickly. The pie is done when the filling is deeply and slowly bubbling through the lattice openings and the crust is deep golden brown all over.
- Cool completely before cutting Transfer to a wire rack and cool for at least 2 hours at room temperature before cutting. The filling sets as it cools. Slicing early produces a runny, loose filling even when the pie looked perfect coming out of the oven. Four hours of cooling gives the cleanest, most defined slices.
Nutritional values are estimates calculated using standard USDA food composition data. Actual values will vary based on the exact size of the pie slice, the variety and ripeness of the fruit used, and the amount of sugar added during maceration.


