Our site contains ads and uses Amazon affiliate links. We may earn a small commission at no extra cost to you. We know ads can be distracting, and we’re sorry for any inconvenience they cause. It helps us keep the site running. Thanks for your understanding and supporting us!
Lemon meringue pie has a reputation for being difficult. The filling runs when you slice it. The meringue weeps a pool of liquid overnight. The meringue shrinks away from the crust, leaving a gap that turns soggy.
None of these problems are random. Each one has a specific scientific cause, and each one has a straightforward fix built directly into this recipe.
This article covers the mechanics behind every decision:
- why cornstarch alone is not enough to hold the filling firm,
- what temperature controls weeping versus beading in meringue,
- how to blind bake a crust that stays crisp under a wet filling,
- and exactly how to store and slice the pie without destroying the layers.
Why Most Lemon Meringue Pies Fail (And What This Recipe Does Differently)
Most published lemon meringue pie recipes tell you what to do but skip explaining why. That matters, because if you do not understand the mechanism, you cannot troubleshoot when something goes wrong.
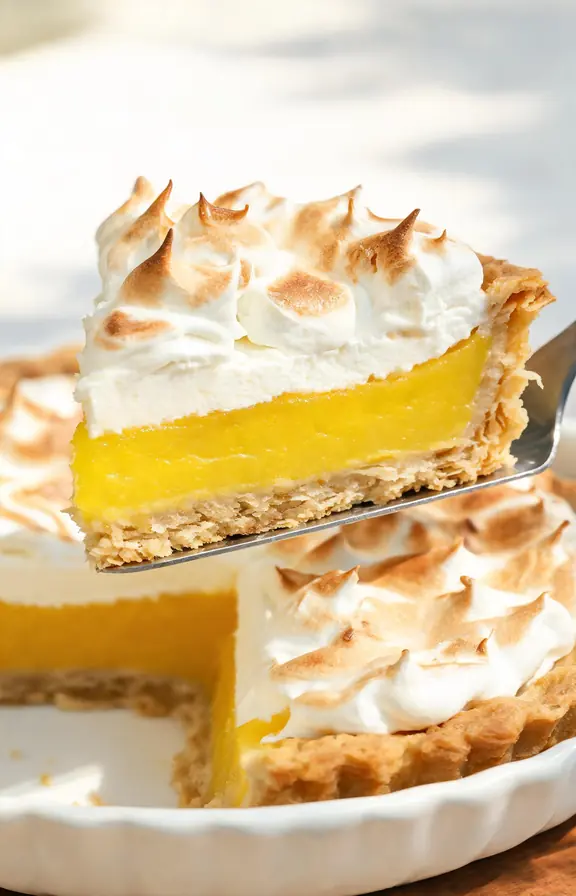
There are two separate thickening systems at work in the filling: cornstarch and egg yolks. Cornstarch thickens by gelatinizing at around 203°F. Egg yolks thicken by denaturing their proteins starting at about 149°F.
The problem is that cornstarch can break down over time, especially in an acidic environment like lemon juice. That is why using egg yolks alongside cornstarch is critical. The yolks trap water inside a protein network, giving you a filling that stays sliceable hours after baking.
Most recipes use one or the other. This recipe uses both, which is why the filling holds a clean slice even after an overnight chill.
The Blind Bake: How to Get a Crispy Crust Under a Wet Filling
A soggy bottom crust is a structural failure, not a flavor problem. The moisture from the filling saturates an underbaked shell. The fix is a fully blind-baked crust that is completely cooked and sealed before any filling touches it.
Line your chilled pie shell with parchment and fill it with pie weights or dry beans. Bake at 375°F for 20 minutes to set the structure. Remove the weights and bake for another 10 to 15 minutes until the entire base is golden, not just the edges.
The golden color matters. That color indicates that enough moisture has cooked off from the dough to create a barrier against the wet filling. A pale crust still contains steam and will go soggy within an hour of filling.
If you want to go one step further, brush the hot crust with a thin layer of beaten egg white immediately after removing the weights and return it to the oven for 3 minutes. This creates a protein seal that adds an extra layer of moisture resistance.
The Filling: Dual-Thickener Method for a Firm, Glossy Curd
This is the section most competitor recipes skip entirely. They list the ingredients correctly but never explain the order of operations or why each step produces the texture it does.
Start by whisking cornstarch and sugar together in a saucepan before adding any liquid. Whisking dry ingredients together first prevents the cornstarch from clumping when liquid is added. Add water and bring to a low boil while stirring constantly.
Once the mixture turns translucent and begins to bubble, it is time to temper the egg yolks. Take a spoonful of the hot starch mixture and whisk it into the yolks. Repeat two more times.
Then pour the warmed yolk mixture back into the saucepan while whisking constantly. This tempering step prevents the yolks from scrambling when they hit the hot starch.
Cook for two more minutes over medium heat until the filling is very thick and coats the back of a spoon heavily. Only then remove from heat and stir in lemon juice, zest, and butter.
The result is a filling with two interlocking structures: the starch gel provides firmness at room temperature, and the egg protein network holds moisture and prevents syneresis (the scientific term for liquid weeping out of a gel) after slicing.
When you are ready to make your filling, you will need a basic understanding of how egg whites behave under heat, which is the same chemistry that governs the meringue layer on top.
French vs Swiss vs Italian Meringue: Which One Belongs on This Pie
This comparison does not appear in a single top competitor recipe for lemon meringue pie, and it is probably the most important question a home baker can ask before they start.
French meringue is raw egg whites whipped with granulated sugar. It is the easiest to make and the least stable. Undissolved sugar granules cause weeping.
It must be baked at the right temperature to avoid both undercooked puddles underneath and overcooked beads on top. Most recipes use this method because it is fast, but it requires precise temperature management to get right.
Swiss meringue is egg whites and sugar cooked together over a double boiler until the sugar fully dissolves and the mixture reaches 160°F, then whipped off the heat.
The dissolved sugar creates a denser, more marshmallow-like texture with far better stability. It weeps significantly less than French meringue and is the best choice for make-ahead pies or humid environments.
Italian meringue uses a hot sugar syrup cooked to 240°F (soft-ball stage) streamed into whipping egg whites. It is the most stable of the three and is used in professional pastry kitchens.
But it requires a candy thermometer and more attention during production. The result is a silky, shiny meringue that holds peaks for days without weeping.
This recipe uses a modified French meringue with one upgrade: a cooked cornstarch slurry folded into the whipped whites before baking. This single step eliminates the weeping problem associated with French meringue.
This is a technique used by food scientists and test kitchens to stabilize home-style meringue without the complexity of Swiss or Italian methods.
Just like the stabilized meringue technique here, the starch-based approach used in ermine frosting relies on a cooked flour and milk paste to create stability in whipped egg-free frosting.
The underlying chemistry is similar: pre-cooked starch inserts itself between protein strands and prevents them from squeezing out moisture as they cool.
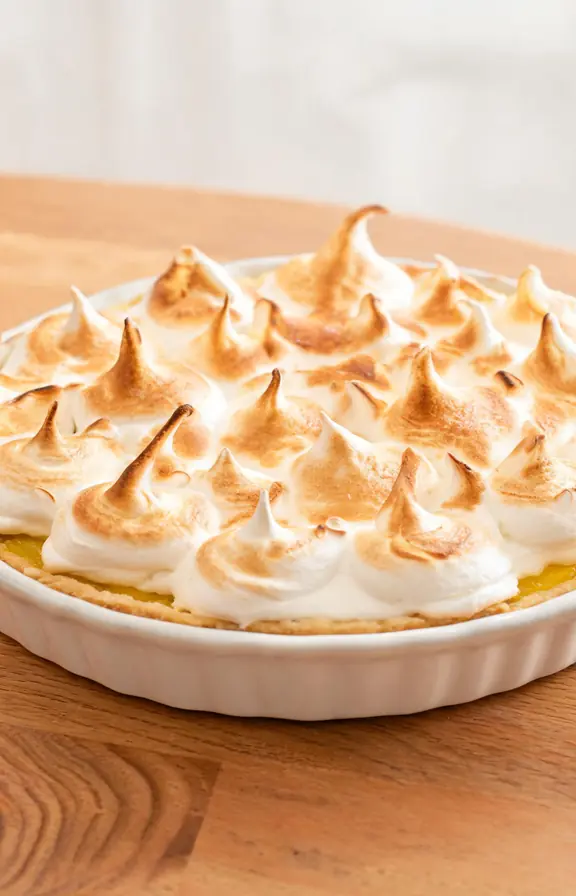
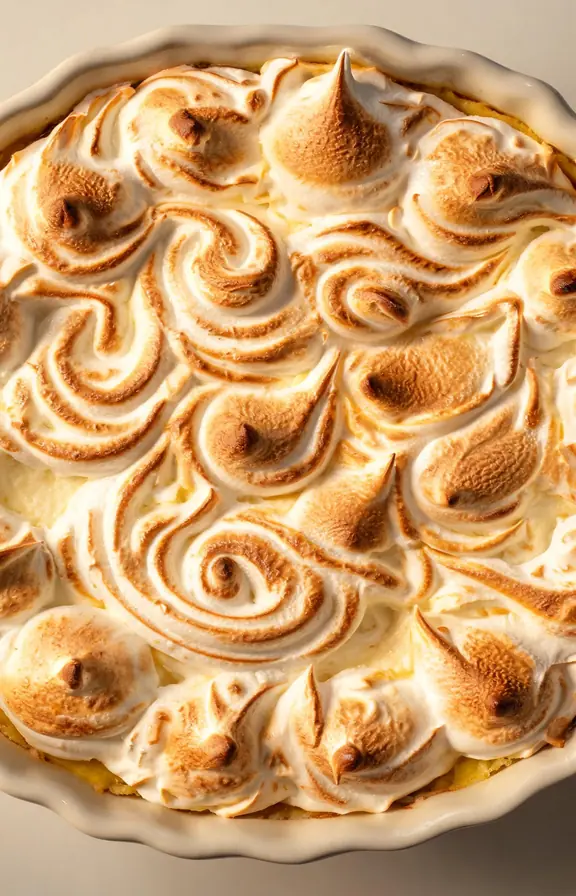
Applying the Meringue: Timing and Technique That Prevents Shrinking
Meringue shrinks away from the crust edge for one reason: it was not properly sealed to the edge before baking. The meringue contracts as it bakes.
If there is a gap between the meringue and the crust, it will widen into an exposed, soggy ring of filling.
Work quickly. As soon as the filling is poured into the hot crust, start piping or spooning the meringue over the surface.
Spread it outward from the center and press the edges firmly against the crust all the way around. There should be no visible gap between the meringue and the pastry edge at any point.
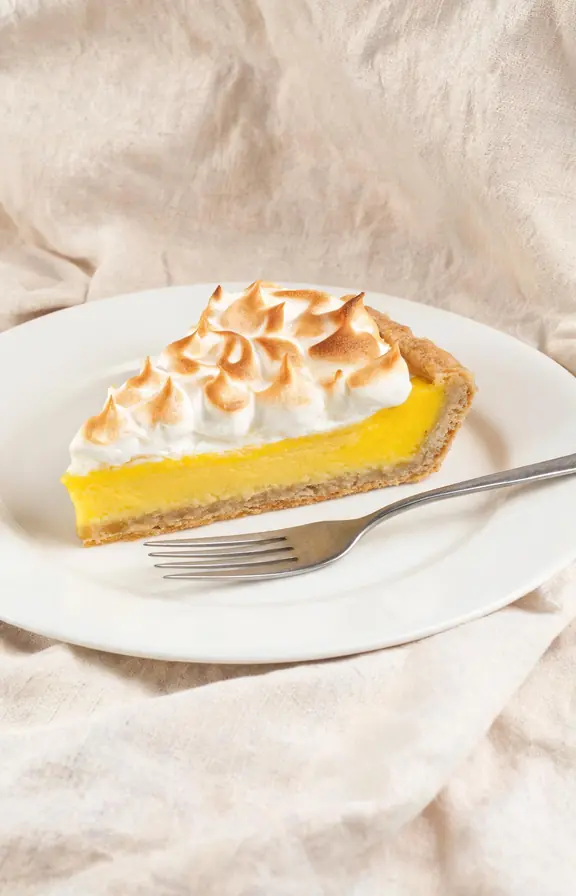
Use the back of a spoon to create decorative peaks across the surface. These peaks brown faster than flat surfaces and create the visual contrast between the golden tips and white valleys that makes lemon meringue pie so visually striking.
For a perfectly golden, evenly browned topping, a kitchen torch gives you control that an oven cannot match.
If you are torching instead of baking the meringue, you can use a Swiss or Italian meringue safely without baking at all, since those meringues are already heat-treated. If you are using French meringue, the oven is mandatory to fully set the egg whites.
Frequently Asked Questions
Lemon Meringue Pie
Silky tart lemon filling with a dual-thickener method for clean slices, a fully blind-baked crust that stays crisp, and a stabilized no-weep meringue baked low and slow. Science-backed technique that solves every common lemon meringue pie failure.
- 9-inch pie pan
- Pie weights or dry beans (for blind baking)
- Medium saucepan (for filling)
- Small saucepan (for meringue cornstarch slurry)
- Stand mixer or hand mixer with whisk attachment
- Fine mesh strainer (for silky filling)
- Rubber spatula and offset spatula
- Candy thermometer (optional, for Swiss meringue variation)
- Kitchen torch (optional, for toasting peaks)
- 1 1/4 cups (150g) all-purpose flour
- 1/2 teaspoon fine sea salt
- 1/2 tablespoon granulated sugar
- 1/2 cup (113g) unsalted butter, cold and cut into cubes
- 3 to 4 tablespoons ice cold water
- 1 cup (200g) granulated sugar
- 1/3 cup (40g) cornstarch
- 1/4 teaspoon fine sea salt
- 1 1/2 cups (355ml) water
- 4 large egg yolks, room temperature
- 1/2 cup (120ml) fresh lemon juice (about 3 to 4 large lemons)
- 1 tablespoon finely grated lemon zest
- 3 tablespoons (42g) unsalted butter, cubed
- 4 large egg whites, room temperature
- 1/4 teaspoon cream of tartar
- 1 tablespoon (8g) cornstarch
- 1/3 cup (80ml) water
- 6 tablespoons (75g) granulated sugar
- 1/2 teaspoon pure vanilla extract
- Make and chill the pie crust Whisk together flour, salt, and sugar in a large bowl. Add cold butter cubes and use a pastry cutter or your fingertips to work the butter into the flour until the mixture resembles coarse crumbs with pea-sized pieces of butter still visible. Drizzle in ice water one tablespoon at a time, mixing gently with a fork after each addition until the dough just holds together when pinched. Do not overmix. Form into a flat disc, wrap in plastic, and refrigerate for at least 30 minutes or up to 2 days.
- Blind bake the crust Preheat oven to 375°F (190°C). Roll the chilled dough into an 11-inch circle on a lightly floured surface. Transfer to the pie pan, fold and crimp the edges. Prick the base all over with a fork. Line with parchment paper and fill with pie weights or dry beans. Bake for 20 minutes. Remove the parchment and weights. Brush the base lightly with a thin layer of beaten egg white (from your meringue egg whites). Bake for another 10 to 15 minutes until the entire shell is golden brown, including the center. Cool slightly while you prepare the filling.
- Cook the lemon filling Whisk together sugar, cornstarch, and salt in a medium saucepan. Gradually whisk in the water until no lumps remain. Place over medium heat and cook, stirring constantly, until the mixture becomes translucent and comes to a low boil with big, slow bubbles. This signals full starch gelatinization. Whisk the egg yolks in a small bowl. Slowly ladle 3 tablespoons of the hot starch mixture into the yolks while whisking constantly to temper them. Pour the warmed yolk mixture back into the saucepan while whisking. Cook for 2 more minutes over medium heat until very thick. Remove from heat. Stir in lemon juice, lemon zest, and butter until the butter melts completely. Strain through a fine mesh sieve for a silky result. Cover the surface directly with plastic wrap to prevent a skin from forming and keep warm while you make the meringue.
- Cook the cornstarch slurry for meringue Combine cornstarch and water in a small saucepan. Stir well and place over medium heat, stirring constantly until the mixture turns translucent and thickens to the consistency of loose pudding. Remove from heat and allow to cool to room temperature. This slurry is the anti-weep insurance for the meringue.
- Whip the meringue Preheat oven to 325°F (163°C). Make sure your mixer bowl is completely clean and grease-free. Beat egg whites and cream of tartar on medium speed until foamy. Increase to medium-high and gradually add the granulated sugar one tablespoon at a time. Beat until the meringue holds stiff, glossy peaks. Reduce speed to low and add the cooled cornstarch slurry one tablespoon at a time, mixing until incorporated. Add vanilla extract and mix briefly. The finished meringue should be thick, glossy, and hold firm peaks that do not fall over when the beater is lifted.
- Assemble and bake Pour the hot lemon filling into the blind-baked shell. Work quickly. Immediately spoon or pipe the meringue over the hot filling, starting at the edges. Press the meringue firmly against the crust all the way around with no visible gaps. Spread toward the center, using the back of a spoon to create decorative peaks. Bake at 325°F for 20 to 25 minutes until the peaks are golden and the meringue feels set when lightly touched. Do not overbake.
- Cool and chill before slicing Transfer to a wire rack and cool at room temperature for at least 1 hour. Then refrigerate uncovered for at least 2 hours before slicing. Do not cover the pie tightly as condensation will drip onto the meringue and cause beading. To slice cleanly, run a sharp knife under hot water, wipe dry, and slice in one smooth motion without sawing. Wipe the blade between each cut.
Nutritional values are estimates calculated using standard USDA food composition data. Actual values will vary based on the specific pie crust recipe used, lemon juice acidity, and exact serving size.