Our site contains ads and uses Amazon affiliate links. We may earn a small commission at no extra cost to you. We know ads can be distracting, and we’re sorry for any inconvenience they cause. It helps us keep the site running. Thanks for your understanding and supporting us!
If you have ripe summer peaches and one tart pan, you are about 20 minutes of prep away from one of the most impressive desserts you can put on a table.
This glazed fresh peach tart skips the food processor, the rolling pin, and the stand mixer entirely.
The crust comes together with melted butter and a fork. The filling is nothing more than sweetened cream cheese pressed flat. The star is the peach itself, and the apricot glaze makes sure it stays that way long after the tart comes out of the oven.
Most peach tart recipes use puff pastry as a shortcut or a classic cold-butter pastry that requires chilling time.
This one does neither. The press-in crust technique is borrowed from French home baking, where simplicity is a point of pride, not a compromise.
Why the Press-In Crust Is the Right Choice for This Tart
A press-in crust works because it uses melted butter rather than cold butter. Cold butter creates flaky, layered pastry. Melted butter creates a sandy, cookie-like crust that holds its shape cleanly against juicy fruit without going soggy.
For a fresh fruit tart, that sandy texture is ideal. It gives you clean slices and a base that tastes like a shortbread cookie baked into the bottom of your dessert.
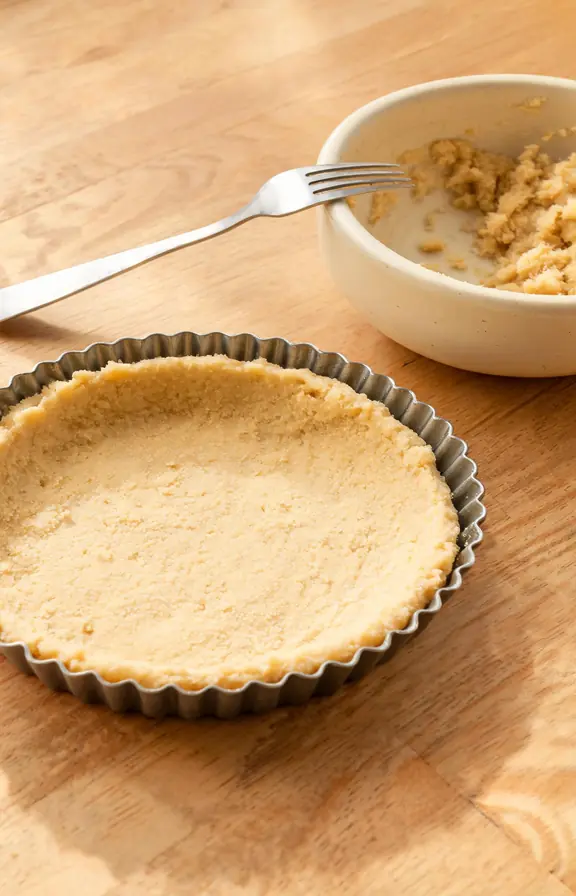
The technique is simple. You mix flour, powdered sugar, and a pinch of salt in a bowl, pour in melted butter, and stir with a fork until large crumbles form.
Those crumbles go into the tart pan and you press them up the fluted sides and across the bottom with your fingers. A flat-bottomed glass smooths the base. That is the entire crust process.
If you enjoy butter-rich no-mixer bakes that come together in one bowl, our one-bowl fresh peach cake made without a mixer uses the same hands-only method with a soft, tender crumb that showcases peak-season peaches.
How to Pick the Right Peaches and When to Skip the Peel
For a glazed tart where the peach slices are the visual centerpiece, use freestone peaches rather than clingstone. Freestone peaches separate cleanly from the pit, giving you smooth, uniform slices that fan out neatly in the pan.
Clingstone peaches are harder to pit cleanly and tend to tear when sliced. They work fine in baked cakes or crumbles where appearance matters less, but they are the wrong choice when the slice shape and arrangement define the look of the finished tart.
Ripeness matters more here than in any other peach recipe. Because the peaches are not cooked deeply in this tart, an underripe peach will taste flat and slightly starchy.
Press the shoulder of the peach gently near the stem. It should give just slightly, the way a ripe avocado does. If it feels rock hard, leave it on the counter for a day or two.
As for peeling: you do not have to. Peach skin softens under the glaze and many bakers leave it on for texture contrast.
If you want perfectly smooth slices, score a shallow X on the bottom of each peach, drop them in boiling water for 30 seconds, then transfer immediately to ice water. The skin slips off cleanly in one motion.
The Apricot Glaze: Why It Works and Why It Is the Right Choice for Peaches
Here is the detail no other peach tart recipe explains: why apricot glaze specifically, and not honey, strawberry jam, or a simple sugar syrup?
When you slice fresh peaches and expose them to air, an enzyme called polyphenol oxidase reacts with oxygen at the cut surface. That reaction is what turns fruit brown. A glaze creates a physical barrier between the fruit and the air, slowing that enzyme reaction significantly.
Apricot glaze does this better than most alternatives for one specific reason: its color. Nappage, the French pastry term for this glazing technique, uses apricot because it dries to a near-transparent golden finish that does not tint the color of the fruit underneath it.
A strawberry glaze casts a pink-red hue over golden peach slices. Honey goes cloudy and sticky rather than clear and glossy. Apple jelly is neutral but lacks the subtle fruit-forward flavor that complements stone fruit.
Apricot jam is also naturally high in pectin, the gelling agent found in fruit preserves. That pectin gives the glaze its characteristic glossy, set finish rather than a dull or greasy coat.
Two tablespoons of apricot jam heated with one teaspoon of water, strained through a fine sieve, and brushed warm onto the tart: that is the entire glaze recipe.
Once you understand the glazing technique, it works on nearly any fresh fruit dessert. Our rustic peach crumble with a buttery oat topping is another summer stone fruit recipe that lets ripe peaches do the work, with a completely different baked texture but the same easy approach.
Make-Ahead Tips and How Long the Tart Keeps
The tart shell can be blind-baked up to 24 hours ahead and kept at room temperature, loosely covered. The cream cheese filling can be made and refrigerated up to a day in advance as well.
When you are ready to assemble, spread the cold filling into the cooled shell, arrange the peaches, and apply the glaze just before serving or up to two hours beforehand.
Once assembled and glazed, the tart keeps well in the refrigerator for up to one day. After that, the peaches begin releasing juice into the cream layer and the crust softens.
This tart is at its best within four hours of glazing, when the crust is still crisp, the cream is cold and firm, and the glaze is set but slightly tacky.
If you enjoy no-bake layered desserts with the same cream cheese base, our no-bake cheesecake dip ready in 10 minutes delivers all the flavor of a fruit-topped cream dessert with zero oven time.
Variations Worth Trying
The base recipe is flexible once you understand the ratio of crust to filling to fruit. A few variations that work well with this specific tart.
Add half a teaspoon of almond extract to the cream cheese filling. Almond and peach is a classic flavor pairing that deepens the filling without competing with the fruit on top.
Replace 2 tablespoons of the flour in the crust with finely ground almond flour for a slightly nuttier, more tender base. The change is subtle but pairs particularly well with the peach and cream layers above it.
For a lighter filling, swap the cream cheese layer for our 3-ingredient Philadelphia no-bake cheesecake filling, which is silkier and holds its shape cleanly under the peach slices without any baking time for the filling layer itself.
Frequently Asked Questions
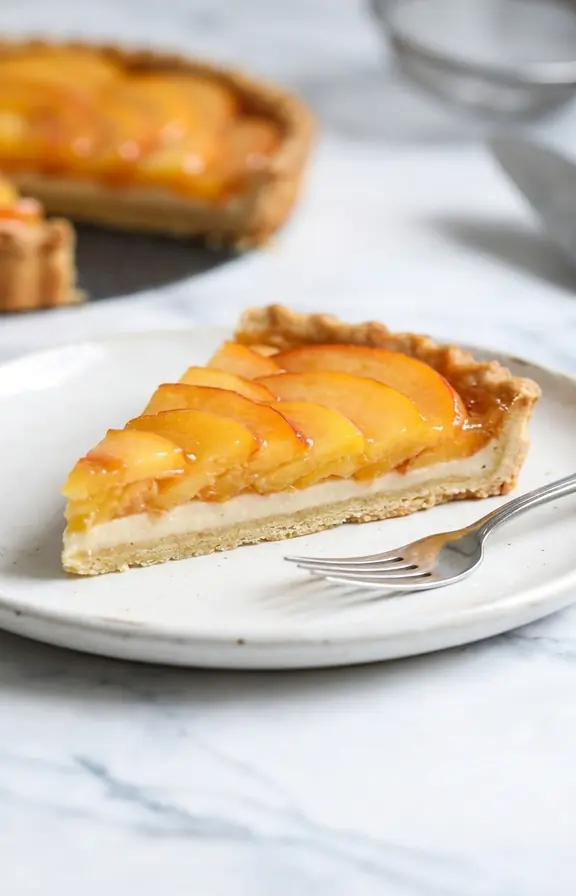
Glazed Fresh Peach Tart
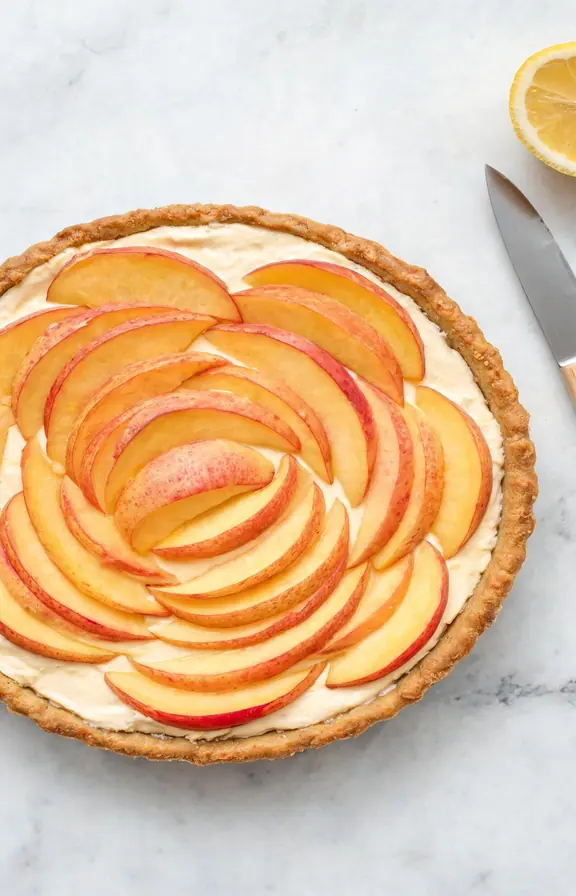
A buttery press-in crust, a simple sweetened cream cheese layer, fresh peach slices fanned in concentric rings, and a glossy apricot glaze. No mixer, no rolling pin, all summer flavor.
- 9-inch fluted tart pan with removable bottom
- Medium mixing bowl
- Fork
- Flat-bottomed glass or measuring cup
- Small saucepan
- Fine mesh sieve or strainer
- Pastry brush
- Paring knife and cutting board
- 1 cup (125g) all-purpose flour
- 3 tablespoons powdered sugar
- 1/4 teaspoon fine salt
- 1/2 cup (113g) unsalted butter, melted and slightly cooled
- 6 oz (170g) full-fat cream cheese, softened to room temperature
- 3 tablespoons powdered sugar
- 1/2 teaspoon pure vanilla extract
- 1 teaspoon fresh lemon juice
- 3 to 4 medium ripe freestone peaches (about 600g total)
- 1 teaspoon fresh lemon juice, for tossing the slices
- 2 tablespoons apricot jam or preserves
- 1 teaspoon water
- Blind bake the crust Preheat your oven to 350 F (175 C). In a medium bowl, whisk together the flour, powdered sugar, and salt. Pour in the melted butter and stir with a fork until large, sandy crumbles form. Transfer the mixture into your tart pan. Press it evenly across the bottom and up the fluted sides using your fingers, then use a flat-bottomed glass to smooth and compact the base. Prick the entire bottom all over with a fork. Bake for 15 to 18 minutes until the edges are deep golden and the base looks dry and set. Remove from the oven and cool completely on a wire rack before filling.
- Make the cream cheese filling In a medium bowl, beat the softened cream cheese with a fork or silicone spatula until smooth with no lumps. Add the powdered sugar, vanilla extract, and lemon juice. Stir until fully combined and silky. Spread the filling in an even layer across the completely cooled tart shell, reaching all the way to the edges. Refrigerate the filled shell while you prepare the peaches.
- Slice and prep the peaches Halve each peach, remove the pit, and slice each half into four to five even wedges about one-third of an inch thick. Place the slices in a bowl and toss gently with the teaspoon of lemon juice to slow surface browning while you work through all the fruit.
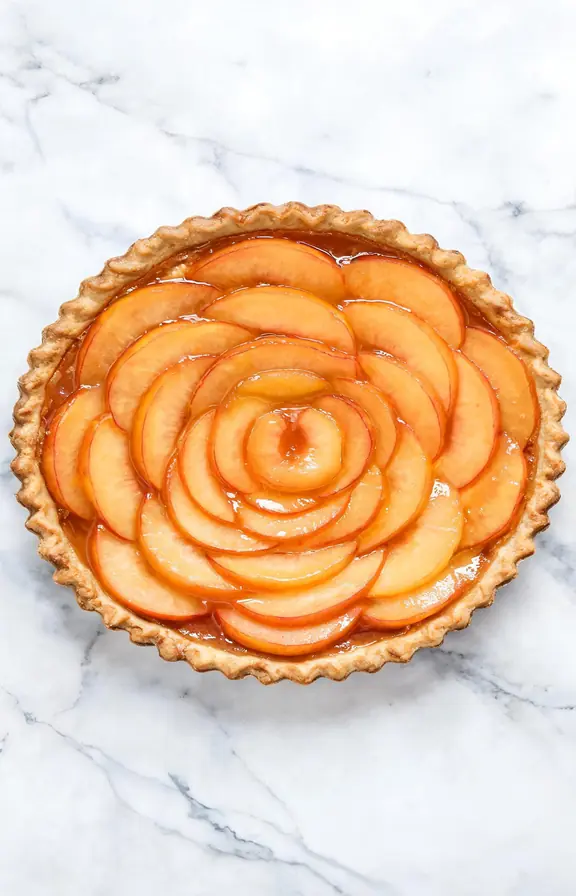
- Arrange the peach slices Starting at the outer edge of the tart, lay peach slices in a slightly overlapping ring, each slice angled inward with the skin side facing up. Work inward with each new ring, overlapping the previous layer slightly. Fill the center with a small fan of three to four slices. Take your time here. The arrangement is the visual signature of this tart and defines the entire finished look.
- Make and apply the apricot glaze In a small saucepan over medium heat, combine the apricot jam and water. Stir and heat for one to two minutes until fully liquid. Pour through a fine mesh sieve, pressing the solids with a spoon to extract all the clear liquid. Discard the solids. Working immediately while the glaze is still warm and pourable, brush it gently over all the peach slices in a thin, even coat. Refrigerate the tart for at least 30 minutes to let the glaze set before slicing and serving.
Nutritional values are estimates calculated using standard USDA food data. Actual values may vary based on peach size, specific brands used, and individual serving size.