Our site contains ads and uses Amazon affiliate links. We may earn a small commission at no extra cost to you. We know ads can be distracting, and we’re sorry for any inconvenience they cause. It helps us keep the site running. Thanks for your understanding and supporting us!
📊Recipe at a Glance
- Prep Time: 25 minutes
- Cook Time: 35 minutes
- Total Time: 1 hour 30 minutes (including cooling time)
- Servings: 12 slices
- Diet Type: Vegetarian
- Cuisine: American
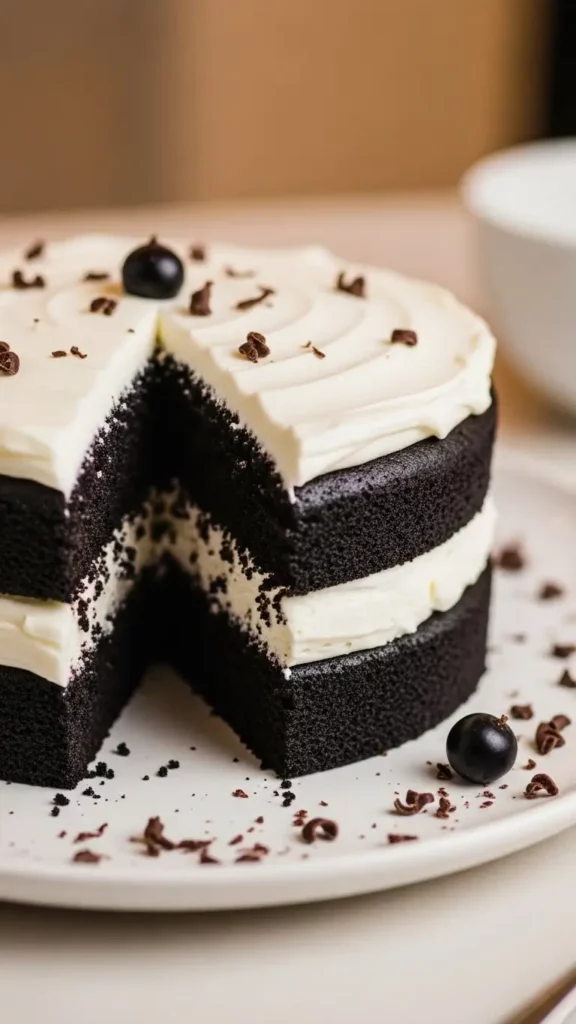
There’s something utterly mesmerizing about slicing into a deep, dark cake that reveals layers as rich as midnight itself.
The Midnight Black Velvet Cake is a showstopper that combines the tender crumb of classic velvet cake with an intensely dramatic black hue.
Every bite offers a perfect balance of cocoa depth and subtle sweetness.
The velvety texture melts on your tongue while the striking appearance makes it perfect for elegant celebrations or gothic-themed gatherings.
This recipe transforms simple ingredients into an unforgettable dessert experience.
Why This Recipe Stands Out
- Dramatic Visual Impact: The deep black color creates an instantly memorable presentation that photographs beautifully and impresses guests before they even take a bite.
- Perfect Moisture Balance: Buttermilk and oil work together to create an incredibly tender crumb that stays moist for days without becoming dense or heavy.
- Natural Color Enhancement: Black cocoa powder provides rich color and flavor without relying solely on artificial food coloring for that signature midnight appearance.
- Foolproof Texture: The careful balance of acidic and alkaline ingredients ensures a soft, velvety texture every single time you bake it.
- Versatile Occasion Cake: Works beautifully for any parties, elegant weddings, or any event where you want to make a bold statement.
Ingredients You’ll Need
For the Cake:
- 2½ cups all-purpose flour
- 2 cups granulated sugar
- ¾ cup black cocoa powder
- ¼ cup regular unsweetened cocoa powder
- 2 teaspoons baking soda
- 1 teaspoon baking powder
- 1 teaspoon salt
- 2 large eggs, room temperature
- 1 cup buttermilk, room temperature
- 1 cup hot coffee or hot water
- ½ cup vegetable oil
- 2 teaspoons vanilla extract
- 2 teaspoons white vinegar
- Black gel food coloring (optional, for deeper color)
For the Cream Cheese Frosting:
- 16 ounces cream cheese, softened
- 1 cup unsalted butter, softened
- 6 cups powdered sugar
- 2 teaspoons vanilla extract
- ¼ teaspoon salt
- 2 to 3 tablespoons heavy cream
Tools to Use
- Two 9-inch round cake pans
- Parchment paper
- Large mixing bowls
- Electric mixer or stand mixer
- Whisk
- Rubber spatula
- Measuring cups and spoons
- Cooling racks
- Offset spatula
- Cake turntable (optional)
- Toothpick or cake tester
How to Make the Midnight Black Velvet Cake
Step-1: Prepare Your Baking Environment
Preheat your oven to 350°F (175°C). Grease two 9-inch round cake pans thoroughly with butter or non-stick spray.
Line the bottoms with parchment paper circles. This prevents sticking and ensures clean cake removal.
Set the prepared pans aside while you mix the batter.
Step-2: Combine the Dry Ingredients
Sift the flour, sugar, black cocoa powder, regular cocoa powder, baking soda, baking powder, and salt into a large mixing bowl.
Whisking these ingredients together ensures even distribution.
The cocoa powders should blend completely without any lumps remaining.
This step is crucial for achieving uniform color and texture throughout your cake.
Step-3: Mix the Wet Ingredients
In a separate medium bowl, whisk together the eggs, buttermilk, vegetable oil, vanilla extract, and vinegar.
Beat until the mixture becomes smooth and slightly frothy.
The vinegar reacts with the baking soda to create the characteristic velvet texture.
Room temperature ingredients blend more easily and create a better emulsion.
Step-4: Create the Batter
Add the wet ingredients to the dry ingredients.
Mix on low speed until just combined. The batter will look thick at this point.
Slowly pour in the hot coffee while mixing on low speed. The batter will become very thin and liquid-like.
This is exactly what you want for a moist cake.
If you want an even deeper black color, add a few drops of black gel food coloring and mix thoroughly.
Step-5: Bake the Cake Layers
Divide the batter evenly between your prepared pans.
Each pan should be about two-thirds full. Tap the pans gently on the counter to release air bubbles.
Place them in the preheated oven on the center rack.
Bake for 30 to 35 minutes. The cakes are done when a toothpick inserted in the center comes out with just a few moist crumbs.
The tops should spring back when lightly touched.
Step-6: Cool the Cakes Completely
Remove the pans from the oven and place them on cooling racks. Let the cakes cool in the pans for 10 minutes.
This prevents them from breaking apart when you remove them. Run a knife around the edges of each pan.
Invert the cakes onto the cooling racks and peel off the parchment paper.
Allow them to cool completely to room temperature before frosting. This takes about one hour.
Step-7: Prepare the Cream Cheese Frosting
Beat the softened cream cheese and butter together in a large bowl using an electric mixer.
Mix on medium speed until smooth and creamy, about 2 minutes. Scrape down the sides of the bowl.
Add the powdered sugar one cup at a time, beating on low speed after each addition.
Add the vanilla extract and salt.
Beat on medium-high speed for 3 minutes until light and fluffy.
Add heavy cream one tablespoon at a time until you reach your desired consistency.
Step-8: Assemble and Frost the Cake
Place one cake layer on your serving plate or cake stand.
Spread about 1½ cups of frosting evenly over the top, leaving a small border around the edges.
Place the second cake layer on top, pressing down gently. Apply a thin crumb coat of frosting over the entire cake.
This seals in crumbs and creates a smooth base.
Refrigerate for 15 minutes to set the crumb coat.
Apply the remaining frosting in a thick, even layer over the top and sides.
Use an offset spatula to create swirls or smooth the frosting as desired.
Step-9: Add Final Touches
For a dramatic presentation, you can leave the frosting bright white against the black cake.
Alternatively, add black frosting accents or decorations.
Consider fresh berries, edible flowers, or silver dragees for elegant touches.
Refrigerate the finished cake for at least 30 minutes before slicing.
This helps the frosting set and makes cutting cleaner slices much easier.
Related Recipes You’ll Love to Try
- Snowy Holiday Showstopper: No-Bake White Christmas Wreath
- Tiramisu Brownie Crinkle Cookies: Ultimate Coffee-Chocolate Mashup
- Vanilla Wafer Cake: A Retro Classic That Never Goes Out Of Style
- Master The Art Of American Buttercream Frosting: A Complete Guide
Nutritional Information
Per Serving (1 slice, based on 12 servings):
- Calories: 685
- Protein: 6g
- Fat: 32g
- Carbohydrates: 96g
- Sodium: 425mg
Note: Nutritional values are approximate and may vary based on specific ingredients used.
Tips for Success
- Use Room Temperature Ingredients: Cold eggs and buttermilk don’t mix as smoothly and can result in a denser cake texture that lacks the signature velvet quality.
- Don’t Overmix the Batter: Mix only until ingredients are just combined to avoid developing too much gluten, which creates a tough, chewy cake instead of a tender one.
- Invest in Black Cocoa Powder: Regular cocoa won’t give you the deep midnight color, so black cocoa powder is essential for achieving that dramatic dark appearance.
- Test for Doneness Carefully: The dark color makes it hard to judge by sight alone, so always use the toothpick test and touch test for accuracy.
- Level Your Cake Layers: Use a serrated knife to trim any domed tops before stacking to ensure a stable, professional-looking finished cake.
- Chill Between Frosting Steps: A cold crumb coat sets quickly and makes applying the final frosting layer much easier and neater.
- Store Properly: Keep the cake refrigerated due to the cream cheese frosting, but bring slices to room temperature before serving for the best flavor and texture.
Common Mistakes to Avoid
- Skipping the Parchment Paper: Without it, even greased pans can cause the delicate cake layers to stick and tear when you try to remove them.
- Using Cold Coffee: Hot coffee blooms the cocoa powder and enhances its flavor, while cold liquid won’t achieve the same depth of chocolate taste.
- Frosting Warm Cake: This melts the frosting and causes it to slide off the layers, creating a messy appearance and unstable structure.
- Measuring Cocoa Incorrectly: Pack cocoa powder lightly into measuring cups rather than scooping directly, which compresses it and throws off the recipe balance.
- Overbeating the Frosting: This incorporates too much air and can make the frosting too soft to hold its shape on the cake.
- Cutting Too Soon: Slicing before the cake has properly cooled and the frosting has set results in messy, uneven pieces that don’t showcase your work.
Creative Serving Ideas
- Elegant Contrast Plating: Serve slices on bright white plates with a dusting of powdered sugar and fresh raspberries to create stunning visual contrast.
- Midnight Dessert Bar: Cut into small squares and serve alongside vanilla ice cream, whipped cream, and chocolate sauce for a build-your-own dessert experience.
- Gothic Romance Theme: Top with dark purple or deep red roses, blackberries, and a drizzle of dark chocolate ganache for dramatic romantic occasions.
- Individual Cake Jars: Layer crumbled cake with frosting in clear glass jars for portable, portion-controlled servings perfect for parties or picnics.
- Ice Cream Cake Transformation: Slice the cake horizontally into four layers and alternate with softened vanilla ice cream, then refreeze for a show-stopping ice cream cake.
- Minimalist Sophistication: Leave the sides naked or semi-naked with just a thin layer of frosting to showcase the dramatic black layers inside.
- Holiday Adaptation: Serve for elegant New Year’s Eve celebrations with edible gold leaf and champagne-flavored frosting.
Frequently Asked Questions
Can I Make This Cake without Black Cocoa Powder?
You can substitute regular cocoa powder, but the cake won’t achieve the same deep midnight black color.
Add extra black gel food coloring to compensate. The flavor will be slightly less intense but still delicious.
How Long Does Midnight Black Velvet Cake Stay Fresh?
Store the frosted cake covered in the refrigerator for up to 5 days.
The cream cheese frosting requires refrigeration.
Bring slices to room temperature 30 minutes before serving for the best texture and flavor.
Can I Freeze This Cake?
Yes, you can freeze unfrosted cake layers wrapped tightly in plastic wrap and aluminum foil for up to 3 months.
Thaw overnight in the refrigerator before frosting. Frosted cake can be frozen but the texture may change slightly upon thawing.
Why Is My Cake Dense Instead of Fluffy?
Overmixing the batter, using expired leavening agents, or not bringing ingredients to room temperature are common causes.
Make sure your baking soda and baking powder are fresh and active for proper rise.
Can I Use This Recipe for Cupcakes?
Absolutely, this batter makes excellent cupcakes.
Fill cupcake liners two-thirds full and bake at 350°F for 18 to 22 minutes. This recipe yields approximately 24 standard cupcakes.
What’s the Difference Between Black Cocoa and Regular Cocoa?
Black cocoa powder is heavily dutched, meaning it’s treated with alkali to neutralize acidity.
This process creates a darker color and milder, less acidic flavor compared to natural or regular cocoa powder.
Can I Make This Cake Ahead of Time?
Yes, bake the cake layers up to 2 days ahead and store them wrapped at room temperature.
Alternatively, frost the entire cake up to 1 day ahead and refrigerate. This actually improves the texture as flavors meld together.
Why Did My Frosting Turn Out Runny?
Your cream cheese or butter was likely too warm, or you added too much liquid.
Chill the runny frosting for 20 minutes, then rebeat. Next time, ensure ingredients are softened but still cool to the touch.


