Our site contains ads and uses Amazon affiliate links. We may earn a small commission at no extra cost to you. We know ads can be distracting, and we’re sorry for any inconvenience they cause. It helps us keep the site running. Thanks for your understanding and supporting us!
Most no-bake peanut butter oat cup recipes tell you to mix, press, and chill. What they do not tell you is why that chilling step works as a structural mechanism, or why using the wrong oat type makes the cups fall apart no matter how long you refrigerate them.
This recipe covers both. You will get chewy, snappy-topped peanut butter oat cups on the first try, and you will understand exactly what is happening inside the cup so you can troubleshoot if something goes wrong.
Why These Cups Hold Together Without Any Baking
In traditional baking, heat causes proteins to set and starches to gelatinize, which creates the structure that holds a muffin or cookie together. No-bake recipes rely on a completely different mechanism: cold-set fat crystallization.
Natural peanut butter contains a high proportion of unsaturated fats that are liquid at room temperature.
When you chill the pressed cups in a freezer, those fats cool past their crystallization point and solidify into a network that binds the oat pieces together. This is the same science behind no-bake cheesecake bars, where cream cheese fats firm up in the fridge rather than in the oven.
The liquid sweetener plays a secondary role. Honey and maple syrup are hygroscopic, meaning they attract and hold moisture. That sticky quality creates additional cohesion between oat flakes, acting like a thin adhesive layer throughout the cup base.
This is why these cups feel firmer out of the freezer than they do at room temperature. The colder the fat, the tighter the structure.
If your cups are crumbling when you eat them, they likely did not get cold enough before the chocolate was added, or they warmed up too fast before you pressed them.
Rolled Oats vs Quick Oats: Why Your Oat Choice Is the Most Important Decision
Every competitor article on this topic mentions oat type in passing, usually in a one-line note. None of them explain what actually happens when you use the wrong one.
Old-fashioned rolled oats are oat groats that have been steamed and flattened into thick, intact flakes. Because they are only partially processed, they hold their shape when mixed with wet ingredients. They create a chewy, slightly textured bite that feels substantial and snack-like.
Quick oats are rolled oats that have gone through additional processing. They are steamed longer and rolled much thinner. According to Healthline’s breakdown of oat types, quick oats develop a softer, mushier texture when they absorb liquid compared to old-fashioned oats.
In a no-bake cup, this means the mixture becomes pasty, the cups do not hold their shape, and the texture after chilling is dense and gummy rather than chewy and sturdy.
Use old-fashioned rolled oats. This is the one ingredient where there is no good substitute.
If you enjoy building no-bake desserts that rely on these same cold-set binding principles, the No-Bake Cherry Cheesecake Bars on our site use a similar fridge-set method with a cream cheese filling that firms up without an oven or gelatin.
Peanut Butter Type: Natural vs Conventional and Why It Changes the Texture
Natural peanut butter, where the only ingredients are peanuts and sometimes salt, contains oils that separate at room temperature. These oils are what make it an effective cold-set binder in this recipe. When chilled, those oils solidify and help lock the cup structure.
Conventional peanut butter (brands that do not separate) contains added hydrogenated oils and emulsifiers that keep the texture creamy and stable at room temperature.
These additives prevent the fat from recrystallizing cleanly when chilled, which means the cups stay softer and can be harder to unmold without crumbling.
For the best result, stir your natural peanut butter well before measuring so the oil is fully incorporated. Peanut butter that still has a layer of separated oil sitting on top will make the mixture too wet and the cups too greasy after chilling.
Almond butter, cashew butter, and sunflower seed butter all work as substitutes. Each one has a slightly different oil content, which affects how firm the finished cup is. Almond butter produces the firmest result. Sunflower seed butter produces the softest.
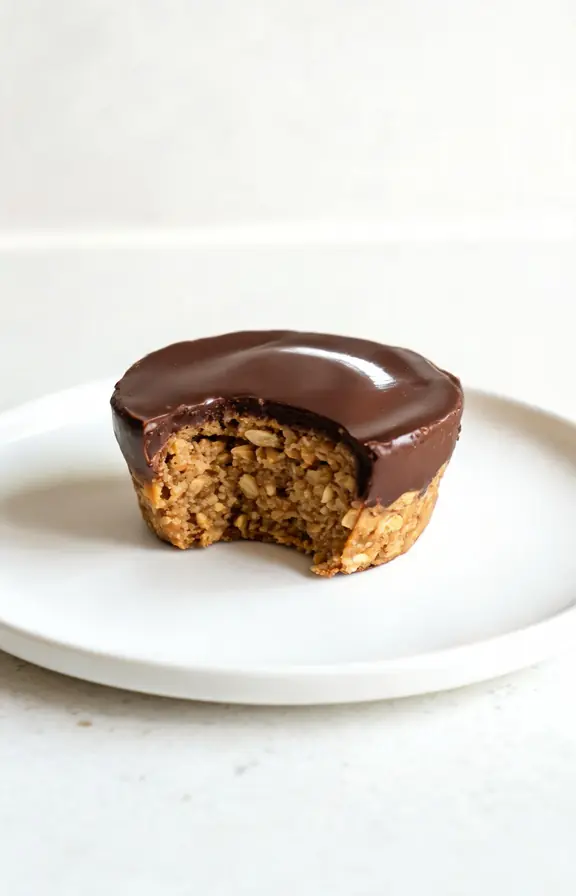
The Chocolate Topping: Getting a Snap That Does Not Crack the Cup
Most no-bake peanut butter oat cup recipes melt chocolate chips with a splash of coconut oil and pour it on top.
This works, but there is a specific texture problem that nobody addresses: if the chocolate layer is too thick, it cracks and shatters when you bite into the cup, which pushes the oat base apart.
The fix is a thin, even chocolate layer. You want just enough to coat the top surface in a smooth shell, not a pooled layer that builds up at the edges. Aim for about 1.5 to 2 teaspoons of melted chocolate per cup.
Adding coconut oil to the chocolate before melting lowers the viscosity and makes the chocolate flow into a thinner, more even layer. It also slightly lowers the melting point, which means the finished shell will be snappy rather than waxy at refrigerator temperature.
If you want a firmer shell with a cleaner snap, use dark chocolate with at least 60% cacao content. The lower sugar content and higher cocoa butter percentage produces a more brittle, defined shell compared to milk chocolate, which stays slightly softer.
If you love the combination of chocolate and no-bake dessert formats, the No-Bake Cheesecake Dip recipe here takes a similarly minimal approach and sets up in the same amount of time.
How to Press the Cups So They Unmold Cleanly
The pressing step determines whether your cups hold together or crumble when you remove the liner. The goal is a compact, even layer with no air pockets along the edges or bottom.
Use a small spoon or the bottom of a shot glass to press the mixture. Start at the center and work outward toward the edges, then press firmly along the sides to eliminate gaps between the oat mixture and the liner wall.
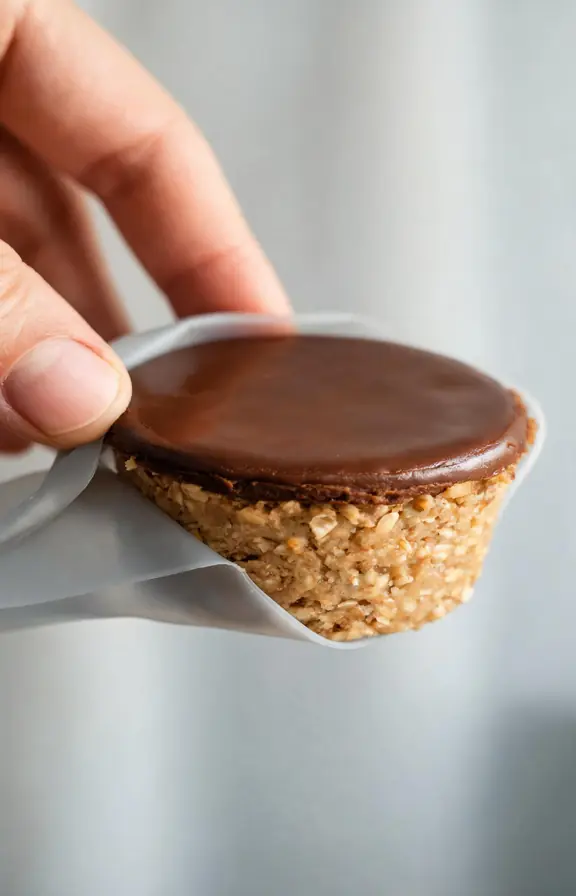
Silicone muffin molds are easier to unmold than paper liners. With silicone, you can peel the mold away from the outside rather than pulling from the inside, which prevents the cup from cracking.
If you are using paper liners, chill the cups in the freezer for the full 30 minutes before attempting to peel the paper away.
Do not fill the cups more than three-quarters full before pressing. Overfilled cups will have a rounded, uneven top that makes it difficult to create a flat surface for the chocolate layer.
Storage: Fridge vs Freezer and How Long They Actually Last
Stored in an airtight container in the refrigerator, these cups last up to 10 days. The oat base stays chewy and the chocolate shell stays firm. The texture is best on days 2 through 5 after the fats have had time to fully recrystallize.
In the freezer, the cups last up to 3 months. The base firms up significantly in the freezer, so let them sit at room temperature for 5 minutes before eating if you prefer a chewier texture. Straight from the freezer, they are more solid and the chocolate snaps cleanly with no flex at all.
Do not store them at room temperature for more than a few hours if your kitchen is warm. Natural peanut butter oils can soften enough to let the cup lose its shape. If you are bringing these to a picnic or event, transport them in a cooler bag with an ice pack.
Frequently Asked Questions
No-Bake Peanut Butter Oat Cups
Chewy, cold-set peanut butter cups made with old-fashioned rolled oats, natural peanut butter, and maple syrup. Topped with a thin dark chocolate shell and a pinch of flaky sea salt. No oven. Freezer-friendly for up to 3 months.
- Standard 12-cup muffin tin
- Silicone muffin liners or paper cupcake liners
- Large mixing bowl
- Microwave-safe bowl (for melting chocolate)
- Spoon or small rubber spatula (for pressing)
- Measuring cups and spoons
- Airtight container (for storage)
- 1 cup (90g) old-fashioned rolled oats
- 1/2 cup (128g) natural creamy peanut butter, well stirred
- 3 tablespoons (60g) pure maple syrup or honey
- 1/2 teaspoon pure vanilla extract
- 1/4 teaspoon fine sea salt
- 1/2 cup (85g) dark chocolate chips (60% cacao or higher)
- 1 teaspoon refined coconut oil
- Flaky sea salt, for finishing
- Step-1: Line the muffin tin Line a standard 12-cup muffin tin with silicone or paper liners. Silicone liners are strongly preferred because they allow you to peel the mold away from the outside when unmolding, which keeps the cups intact. Set the tin in the refrigerator while you prepare the filling so the liners are cold and ready to help the mixture start firming immediately.
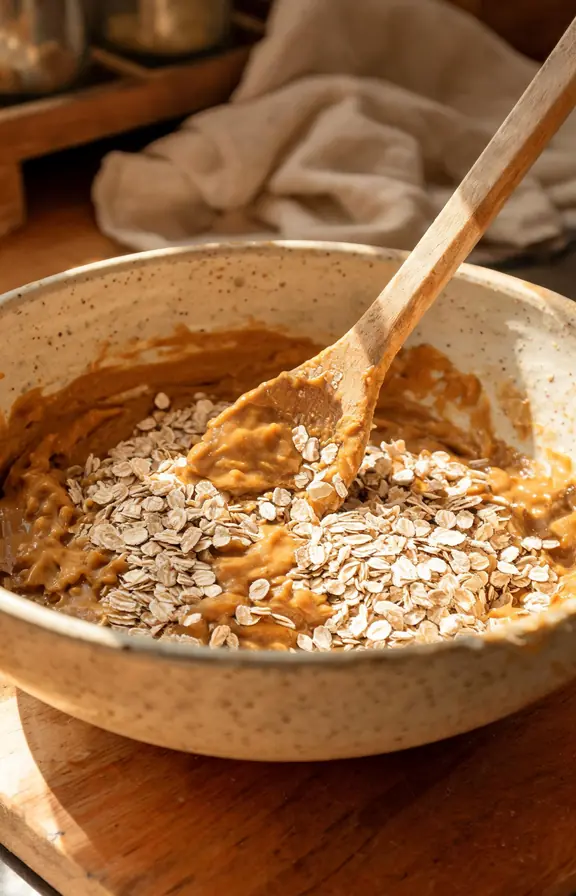
- Step-2: Mix the oat base In a large bowl, combine the well-stirred peanut butter, maple syrup, vanilla extract, and sea salt. Stir until fully combined and the mixture is smooth and uniform. Add the rolled oats and fold them in until every flake is coated. The mixture should be thick, sticky, and hold its shape when you press a small amount between your fingers. If it feels too dry and crumbly, add an extra teaspoon of maple syrup and stir again. If it feels too wet and does not hold a shape, add one tablespoon of oats and stir.
- Step-3: Press into cups Divide the mixture evenly among the 12 lined cups, using roughly 1.5 tablespoons per cup. Do not fill each cup more than three-quarters full. Using the back of a small spoon or the flat bottom of a shot glass, press the mixture firmly and evenly into each cup. Start at the center and press outward so the mixture is flush against the liner walls with no gaps or air pockets. The surface should look smooth and matte, with no loose oat pieces sticking up.
- Step-4: Freeze to set the structure Transfer the muffin tin to the freezer for at least 20 to 30 minutes. This is the critical step where the peanut butter fats recrystallize and lock the oat structure into a firm, stable cup. Do not rush this step by moving to the fridge instead. The fridge takes 2 to 3 times longer to reach the same structural firmness. The cups are ready for topping when they feel firm and cold and resist light finger pressure without any flex.
- Step-5: Melt the chocolate Combine the dark chocolate chips and coconut oil in a microwave-safe bowl. Microwave in 20-second intervals at 50% power, stirring between each interval, until fully melted and smooth. This takes approximately 60 to 90 seconds total. Do not microwave at full power or the chocolate may seize. The finished chocolate should be glossy and thin enough to flow easily off a spoon in a steady stream.
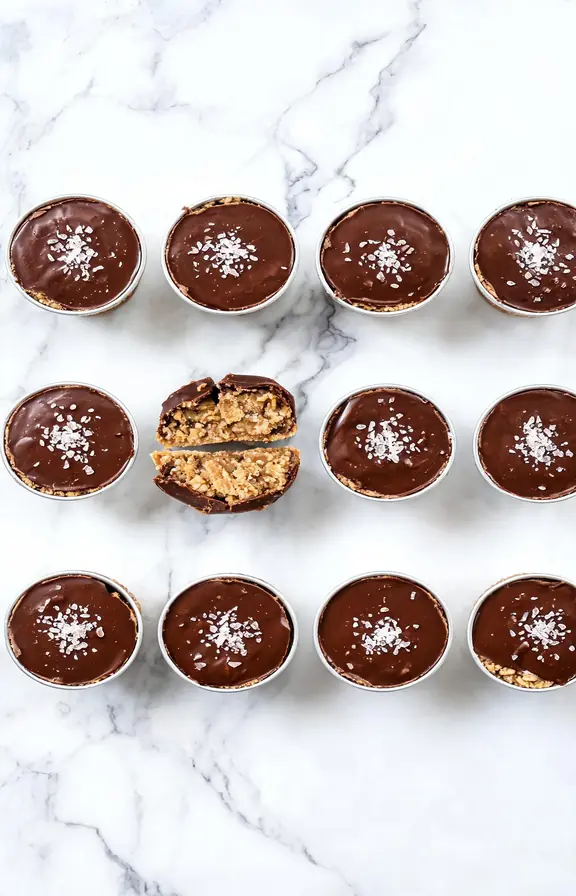
- Step-6: Top and finish Remove the tin from the freezer. Spoon approximately 1.5 to 2 teaspoons of melted chocolate onto each cup. Tilt the spoon slightly so the chocolate spreads toward the edges in a thin, even layer. Do not let it pool in the center. Immediately add a small pinch of flaky sea salt to each cup before the chocolate starts to set. Allow the chocolate to set at room temperature for 10 minutes, then transfer the tin to the refrigerator until fully firm, about 15 more minutes.
- Step-7: Unmold and store Once the chocolate is completely set, remove the cups from the tin. If using silicone liners, gently peel the mold away from the outside of each cup rather than pulling from the top. If using paper liners, peel from the bottom edge upward. Store finished cups in an airtight container in the refrigerator for up to 10 days, or freeze for up to 3 months.
Nutritional values are estimates calculated using standard USDA food composition data. Actual values will vary based on the specific brand of peanut butter used, the type of chocolate chips selected, and the size of each individual cup after pressing.